Nettio Designs

Design + Creativity + Adventure = LOVE

  • HOME
  • JOIN THE 2023 MONTHLY FAVES
  • THE SHOP
  • ABOUT
  • CONTACT
You are here: Home / Archives for Hybrid Scrapbooking

Holiday Faves Mini Album 2012 | Faves #1-5

POSTED ON January 10, 2013 IN Holiday Faves, Holiday Faves 2012

Oh Holiday Faves, how I love thee…

Now that 2013 is here and the holiday season is officially behind us, I figured it was high time I got around to sharing my mostly-completed Holiday Faves Mini Album.

Well the part I’m sharing is mostly completed. I still have to finish Faves 6-10 from while we were in California and finish up the cover. (I want to add a fabric spine to it like I did last year.)

But since Faves 1-5 are ready to go I wanted to share them now. And really this post is going to more than enough Holiday Faves eye-candy in it as it is so it’s probably good to break it up.

Holiday Faves Mini Album 2012 Cover + Intro

First up is a look at my Holiday Faves mini album cover for this year:

Nettio holidayfaves2012 00c

In the interest of keeping it real, I’m not going to lie – this is not my most favorite cover ever. In my head I had a bit of a different vision – something clean, all-white and simple – and for whatever reason I just could not make it work the way I wanted with the supplies I had.

So I eventually ended up adding the kraft paper (which is actually an old product wrapper from West Elm that I saved last year) and the stars and I think it’s ok. Not my fave but ok. Let’s just call it a #makeitwork moment a la Tim Gunn and move on.

One of the items from my original vision that did work (well mostly, haha) was the white tone-on-tone chevron background. I wanted it to be fairly subtle so I started with a slight cream/off-white paint as my base color and then misted over it using a Studio Calico chevron mask and a Mister Huey’s Color Mist in Opaque White.

Nettio holidayfaves2012 3

This was my first time using one of their misters and I’m not sure I totally had the uh, misting part of it totally down. It came out a bit drippier than I thought it would and after two solid days of letting it dry, the mist still hadn’t set. Like if you rubbed your finger gently across it, you’d end up with white paint on your fingers.

Since I was planning to travel with my album out to California, I was kind of panicking that it was going to get white paint all over everything, so I ended up spraying it with a couple of coats of Krylon Clear Spray in Matte which seemed to finally seal it.

Here’s a look at the inside of the cover. Ignore the fact that it’s terribly ugly inside as I’ll be covering it up with paper once I add the fabric spine to it. If you look closely you can still see some of the gold paint along the right edge from one of my failed attempts to fix what wasn’t working. I told you I tried a bunch of things!

Nettio holidayfaves2012 4

On the first journaling card page, I wrote a short paragraph about what this album is about and added a small decorative badge from American Crafts onto the overlay on the right:

Nettio holidayfaves2012 5

One of things I’ve learned to embrace with my handwritten journaling is the fact that it almost always slopes down to the right a little bit. I’m pretty sure this is a lefty thing, probably due to the many years of trying to write in spiral-bound notebooks and having to contort my paper to a crazy angle to avoid resting my hand on the metal spine. That is until I got smart in college and started using all my notebooks back to front, which I loved, but it made for some rather hilarious experiences for those who tried to borrow my notes.

On the right page of the album I left the accent page as is:

Nettio holidayfaves2012 6

Holiday Faves #1

On the back of the accent card I added one of the photos for Holiday Fave #1 – Jet Pack Santa! I actually cheated a little bit this year with the start date of my album since this technically happened the weekend before Thanksgiving when we went up to Dallas for the Cowboys game. But it was too awesome NOT to include.

Nettio holidayfaves2012 7

I mean come on, as part of the Dallas downtown lights on celebration, Santa flew in on a jet pack. Where else can you say you’ve seen that? It was hilariously awesome and amazing and even Adam, who almost never gets excited about stupid things like I do, was like a kid on Christmas. It was so fun!

Nettio holidayfaves2012 10

Here’s a closer look at my journaling. All of my pages were printed using Epson Premium Presentation Paper in Matte and then I just wrote on them with one of my regular pens. I haven’t found a scrapbooking pen I like yet that is both thin enough and dries fast enough to not smear when my left hand drags across it. If anyone has a good recommendation, let me know!

Nettio holidayfaves2012 8

For the title on each Fave card, I used some tiny stickers from the American Crafts Dear Lizzy line. I love the little bit of gold sparkle they add:

Nettio holidayfaves2012 9

On the back of the journaling card I used one of my photo collage templates from the Holiday Faves Mini Album templates to put together some of the photos from the night.

The photo on the right is a 4×6 photo of the tree they lit at the event. It’s hard to tell in this photo but I also a Merry+Bright word art in red over the black area of the photo.

Nettio holidayfaves2012 11

By far one of the best things I did this year was purchase 4×6 and 5×7 sized photo paper to print my photos on. It made it SO much faster and easier to put together since no trimming was required. Plus it wasted a lot less paper than printing on 8.5×11 sheets!

This is one of the themed journaling card spreads I haven’t finished quite yet. Since this one is for decorations, I wanted to include pictures from both our house here in San Antonio and my parents house in California. I’ll include this one when it’s finished in the next update.

Nettio holidayfaves2012 12

On the right side of this spread, I added a photo I took of Adam when we went to the Renegade Craft Fair in Austin the weekend after Thanksgiving:

Nettio holidayfaves2012 13

It was actually a wooden cutout but I cropped the photo to make it look more like a card. I told Adam if we were organized enough people that we actually sent out cards, this is the one I’d choose, haha. Does it get more hipster than a merman with a beard in a lumber jack suit? I’m thinking not.

Nettio holidayfaves2012 14

Holiday Faves #2

For Holiday Fave #2 I chose Thanksgiving so on the back of the Mer-jack? photo page, I added two of our thankful cards. Well I should really say our only two thankful cards since despite plans to write these out throughout November, these are the only ones we did. #weareawesome It was still fun to see what each of us wrote though!

Nettio holidayfaves2012 15

On the right is a Happy Thanksgiving card my mom sent me in the mail. I love that my mom still sends cards for all the holidays by real mail – it’s so much more fun than getting an e-card or email! Plus is he not the most adorable pilgram ever?

Nettio holidayfaves2012 16


Nettio holidayfaves2012 17

On the overlay page on the right, I added a little Making Memories tag held on with some brads:

Nettio holidayfaves2012 18

I used the tips of my scissors to punch through the overlay since it was too thick for the brad to poke through.

Nettio holidayfaves2012 19

A look at our Thanksgiving table – I totally Macguyver-ed the center piece last minute from a bunch of random plants we have in our yard. And I added a little triangle tab on the back of a few of the blank Give Thanks cards to use in place of place cards. Since there were only two of us, it wasn’t exactly hard to figure out who sat where, haha.

Nettio holidayfaves2012 20

More Thanksgiving journaling and photos. I have to laugh because clearly I don’t have the spacing down for the title stickers just yet:

Nettio holidayfaves2012 21

This accent page I’ve left blank for now. I figure once I finish the second half of the album, I can add any leftover memorabilia or photos I have or I may just add a decorative accent and call it good.

Nettio holidayfaves2012 22

Holiday Movie Faves

Here’s a look at one of the completed themed journaling cards. I used this movie one to document my love of Elf:

Nettio holidayfaves2012 23

A closer look at the journaling card:

Nettio holidayfaves2012 24

On this overlay on right, I added a couple of accent stickers:

Nettio holidayfaves2012 25

Nettio holidayfaves2012 26

Then behind the overlay I added a photo I took here in Texas. Figured it was appropriate given we won’t (hopefully) be living in Texas for forever:

Nettio holidayfaves2012 27

Holiday Faves #3

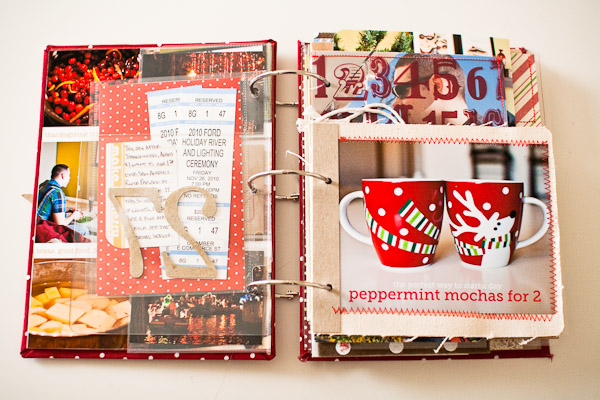
Holiday Fave #3 was the Holiday River Parade down on the Riverwalk which has become one of our favorite day-after-Thanksgiving traditions here in San Antonio.

On the left side I added a photo collage (also one of the templates included in the Holiday Faves Mini Album templates) as well as our tickets from the parade.

Nettio holidayfaves2012 28

It’s hard to tell from this picture since it was a bit dark but in the top photo of the collage,the Chik-Fil-A cows are totally dancing Gangnam style and that’s supposed to be Psy in the white jacket. We thought it was hilarious but we were surrounded by a bunch of older people – like in their 70s & 80s older people – who clearly had no idea what was happening. It was rather hilarious hearing some of the younger people in their group trying to explain what was going on.

Faves journaling card on the right, now with extra sloping:

Nettio holidayfaves2012 29

Oh and a friendly note for all you Crop-o-dile hole punch lovers, if you attempt to carry-on your Crop-o-dile when flying, TSA will confiscate it because it’s over 7 inches and therefore considered a dangerous “tool.” #askmehowIknowthis

For this page I decided I wanted to print out a photo to span across the full spread. I like how it turned out but I cut my covers a little larger this year so the gap between the pages is wider. I think it might have worked a little better if the gap was smaller. But I like the concept, the execution could just use a little tweaking I think.

Nettio holidayfaves2012 30

I also added one of Ali Edwards holiday brushes onto the photo before printing:

Nettio holidayfaves2012 31

Does anyone else look at Ali Edwards handwriting and wish it was your own? Her handwritten journaling always looks so cool. I’m pretty sure I could do a ton of practicing and mine would never look like that, haha.

On this page I added a little random photo of our 1st sweets of the season, some super delicious brownies Adam made. The photo wasn’t a polaroid obviously, but I trimmed it down to look like one and added a little washi tape from Target to hold it on.

Nettio holidayfaves2012 32

This left page came courtesy of a Pottery Barn catalog I received in the mail. Love when that happens!

Nettio holidayfaves2012 33

Holiday Traditions

Our wedding anniversary is on December 10th, so in honor of our 7th anniversary, I added some American Crafts Thickers onto the overlay on the right:

Nettio holidayfaves2012 34

If anyone from American Crafts is reading this, I have a request. Could you pretty please bring back the white chipboard Thickers in the Shoebox font? I know you’ve brought it back in a glitter form which gives me hope but I’m still holding out for the all-white to return. It’s my fave and I’m still hoarding the little bit of it I have left. *Note: I’m pretty sure no one from American Crafts is reading my blog.

Behind the overlay I added a self-portrait I took of Adam and I on our anniversary:

Nettio holidayfaves2012 35

One of our yearly traditions while we’ve lived here in San Antonio has been to spend the night up in Austin in honor of our anniversary. It’s a fun little getaway and since we aren’t usually up there late all that often it gives us a chance to try out some new places for dinner. This year we went to this Mexican restaurant downtown called La Condesa. By far my favorite thing was the guacamole and salsa sampler (well and their crazy patterned paper-esque wall):

Nettio holidayfaves2012 36

I included a business card from the restaurant punched with my now confiscated-by-TSA crop-o-dile:

Nettio holidayfaves2012 37

Nettio holidayfaves2012 38

Another card from my mom, this time for our anniversary:

Nettio holidayfaves2012 39

Little did she know she was sending me so much scrapbooking material, haha.

Nettio holidayfaves2012 40

Since this has become one of our traditions, I used the Holiday Traditions themed journaling card for my journaling:

Nettio holidayfaves2012 41

On the back of the card, I include a two-page photo spread with photos of the hotel where we stayed. The past two years we’ve stayed at the Westin at the Domain because they ofter a good military rate but this year we stayed at this awesome (but not cheap) little boutique hotel called the Heywood Hotel:

Nettio holidayfaves2012 42

Seriously, they had me at hello as soon as I saw that graphic wallpaper and modern wood bed on the website. I’m pretty sure I would have moved in had they let me. Oh and ignore my ghostly-ness in that bottom left photo – clearly my pale skin and my black coat are not a camera match made in heaven, haha.

In the middle of the spread I used some paper I picked up from our room to journal about the hotel. The travel tag is from Basic Grey:

Nettio holidayfaves2012 43

I also included the free map of Austin they gave us. Not that we needed it but it makes for great scrapbooking material:

Nettio holidayfaves2012 44

The right side of the photo spread. I so would have taken the chair from our room home with me. I’m not normally a black & white print girl but I loved how graphic and super comfortable it was. Plus I was way excited they had the most recent issue of Austin magazine which I’d been eyeing at Whole Foods the week before. #itsthelittlethingsright?

Nettio holidayfaves2012 45

On the back of the map page, I added the card the hotel had left for us in our room. Love when places do nice things like that:

Nettio holidayfaves2012 46

Nettio holidayfaves2012 47

Holiday Faves #4

And now it’s time to leave Austin behind and head back to San Antonio for Holiday Fave #4 – The Nutcracker!

Nettio holidayfaves2012 48

I had never seen The Nutcracker before so Adam and I thought it would be fun to go this year. I have to say, it was kind of surreal hearing the music you’ve heard a thousand times in it’s actual intended context.

Nettio holidayfaves2012 49

More punched tickets. To keep them together I just added one strip of tape runner to the back of the top one so when you turn the page, they move as one.

Nettio holidayfaves2012 50

The cover of the program from the ballet:

Nettio holidayfaves2012 51

The funniest part of the night happened when we first arrived at the theater. Adam had chosen to pay a little extra to get the upgraded seats that came with valet parking so we wouldn’t have to worry about finding parking in downtown San Antonio. I had figured when the tickets came and they said “Box R3” on them that we’d be off in some corner since we bought them rather last minute. But when we got there the usher just kept walking and walking and next thing we knew we were walking past where we thought we’d be…

See those boxes hanging off the side in that top right photo? That’s what it turns out we were sitting in. Hence the “Box” on the ticket! The bottom right photo was the view from my seat. We had NO idea that’s where we’d be sitting but I told Adam, hey at least I can cross “sitting in box seats in a theater” off my bucket list now, haha.

Nettio holidayfaves2012 52

For dinner before the show we went to one of Adam’s favorite places, Texas de Brazil, since it’s right across the street from the theater which meant we could valet park and then go eat without moving the car. For the photos from dinner I trimmed down a divided page protector to make a little pocket:

Nettio holidayfaves2012 54

Nettio holidayfaves2012 53

Holiday Faves #4 journaling card on the right:

Nettio holidayfaves2012 55

Holiday Faves #5

For Holiday Faves #5, I kept things fairly simple, just a journaling card and photo collage. Adam and I decided to take a walk around our neighborhood and check out the lights – definitely one of the perks of living where it’s still 70 *cough* or 90 *cough* in the winter!

Nettio holidayfaves2012 56

Well that’s it for Part 1 of my Holiday Faves Mini Album update: Faves 1-5. If you’ve made it this far, congrats! 1000 awesome points to you! I’ll be back either Friday or more likely Monday with Faves 6-10. And then it’ll be time to wrap this baby up and move on to new projects for 2013. Eeek, so excited!

Anyone else still working on your December Daily or Holiday Faves album like me? Have a completed album you want to share? Feel free to link me up because I’d love to see your stories!


Fraudulent Drugs Are A Huge Global Problem

POSTED IN Holiday Faves, Holiday Faves 2012, Hybrid Scrapbooking, Mini Albums

It’s Time for December Daily Nettio-Style, Round 2

POSTED ON November 17, 2012 IN Announcements, Holiday Faves, Holiday Faves 2012, Shop News & Releases

Wow, November is half already half over! The holiday season will be here before we know which means it’s time for one of the scrapbooking projects I most look forward to every year: December Daily.

Back in 2010, I created a 7×9 mixed-sized paper mini book and I have to say I LOVED it. Of all the scrapbooking projects and layouts I completed in 2010, my December Daily album is the one I never stopped thinking about.

There is just something magical about putting together the foundation of the album ahead of time and then seeing it fill up with memories over the course of the holiday season.

But in thinking about my December Daily plan for 2011, I realized there were a few things about the album that didn’t work for me: the daily-ness of December Daily, the mixed-sized pages and the lack of any digital goodness.

So last year I came up with a new plan for my not-so-daily December Daily mini book which I lovingly called the Holiday Faves. It was a 5×7 hybrid mini album complete with foundation pages which I printed and then filled up with goodness over the Holiday season.

And I have to admit, I may have done a happy dance or two in excitement over it because it worked out even better than I’d hoped.

(You can find an entire video of my 2011 Holiday Faves album here.)

Which brings me to today’s Sweet Shoppe Saturday New Release!

The Holiday Faves 5×7 Mini Album Templates Vol. 2

Yes, the Holiday Faves 5×7 Mini Album templates are back with an all-new more awesome design combined with the same hybrid 5×7-inch tree-saving style!

And I could not be more excited. Seriously, lots of oh-so-excited (and occasionally awkward, I’m sure) happy dances going on over here, haha. Especially knowing just how well the Holiday Faves worked out for me last year.

You can read about all the details of the Holiday Faves 5×7 Mini Album Templates here at Sweet Shoppe Designs but here are a few specific things I want to point out:

  • The mini album templates are 5×7 inches which for me is the perfect balance of size and at-home printability since you can print 2 5×7 pages on a single 8.5×11 pages. Woohoo for saving trees!
  • I designed the templates to be a starting point for building your Holiday album foundations pages so I kept the design simple so you can dress them up or down depending on your personal style. The goal is to let your photos, memorabilia and memories take center stage.
  • I will be going with a Holiday Faves theme for my album with my plan being to document my top ten favorite things from this Holiday season (with the backup plan being if I only get to say, 5, it’ll be ok). But if you’re not a Faves fiend like I am, haha, I also included a “Holiday Memories” cover and journaling option as well a list of the fonts I used so you can customize your own.
  • One thing I missed from December Daily last year was capturing a few of the more broad holiday themes, like decorations, music, etc so this year I’ve included 8 additional more general holiday-themed journaling cards for documenting those stories.

What’s really cool about these templates is not only can you use these mini album templates for creating your own Holiday album but I will be using them to create my own album as well.

And starting next week here on the blog, I will be sharing more details on how I’m personally using these templates to create the foundation for my own Holiday Faves album and of course throughout December I’ll be showing how it all comes together as well. It’s going to be fun so I hope you’ll come scrap along with me!

The Holiday Faves 5×7 Mini Album Templates Vol. 2 are available now at Sweet Shoppe Designs and are 20% off thru Saturday, November 17th.

So now’s a great time to get yourself ready to scrap your holiday heart out.

How Can Customers Lower Their Remedy Costs

POSTED IN Announcements, Holiday Faves, Holiday Faves 2012, Shop News & Releases, Hybrid Scrapbooking, Mini Albums, Template-y Goodness

An Update On My 29th Year Project Life Album

POSTED ON January 17, 2012 IN Project Life

Back in May as part of my 29th birthday celebration, I wrote a list of 5 personal goals I wanted to achieve before I turn 30 this year.

29goals 5

Number 5 on the list is to document my 29th birthday year because as I wrote in this guest post over at Sweet Shoppe Designs, turning 29 feels like a pretty big milestone. A rite of passage. The last official year of my twenties.

And as any good scrapbooker will tell you, milestones are made to be documented.

So in July, after a mulling it over for a little bit, I decided jump into the Project Life pool and choose it as my method for documenting this year. I even wrote a post about my plan and shared my first spread.

IMG 34947

With the start of the new year and the ensuing Project Life overload that’s going on right now, I’ve gotten a few requests to share an update on how my Project Life album is coming along. And so I’m back today with a little update…which you may or may not like.

You see…that one lonely little spread up there? That’s all I’ve completed of my Project Life album.

I know, sad.

But before you go assuming this is just another case of #ProjectLifeFail, here’s the deal.

I posted about my plans for Project Life on July 20th. And only five short days later, on July 25th, I embarked on another not-so-little project called A Week In the Life.

AWITL 20119 new

Having never completed A Week In the Life before, I didn’t really know what to expect. But I went into it with a plan and came out of it with an amazingly AWESOME Blurb photo book.

Nettio blurb01

And what I realized once I had this book in my hot little hands is that this AWITL album achieves my goal of documenting my 29th birthday year.

Sure it doesn’t include each and every moment of every day the way Project Life might have, but it does exactly what I wanted to do with my 29th birthday year album:

It captures a snapshot of what our life is like as two child-free married twenty-somethings.

Nettio blurb07

The places we go, the things we do, the technology, fashion, food and so much more we love.

Nettio blurb010

And I LOVE it. I love it in a it-still-makes-me-want-to-do-happy-dances-everytime-I-look-at-it kind of way.

And that’s good enough for me.

So in keeping with my 2012 scrapbooking resolution to trade the busy for the meaningful, I’ve decided to call this goal done and let it go.

I may feel inspired to pick up my Project Life album again, I may not, but either way, I’m happy with my decision.

And with that I leave you with two little reminders:

1) It is OK to change your plans (and not feel any guilt about it).

2) Just because everyone else is doing something, doesn’t mean you have to stick with it too.

So what about you? Anyone else ever start something only to change your plans mid-way? Were you happy with the end result?

Fraudulent Drugs Are A Huge Global Problem

POSTED IN Project Life, Hybrid Scrapbooking

Holiday Faves Mini Album | How to Add a Fabric Spine & My Final Thoughts on this Project

POSTED ON January 13, 2012 IN Holiday Faves, Holiday Faves 2011

Nettio Faves5 10 42 text2

As I mentioned in yesterday’s post I have finished my Holiday Faves 2011 Mini Album. Woohoo!

My final task for finishing the album was to add a fabric covered spine to the mini book. I had seen this tutorial forever ago on Ali Edwards site but I hadn’t had a chance to try it out. Since the fabric spine has to be added after the album is finished, this seemed like the perfect opportunity.

If you want to give it a try yourself, I recommend following the tutorial linked above since she includes more detailed directions, but below is how I did it. Excuse the less-than-stunning photos. I was doing this at night and the overhead light in our office is wacky, haha.

How to Add a Fabric Spine to your Mini Album

Materials you’ll need:

  • Book cloth tape (like this) – I bought mine at Paper Source. It’s 3″ wide.
  • Patterned paper for the inside of your album
  • Super Tacky Tape – I bought mine at Michael’s.
  • A glue stick or tape runner

Step 1: Measure the thickness of your completed mini album. Mine was 2″ thick at the widest part.

Nettio Faves binding 1

Step 2: Cut a strip of book cloth tape a little longer than the height of your album.

Step 3: Trim the width of the book cloth tape to be equal to the width of the album, plus 1/2″. So I trimmed mine my 3″ tape down to 2.5″ (2″+ 1/2″=2.5″) using my paper trimmer. I really expected this not to work at all but it was surprisingly easy to cut with the trimmer – only took one pass!

Nettio Faves binding 2

Step 4: Once you have the book cloth tape trimmed to the proper size, lay the tape flat, fabric side facing up and place your front and back covers overlapping the tape a 1/4″ in on each side.

The space between the covers should equal the thickness of your album from Step 1. I used a cutting mat and ruler to help line everything up.

Nettio Faves binding 3

Now we’re going to attach the covers to the fabric side of the book cloth tape.

Step 5: Flip one of your covers over and attach a small strip of Super Tacky Tape along the edge of the cover.

Nettio Faves binding 4

Step 6: Remove the plastic protector from the tape, flip your album back over so the right side is facing up and attach it to the book cloth tape 1/4″ from the edge. To help keep it lined up, I placed a metal ruler at 1/4″ and line my cover up with it as I pressed down to stick the tape.

Once you’re done repeat steps 5 & 6 for the other half of your cover.

Nettio Faves binding 5

Now that we have the two covers attached to the front of the book cloth tape, we’re going to add the paper on the inside of the cover.

The directions in the tutorial are designed for you to use one big sheet of paper to cover the entire inside of the album but since I didn’t have a big enough sheet of paper on hand, I cut two papers for the sides and a third for the spine. This will make more sense in a minute.

Step 7: Flip your album over so the inside of the covers are shown.

Step 8: Measure and trim to size your papers for inside the cover. If you’re following the tutorial, you’ll only have one sheet of paper but in my case I had three. Since I wanted a little of the red painted album to show, I trimmed my inside cover papers to 5″ x 7.25″ and my spine paper to 2.5″ (the width of the book cloth tape) x 7.75″ (the height of my mini album covers).

Step 9: Remove the paper backing off the back of the book cloth tape so the sticky back is exposed.

Step 10: Add glue using a glue stick or tape runner to the back of your paper and attach it to the inside cover of the album. I didn’t bother measuring for this step, I just eyeballed where I wanted to paper.

It’ll now look like this:

Nettio Faves binding 6

If you used one sheet of paper for the inside, you’re inside cover should be done. Skip ahead to Step 14. If you’re using multiple papers like I am continue to step 11.

Step 11: Repeat Step 10 for the right hand inside paper so it looks like this:

Nettio Faves binding 7

Now we’re going to add the third paper to cover the inside of our fabric spine.

Step 12: Grab the strip of paper you trimmed for the inside spine, flip it over so the backside is facing up and add a small strip of glue to each edge using a glue stick or tape runner. This will make sure the paper sticks to the areas that don’t touch the sticky book cloth tape backing.

Step 13: Flip the inside spine paper over and attach it down onto the sticky backing of the book cloth tape. Smooth it down firmly to make sure all of the paper gets attached to the backing. You want to make sure this paper is nice and attached since it’ll get moved every time you open and close the mini album.

Nettio Faves binding 9

Step 14: Once your glue is nice and dry (I let mine sit for a little bit to be sure), fold in the front and back covers one at a time to make a nice crease on the spine. The tutorial recommends scoring it but since I don’t have a scoring tool, I just used a ruler and folded it using that as a guide. I wanted my spine to be more rounded so I was fine with now having a super sharp crease.

Step 15: Punch holes for where you want the binder rings to go through. Since I already punched holes in my covers when I originally put my album together, I used a screw (a nail would work too) to poke through the paper on the inside of the album. It’s not the cleanest hole ever but since I didn’t have a hole punch that could reach the holes, it worked well enough.

Here’s what the album cover looked like with the fabric spine attached and the holes in place:

Nettio Faves binding 8

And here’s what the fabric spine looks like with the rings added back in. Pretty, no?

Nettio Faves5 10 43

The fabric spine from the other direction. You can see how the spine is rounded:

Nettio Faves5 10 44

I really love the way it finishes off the album. It looks like a real little book now.

Nettio Faves5 10 42 text2

And that’s my final completed version of my Holiday Faves 2011 Mini Album!

Since I know it’s kind of hard to see how it flows all together in the blog post photos, I put together a 1 minute little video of all the pages together:

Holiday Faves Mini Album 2011 from Lynnette Penacho on Vimeo.

My Final Thoughts On My 2011 Holiday Faves Mini Album

So now that I’m officially finished with this album, here are a few of my final thoughts on this project:

1) WOOOHOOO, I’M FINISHED!!!!!!

Umm *ahem* *finishes happy dance* *composes self*

Sorry about that, but after 3 failed attempts at December Daily, I’m really excited that I actually finished this album this year! Which brings me to thought #2…

2) Holiday Faves is WAY easier than December Daily

I have no doubt THIS is the reason I finished this year. As much as I love the concept of December Daily and the numbers and all that jazz, it’s just not realistic for me to do keep up with a page a day and to be honest, I don’t want to commit to that amount of work in December. I want to be able to actually enjoy the holidays and not be hunkered down in my scrap room every night, trying to stay caught up.

That’s what I loved about this project. I was able to include things when I felt like it but not worry about capturing something each and every day.

3) I LOVED this mini album size

In my previous attempts at December Daily, I had done an 8×8-inch album and a 7×9-inch album so I was a little nervous that 5×7 might end up seeming too small.

But I actually think it was the perfect size. Not too big to carry around but still big enough to include memorabilia and photos. I especially loved the full size 5×7 photos – they’re stunning. Plus I loved being able to fit two photos/pages onto one sheet of paper. Yay for saving trees!

And as much as I love the mix and match look of some albums, I have to admit, keeping all the pages the same size definitely makes the album a whole lot simpler to put together.

My Top Tips for Finishing a Holiday Album

If you’re wondering what my top tips for finishing a December Holiday album it would these two:

1) Be honest with yourself about what you can actually get done.

I know, we all love projects. Especially ambitious projects like December Daily, A Week In the Life and Project Life.

But you really need to really ask yourself whether a project fits into your life, and if it doesn’t, figure out a solution that works for you. Don’t be afraid to go against what everyone else is doing if it’s what’s best for you. Doing something different is better than stressing yourself out or doing nothing at all.

2) Start with a plan but keep it flexible.

Starting December with the focus and foundation of your album ready to go is key. Having a clear idea in your head of how much and what exactly you want to capture makes the documentation process so much easier because it allows you to say free yourself from feeling like you need to capture every.little.thing.

And if you find you have to adapt your plan a little along the way, it is ok. Don’t be afraid to let things go or change things up when something doesn’t work out like you had planned. Again, doing something different is better than doing nothing at all.

Well, I hope you’ve enjoyed the 2011 Holiday Faves mini album adventure! I absolutely love how it came out! I did want to send an extra special thank you to everyone who left a comment or sent me a nice thought during this process. I know having people waiting to see what I was up to definitely kept me on track. : )

And with that it’s time to wrap up and move on to some new and exciting projects! Weeee, I can hardly wait!

Psst…if you haven’t shared your Holiday Faves or December Daily album in the comments, feel free to do so! I’d love to see what you’ve done!

Psssst…looking for more Holiday Faves inspiration? Check out all my Holiday Faves posts here.


Benefits Of Using Canadian Pharmacy

POSTED IN Holiday Faves, Holiday Faves 2011, Hybrid Scrapbooking, Mini Albums, Tips & Tricks

Holiday Faves Album | Faves 5-10

POSTED ON January 12, 2012 IN Holiday Faves, Holiday Faves 2011

Nettio Faves5 10 42 text2

Woohoo, I have done it! I have finished my Holiday Faves mini album.

That’s right, stick a fork in this baby because it is done.

And I’m quite thrilled with how it turned out!

When we left off at the end of my last Holiday Faves update in December, I had completed Faves 1-4 and was working on 5 & 6. I had been hoping to squeeze one more update in before we left for two weeks of holiday vacation bliss on December 19th, but Adam seemed to think packing was more important than me working on my album.

I know the nerve, right?

So instead I’ve got a nice big update for you today!

As a nice little recap, here are the Holiday Faves I’ve shared so far:

  1. Thanksgiving
  2. Local Events
  3. Holiday Decorations
  4. December Weather


Holiday Fave #5

For Holiday Fave #5 I chose our anniversary as we celebrated our 6th wedding anniversary on December 10th. Hard to believe it’s been 6 years already!

To celebrate our anniversary, we headed up to Austin for the weekend. Since I had a couple of extra memorabilia type items from our trip I wanted to include, I added them directly onto the foundation page:

Nettio Faves5 10 2

The top card is a business card from the restaurant where we had dinner and underneath that is a post-it from the Westin where we stayed. We love staying at the Westin – their bedding is like sleeping on a cloud, plus they do nice things for anniversaries. Last year we got rose petals and chocolate-covered strawberries, this year it was wedding balloons, chocolate and wine.

Nettio Faves5 10 3

On the right is an anniversary card my mom sent us. I totally agree that the 6 years have flown by!

Nettio Faves5 10 5

The drawing on the front of the card is so cute. I especially love that it has “adventure” on it since that was my One Little Word in 2010 and ’11.

Nettio Faves5 10 4

The back of the card and the accent page. The card is just added in between the foundation page and the accent page.

Nettio Faves5 10 6

On the back of the accent page, I added a photo of Adam and I. We tried to do the whole mirror photo thing but it totally didn’t work (how do you get it to focus??) so this was a quick one we took using the remote on our way out to dinner.

Nettio Faves5 10 7

I printed some text directly on the photo and then added a 6 using a foam alpha from American Crafts. Although I think I’ve officially decided I don’t love these AC foam alphas – they always go wonky on me when I try to stick them down. But I like the subtle dimension it adds to the page.

Nettio Faves5 10 8

On the right side behind the text overlay is a photo of the Zilker Park Holiday tree in Austin. The picture really doesn’t do it justice because it’s seriously huge – like 150 feet tall! It’s made of all light strings and if you stand in the middle and spin around it makes crazy patterns. There were a bunch of people doing that and it was quite hilarious to watch.

Nettio Faves5 10 9

On the back of the tree photo, I added a photo collage of our anniversary day’s events. It was a definitely a day of food bliss as we had Italian at Asti for dinner and then the Melting Pot for dessert. It was delish but we were definitely stuffed by the end of the night!

Nettio Faves5 10 10

Christmas Highlights

In between Faves 5 & 6, I added some photos from our pre-Christmas Christmas. Since we were traveling to California for Christmas, we decided to celebrate early rather than lugging all our own gifts with us on the plane. Believe me we had enough stuff, like Adam’s ski boots, going with us as it was!

Nettio Faves5 10 11

On left side I printed a journaling card from Cathy Zielske and wrote some bits about our early Christmas.

Nettio Faves5 10 14

At the bottom of the card I added a scallop trim from Ormulu and stapled a little accent and word sticker from Making Memories.

Nettio Faves5 10 13

In between the pages, I added a coffee sleeve from Panera. I thought the wording seemed fitting for the day.

Nettio Faves5 10 12

As I was putting the book together, I did end up moving some of the printed transparencies. This numbers in this one seemed to fit better with our early-25th celebration. I added a little 25 chipboard bit from Making Memories onto it.

Nettio Faves5 10 15

Behind the transparency I added another photo collage from the day. I really love the 5×7 photo collage pages because the photos aren’t too small but it’s simpler to print out than multiple photos at once. So glad I included all those photo-page templates in the mini album set because they really came in handy, hehe.

It was a good day filled with hot chocolate, Pioneer Woman cinnamon rolls (so amazing!) and yes a Toy Story puzzle. (Adam bought me Toy Story legos last year so it’s kind of a thing around here, hehe.) Although I have to say it didn’t take us very long to put together that 100 piece puzzle, haha.

Nettio Faves5 10 16

Holiday Fave #6

For Holiday Fave #6, I kept things simple and documented our favorite holiday movies.

This year we watched Meet Me in St Louis which I love but Adam had never seen. It’s not specifically a Christmas movie per-se but it’s hard not to feel Christmas-y when Judy Garland starts singing Have Yourself a Merry Little Christmas.

And of course we watched our other fave, Elf! I’m not always a Will Ferrell fan but oh how I love that movie.

Nettio Faves5 10 17

Travel Highlights

On the accent page on the back of the movie image, I added a few items from our flight out to California. Every time I fly Southwest I always save the drink napkins planning to use the map on them but this is the first time I’ve actually done it and I love how it came out.

*A tip when dealing with napkins, take the napkin apart (they usually have a couple of layers), glue the top image layer onto a piece of card stock and then glue the card stock into the book. If you don’t, the napkin tends to fall apart (learned that the hard way when dealing with the turkey napkin for Holiday Fave #1, haha)

Nettio Faves5 10 18

Here’s a closer look at the map. I used an American Crafts Slick Writer and a ruler to draw our route and then added some word strips for the places we went. The Southwest tag was an extra luggage tag I grabbed at the airport. All of the journaling strips are from October Afternoon.

Nettio Faves5 10 19

Holiday Fave #7

Cookie baking is a huge deal with my mom’s side of the family down in Southern California (although my aunt and uncle refer to it as “Cookie Gulag” which I think scared Adam a bit, haha), so for Holiday Fave #7, I chose Cookie Time as it’s not Christmas without cookies!

We were lucky enough to be there for cookie decorating day which in my opinion is the best day:

Nettio Faves5 10 20

My sister with one of her super adorable cookies:

Nettio Faves5 10 21

Holiday Fave #8

Adam and I ended up being in California for a few days before the rest of the family arrived so on our second day there, we decided to make an impromptu trip to Disneyland, which is Holiday Fave #8. Yeah, it was tough being in California for Christmas, haha.

On the foundation and accent spread, I added our tickets and the map from our day. I always love saving the Disney maps since things change every so often around there.

Nettio Faves5 10 22

The back of the map and accent page:

Nettio Faves5 10 23

Adam and I in front of the castle. This photo must have been a Christmas miracle because it’s the first time I’ve managed to hand over my DSLR and not get a blurry photo back. So a big thank you to the random guy who offered to take our photo! This shot came out way better than the hold-the-camera-out-try-not-to-squint-but-still-get-the-castle-in-the-background photo I was trying to take would have.

Nettio Faves5 10 24

On the right is the giant Disneyland tree. I love Disney at Christmas, it’s so pretty and festive. Crazy crowded but the pretty and festive makes up for it. I’ve been several times at the holidays before but this was Adam’s first Disney Christmas trip.

Nettio Faves5 10 26

On the back of the tree photo I added another photo collage. (Are we sensing a theme here?) I still feel a little bad about eating that gingerbread man. He was almost too adorable to eat. Almost.

Nettio Faves5 10 27

Holiday Fave #9

After spending several days with my mom’s side of the family out by the coast, the fam and I headed out towards the desert where my 94 year-old grandma lives. The town where my dad grew up isn’t the most exciting place ever but it was Adam’s first trip out there so we had to show him some local culture, which on this trip included the local Holiday Lights Tour, which is Holiday Fave #9.

It’s hard to tell in this photo but the display in that bottom photo had a working ski lift full of super cute little animals and fake snow that would blow when you parked near the display. Considering the size of the town it was actually rather impressive!

Nettio Faves5 10 28

Here’s the Holiday Faves #9 journaling card. On the right side is the holiday lights tour map from the local paper.

Nettio Faves5 10 29

I’d say it’s a sure sign you’re in an old school town when they include a map of the lights tour in the local paper. It was really fun though and we saw some parts of town we had never seen before. We only did part of the tour and we were still gone for almost 2 hours.

Nettio Faves5 10 30

On the foundation page on the back of the map page, I kept things simple and added a Christmas tag from Ormulu.

Nettio Faves5 10 31

Holiday Fave #10

And finally we’re at the very final Holiday Fave, #10!

For Holiday Fave #10, I went with Family Time as getting to see both sides of my family was my favorite part of the holiday. When you live so far away all the time, it’s nice to get to spend time with everyone. Since Adam has been gone so often, this was the first time a lot of them had seen him since our wedding!

In addition to whale watching, cookie baking and decorating, family time included hopscotch with the cousins:

Nettio Faves5 10 32

On the printed transparency I added a little holiday accent by Making Memories:

Nettio Faves5 10 34

My final journaling card. I wasn’t so sure at first about the handwritten nature of the cards but it was definitely nice to be able to have my journaling completed as the month went on. Much better than trying to remember everything all at once.

Nettio Faves5 10 35

Adam and I also got in on some bowling action. And yes the weather was gorgeous in California. We didn’t even need coats most of the time!

Nettio Faves5 10 36

In between the pages I added a card from my aunt and uncle:

Nettio Faves5 10 37

And as my final photo entry, another collage, this time of all the family. It was a fun time seeing everyone!

Nettio Faves5 10 38

The final accent page and back cover:

Nettio Faves5 10 39

And that’s the end of my Holiday Faves mini album! Since this post is already crazy long, I’ll be back tomorrow to share a little bit more about how I finished up the cover binding and my final thoughts on this project overall.

Now It’s Your Turn

In the meantime, I’d love to hear how things went for you!

How did your holiday scrapbooking go? Did you finish up your Holiday Faves or December Daily album?

Let me know in the comments!

Psst…looking for more Holiday Faves Mini Album goodness? Check out all of the Holiday Faves posts right here.

How Can Customers Lower Their Remedy Costs

POSTED IN Holiday Faves, Holiday Faves 2011, Hybrid Scrapbooking, Mini Albums

Holiday Faves Album | New Cover and Faves 3 & 4

POSTED ON December 14, 2011 IN Holiday Faves, Holiday Faves 2011

Things are moving along on my Holiday Faves Mini album. I made a new cover, finished up Faves 3 & 4 and have started on Faves 5 & 6.

I’ll admit I wasn’t totally sold on how things were coming together at first but after this latest installment I’m really starting to love it. I think maybe it just wasn’t feeling Christmas-y enough yet?

As I mentioned before, the cover for my album at first was just a 5×7 card stock page I printed on the computer, like this:

Nettio FoundationPage 1

But I’d always intended to put together a stronger cover (no way would the paper cover survive traveling) so last week I got to work putting together a new cover.

Since I didn’t have any chipboard on hand that was the size I needed, I decided to stop by our local Michael’s to see if I could find something that would work. My goal was to find something that would not only be strong enough to maintain it’s shape but that would be able to handle some paint as well. And lucky for me, I found something that was perfect!

It’s called Watercolor Board – it’s a sturdy 1/8″ thick piece of board that has a watercolor paper texture one side. It’s a lot like this although my board is acid-free. The piece I purchased was 16×20 inches so I used an exacto knife and ruler to cut two pieces that were each 5.5 x 7.75″ for my cover. Then I painted them each with a couple of coats of Making Memories paint in Cranberry.

Nettio Faves3 4 18

Once I had the covers painted, I decided I wanted to add a little pizazz by adding some horizontal stripes. So I broke out my trusty Frog Tape (seriously, LOVE this stuff!), and taped out some stripes. On my first attempt I taped out 5 stripes which meant I ended up with really skinny painted stripes, so on my second attempt, I only taped out 3 stripes instead so the stripes would be thicker.

I knew I wanted the stripes to be subtle so rather than painting with another color, I painted the stripes using Making Memories Scrapbook Glaze in Pearl. I like the subtle shimmer it adds.

Nettio Faves3 4 19

Here’s the look at the finished cover. I ended up using the thicker strips for the front cover and the thinner stripes for the back.

Nettio Faves3 4 1

Here’s the back and front together. It’s a little mis-matched but since you’ll never see them together, I’m fine with it. (See, embracing imperfection is working!)

The painted stripes look a little uneven but it’s just because of the way the light was shining as I took the photo.

Nettio Faves3 4 2

On the front, I added a cluster of elements. The star is from Jenni Bowlin which I painted with the MM Pearl Glaze as well and the green accent is from Making Memories. The chipboard numbers are from Basic Grey and I painted them with Making Memories paint in Funky Vintage – Sea Foam.

Nettio Faves3 4 4

I love the subtle dimension the elements add to the album without it being too bulky to take with me. This is also the truest representation of the stripes. You can see how they’re shimmery but subtle. Love that.

Nettio Faves3 4 3

Once I had the cover finished, I decided to go back to that bare spread from Fave #2 and add some photos. This is what it looked like sans photos:

Nettio Faves1 2 18

Rather than adding photos on top of the pages I already added, I added a new photo page in between. On the right side are our photos from our dinner at Luke the night of the River Parade.

Nettio Faves3 4 5

On the back of the photo page, I added photos from our trip to the Renegade Craft Fair. This was my second time attending the fair (you can read my recap from my first trip here) and I have to say, it is SO fun to shop Etsy-style shops in person. They are finished for the year but if you have a fair near you next year, I definitely recommend checking it out!

Nettio Faves3 4 6

On the back of the Renegade Craft page, I added a 4×6 photo to the foundation page. Just a fun photo of a cup of hot chocolate but I loved the way the lights from the tree turned out in this photo. It feels very Christmas-y to me.

Nettio Faves3 4 7

After the handwriting fiasco last week, I took the advice of my lovely commenters and went and bought a pack of one of my most favorite pens from college – the Uniball Gel RT Micro. I love these pens because they not only write smoothly but they don’t smear which when you’re a lefty becomes incredibly important (and surprisingly difficult to find). Plus I love the thinness of the tip. I still say my handwriting is a bit out of practice but at least it’s mostly readable this time, haha.

Nettio Faves3 4 8

For Fave #3 in my album, I decided to feature some of the decorations around our house. On the left side I included a 5×7 photo Adam took of me putting the lights on the tree. And as an extra attempt at embracing my handwriting, I even wrote right on the photo with a Sharpie white paint pen. I’m no Ali Edwards, haha, but I still think it turned out pretty cute.

On the right side of the page I added one of the divided page protectors I’d sewn and included some Instax photos I took around the house. I love the vintage feel of the Instax photos. They remind me a lot of the photos my parents have from when I was a kid.

Nettio Faves3 4 9

Another look at my awesome handwriting. I think the little hearts really make it, haha.

Nettio Faves3 4 10

Here’s a look at the backside of the page protectors. To fill the pockets, I taped two Instax photos back to back. Then in the bottom corner, I added two pieces of the wrapping paper I used to decorate around the house.

On the right side of the spread, I created a photo collage in Photoshop of a bunch of our decorations. I have to say the photo of Yukon Cornelias and the Bumble might be my favorite. Although Bumble looks rather cute and happy considering he’s suppose to be abominable, haha.

Nettio Faves3 4 11

A little detail shot of the page protector. Although I don’t bother to add eyelets to any of my paper pages, I did add them to the page protectors as the hole I punched with my Crop-o-dile was a bit messy. Just makes it a little easier to turn the page. You can also see the stitching a bit better here. I just did a simple straight stitch right through the page protector to make my pockets.

Nettio Faves3 4 12

On the back of the photo collage is my Faves #3 journaling card complete with my handwriting. I love that depending on my mood, I’ll either write in a cursive-y all lower case font or in all caps like on this card.

To the right of the journaling card, I added a photo of our decorated Christmas tree. And yes, we do have an olive-y green wall in our family room but it’s not quite as bright as it looks in the photo, haha.

Nettio Faves3 4 13

For Fave #4, I decided to talk about the weather, which considering the extreme heat we had for so long this year, this cooler weather has definitely become a fave of mine. I mean, I know I’m from California and all but it’s just wrong for it to still be 78 in December!

Originally I had this printed transparency in front of the journaling card but I decided to move it in front of the photo instead. I love that it kind of looks like falling snow or rain.

Nettio Faves3 4 14

The photo on the right is a 3×5 photo of the day our thermostat finally showed a temperature below 40. I think that was the same night it actually went below freezing!

Nettio Faves3 4 15

On the back of the foundation page, I added a photo of one of the trees outside our house. I loved the bright fall colors of the leaves, but it’s a good thing I took the photos when I did since all of the leaves have fallen off now. So sad.

On the right page is some more handwritten journaling. Woohoo, go me for embracing the handwritten imperfection. I’m rather liking the home-y touch it’s adding to my album.

Nettio Faves3 4 16

And that’s where my Holiday Faves album is at so far! How’s your Holiday Faves (or December Daily) album coming along? Has anything surprised you about the process and/or your album? Feel free to share in the comments!

Psst…looking for some more Holiday Faves inspiration? I had the chance to chat with the lovely Melissa Shanhun as part of her December Daily Inspiration podcast and best of all it’s free to listen! You can check out my episode here. 

Can I take Levitra if I am taking other remedies at the same time

POSTED IN Holiday Faves, Holiday Faves 2011, Hybrid Scrapbooking, Mini Albums

  • « Previous Page
  • 1
  • 2
  • 3
  • Next Page »
HI I'M LYNNETTE. Graphic designer, tech-lovin’ memory keeper and lover of bold colors & patterns, good food and the great outdoors. Here at Nettio Designs, I share a behind the scenes peek at my own creative & life adventures. Read more...

KICKSTART YOUR CREATIVITY


By popular demand, photo book templates are back! Grab all three sets in the shop.
ADVENTURES IN ORGANIZING
GOAL-SETTING
MEMORY KEEPING
PROJECT LOVE
LIFE ADVENTURES
TIPS & TRICKS
BEHIND THE SCENES

POPULAR PROJECTS

TO SEE ALL MY PROJECTS, CLICK HERE

MUST READ POSTS

  • WHY EVERY SCRAPPER SHOULD SCRAP A FAVES PAGE
  • HOW TO CREATE A SCRAP-WORTHY MAP WITH PHOTOSHOP
  • REMEMBERING THE IMPORTANCE OF TELLING YOUR STORY
  • WHAT DOES IT MEAN TO CREATIVELY CAPTURE YOUR LIFE ADVENTURES?
  • BROWSE BY CATEGORY

    BROWSE THE ARCHIVES

    GET IT FOR FREE

    Copyright © 2025 ·Dynamik Website Builder · Genesis Framework by StudioPress · WordPress · Log in