Nettio Designs

Design + Creativity + Adventure = LOVE

  • HOME
  • JOIN THE 2023 MONTHLY FAVES
  • THE SHOP
  • ABOUT
  • CONTACT
You are here: Home / Archives for Adventures in Organizing / The Great Computer Spring Clean-a-Thon / The Great Computer Spring Clean-a-thon 2012

So How Did You Do? The 2012 Great Computer Spring Clean-a-thon

POSTED ON March 26, 2012 IN The Great Computer Spring Clean-a-thon 2012

Happy Monday everyone! Today marks the final day of the 2nd Annual Great Computer Spring Clean-a-thon which means it’s time to share the progress you’ve made this week!

As a refresher, here were the goals I set for the 2012 Computer Spring Clean-a-thon:

1) Clean out my Downloads, Documents and Current Projects folders. I set these up last year and have mostly kept them updated so they should only need a little work.

2) Reorganize my NettioDesigns folder. This folder is a hot mess right now. And not in a template-y goodness kind of way.

3) Get started organizing my photos in Aperture. This is a major major task and definitely not one I will complete this week but I am going to get started on it and see what I can get done. Started is better than nothing, right?

When I last updated you on my progress, I had completed the first 2 of my 3 Clean-a-thon goals, as well as a little extra credit digiscrap supplies purging.

So how did the rest of my week go?

Well…as much as it pains me to say it, I’m afraid I never did get to tackle goal number 3.

Because despite my best intentions, the universe had different plans for me and decided instead of spending my evenings happily purging photos while I watched my favorite reality TV shows, I should spend the week wallowing in my misery sick with the flu. Oh and just to add to the fun, I should wake up at 4am Wednesday morning with intense ear pain requiring a trip to urgent care and a round of antibiotics.

Believe me, I would have much rather been organizing photos.

But despite my initial disappointment, I’ve realized it’s ok.

Because while I would have loved to come in here today with a big splashy photo-tastic update, the reality is that’s not what the Great Computer Spring Clean-a-thon is about.

The goal of the Computer Spring Clean-a-thon is to kickstart your organizing progress, get you excited about organizing again and maybe even help you think about organizing in a different way.

And I definitely feel like I’ve done that. 

So while I may not have tackled everything I hoped this week, I’m still feeling good about my progress. For the first time in a long time I’m feeling excited about the prospect of organizing photos and I’m ready to move forward and keep working on my goals. And that IS what this week is all about.

So how about you? How did your Computer Spring Clean-a-thon week go? Did you make the progress you hoped? Did you run into any unexpected roadblocks?

I’d love to hear about the progress (or lack of progress) you’ve made this week!

Oh and if you’d like to check out all the Clean-a-thon posts from this past week, here’s a handy list for ya:

The 2nd Annual Great Computer Spring Clean-a-thon Intro

The Key to Matching Your Organizing Style to Your Scrapbooking Style

Downloads, Documents & NettioDesigns: Day 1 Update

How To Organize Your DigiScrap Supplies Using Adobe Bridge

From A to Z: How To Organize Your Alphas Without Tearing Out Your Hair
Why I Switched From Adobe Lightroom to Apple Aperture

How do I purchase Levitra without going to the doctor

POSTED IN The Great Computer Spring Clean-a-thon 2012

Why I Switched From Adobe Lightroom to Apple Aperture

POSTED ON March 23, 2012 IN Stuff I Love, The Great Computer Spring Clean-a-thon 2012

Happy Great Spring Clean-a-thon Day 5 everyone! Today’s post is perhaps a bit too specific for the Clean-a-thon being that it’s both Mac-specific and highly based on my own personal experience, but because one of my goals for this week was to organize my photos in Aperture, this seemed like a good time to write this much overdue post about why I decided to make the switch from Adobe Lightroom to Apple Aperture.

A few things to note before we get started:

1) Aperture is designed by Apple which means it’s Mac only. My apologies in advance to any of you PC users since this post will probably not be quite as useful for you as I would like.

2) My experience is based off Lightroom 2 and Aperture 3. But other than lens correction, I haven’t seen any features in Lightroom 3 or 4 that have made me regret my decision.

3) I am not a professional photographer. I have no desire to be a professional photographer. So if you are one or hope to be one, your needs are likely different than mine. This is just my opinion based off my needs as a tech-lovin’ digital scrapbooker.

Ok, so with that in mind, here we go…

Why I Decided To Switch To Aperture

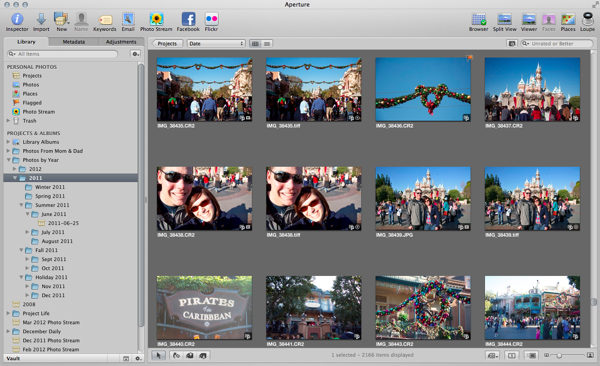
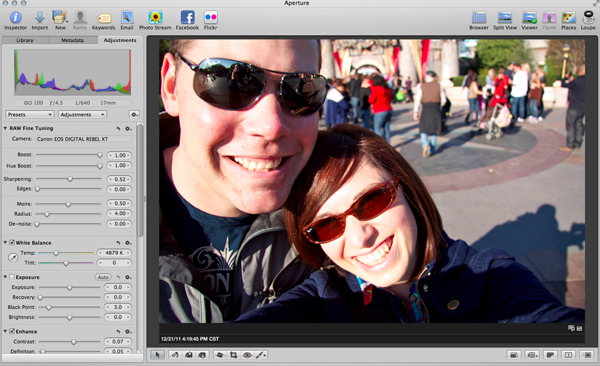
Nettio aperture

Last summer, I decided it was high time I get my photos in order. At the time I was planning to start Project Life as one of my 29th birthday goals and I knew in order to keep up with it, I would need an easy way to manage my photos. Up to that point I had been using Lightroom for organizing and editing all of my photos in tandem with Photoshop and while I liked it, there was something about it that never felt quite right to me.

Yes, I understood how it worked. Yes, I could organize and edit my photos and get good results. But I didn’t enjoy using it.

For one, I found the module design to be overly clunky. While I’m sure it’s fantastic when you’re editing 100s of photos from a shoot in a linear fashion, I never do and so even with shortcut keys, I found it annoying to switch between modules all the time. I especially found the separation between folders, collections, smart collections and tags made it difficult to organize everything easily in a way that made sense to me.

So when Apple announced they were lowering the price of Aperture to less than what it would cost me to upgrade to Lightroom 3, I decided to download the 30-day trial and give it a shot.

And I have to tell you, I was sold from day 1.

  • I LOVED the simplicity of the interface. In fact, it was almost one of those, that’s really all I need to do? kind of moments. It seemed overly easy compared to Lightroom.
  • I could organize, tag and edit my photos all in the same window. It was quick and easy to switch from a slideshow to a folder to a smart collection and I could group them all together in one spot.
  • I was getting better edits out of my photos with less work and the colors in the photos popped in a way I could never get them to do in Lightroom.
  • Even though it’s not an Adobe product, I was still able to easily open my photos in Adobe Photoshop for more editing.
  • I love the integration it has with my Mac. Auto-downloading of iPhone photos? Yes please.


It all just felt so much less complicated and better suited to my needs as a scrapbooker.

No, Aperture is not perfect. I find it runs slower than Lightroom 2 on my almost 4 year-old MacBookPro (although I suspect the same would be true for LR 3 & 4. Poor compy is just getting to that age.). I find the import options, especially when it comes to renaming files and not importing duplicates, to be more robust in Lightroom. And I think having built-in lens correction for lens distortion, etc., would be really handy to have.

But ultimately, I’m willing to deal those issues in exchange for the overall experience of using Aperture. Because I enjoy using it in a way I never enjoyed using Lightroom. Much like how I felt when I originally switched from a PC to a Mac.

Which ultimately is what I think this debate boils down to. In much the same way as the never-ending Mac vs PC debate, it ultimately comes down to personal preference. Both Lightroom and Aperture are amazing programs. They’ll get you where you need to go.

But which one works best with the way your brain works? For me, that’s Aperture.

Anyway, I realize this is a highly untechnical review of a largely technical program, but I realized when I sat down to write about why I switched, it wasn’t because of any tech specs or specific features. It was the overall experience and flow of the program that sold me.

So if you’re a Mac user, check it out or download the trial and give it a try! If you like it great, if not, Lightroom is a pretty awesome program too. And if you’re an iPhoto user, Aperture is kind of like iPhoto advanced but you can read more about the differences here.

Well I hoped you enjoyed this little insight into why I made the switch from Lightroom to Aperture! As always, if you have any questions, feel free to ask them in the comments.

Can diabetes cause erectile dysfunction

POSTED IN Stuff I Love, The Great Computer Spring Clean-a-thon 2012, Digital Scrapbooking

From A to Z: How To Organize Your Alphas Without Tearing Out Your Hair
POSTED ON March 22, 2012 IN The Great Computer Spring Clean-a-thon 2012, Tips from Team Awesome


The 2nd Annual Great Computer Spring Clean-a-thon continues on today with the lovely Natalie sharing a peek into her adventure in organizing her alphas. Take it away, Natalie!

Hello, everyone, it’s Natalie(KW) today, talking about alphas. I love to use multiple alphas on a page in my title work. Personally, I find that I just like my pages better when I do.

However, I don’t like the time it takes me to find an alpha that will match or recolor well. I’m not a tagger either, so when someone suggested in the Sweet Shoppe forums to put all of one letter into a folder so you could see all your alphas in one place, I knew I had found my answer.

Fast forward half a year or more, and I’m still sitting in the same spot. I haven’t done a single thing to get this ball rolling. When Nettio mentioned the Spring-clean-a-thon, I knew what my project would be. Organizing my alpha stash!

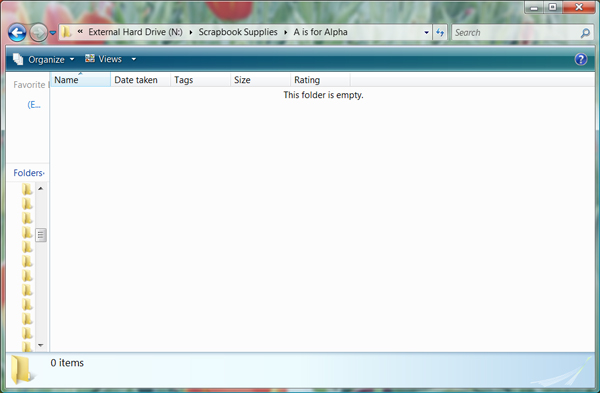
I started by making myself a folder:

Natalie alphas1

My stash is organized by designer: Scrapbook Supplies>Designer>Kit Name.

My plan was to go through each designers folder and each kit/alpha I have from the designer and COPY the alpha into my “A is for Alpha” folder. After I copied the A from each kit, I would rename the copied file Designer Name_Kit Name or Alpha Name if the alpha is a stand alone alpha.

That was the plan…

Immediately, I noticed some issues that would make my process a little harder.

Problem #1: Collaborations

The first thing is that when I save a kit, I save it in the designers folder. No problem.

Except for collabs.

Oh how I love them! Oh, how they made this process a little more complicated. Just because I save a kit in one designer’s folder, doesn’t mean that designer is the one who made the alpha.

I still saved the copied a file in my “A is for Alpha” folder under the designer’s name and kit such as: Traci Reed_Christmas Countdown. The problem is that this kit is actually in my Meg Mullens’ folder.

As of right now, I didn’t rearrange any kits into the collab partner’s folder because I like to keep collections together. I also like to keep my collabs in the designer’s folder that I CT for. I knew if I decided to start moving folders around that I would make a mess, not be consistent or get confused and I didn’t want to make this process any longer than it was already going to be.

In the end, I hope that when I’m browsing my “A is for Alpha” folding looking for items to use on my page, that if I pick a collab kit’s alpha, that I’ll just remember who the collab partner is. If not, I’ll search it in my Scrap Supplies file or in the store.

Problem #2: Sheet Alphas

The second problem I came across is when the alpha is not broken up into individual png files, but the is on an alpha sheet. I didn’t really want to go to all the work of cutting the A off of the alpha sheet and saving it as a separate png, but my OCD wouldn’t really allow me to do anything different.

So, I actually started cutting the A off of the alpha sheet and saving it as it’s own png file. This added a very significant amount to time to the process and after doing this for approximately 40 alphas, I threw my OCD to the wind and just started saving the whole alpha sheet to my “A is for Alpha” folder. I don’t love that I had to do this, but the amount of time that it saved me was probably at least 6 hours. I have a lot of alpha sheets!

Problem #3: Multi-Colored Alphas

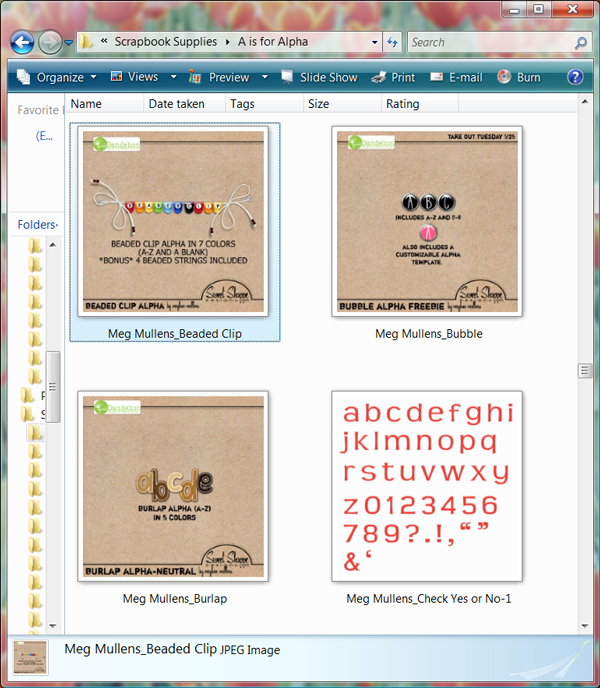
Another thing I learned about half way through was I have several stand alone alphas that come with six alphas packaged together that are the exact same but recolored. I was taking the A from each one of the colors and saving them in my alpha folder.

However, I realized I could just save the alpha preview that shows all the colors on it instead. Here’s a picture, in case you are having a hard time visualizing what I’m talking about:

Natalie alphas2

Problem #4: Kit Specific Alphas

One other thing I decided is that there are some alphas that are so kit specific that I’m never going to use them on a page using any other kit than the kit it came with.

You know the alphas…the ones that are made using a stripe from the kit. It just isn’t realistic that I will ever be able to put it on another kit’s page.

After a while, I stopped copying these alphas to my “A is for Alpha” folder. I feel great about this decision because even on the very off chance that I would use one of these alphas again on a page, realistically, there will be a better choice in my huge alpha folder.

How To Save Time Renaming Alphas

I did learn a little time saver when it comes to renaming multiple alphas the same thing.

If you select all of the alphas from a kit, right-click on one and rename it, it will rename all the selected alphas at once and just number them 1, 2, 3, etc. Great time saver.

HOWEVER, there is a warning with this!! When designers cut apart their alphas, and they have several alphas in a kit, usually they put the separated alphas into different folders. While I was going through each folder, copying the different alphas into my alpha folder, I discovered something bad.

If after I copied one of the alphas to the alpha folder, went back to the kit folder and copied the second alpha to the alpha folder and did this for all the kit alphas, when you go to the alpha folder to rename the files, you have to be careful. It is when you go to rename them that you have to be careful that only the alphas you want to rename are selected.

At one point in my process, I renamed 45 alphas at once instead of the three I needed to. I had to pull out all of the misnamed alphas and figure out what kit and designer they belonged to, and rename them correctly. It was pretty discouraging.

The End Result

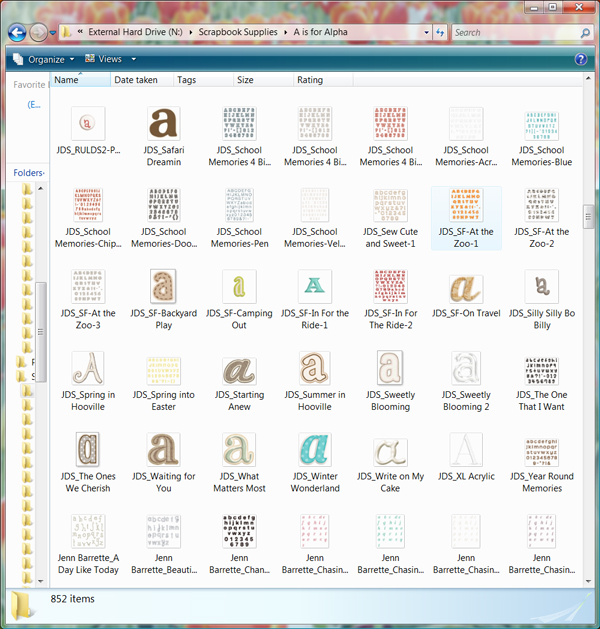
After all is said and done, here’s a little look at what my folder looks like:

Natalie alphas3

A whole 836 alphas copied and renamed later! Now, I’m itching to make a page! Now the key part is to make sure I copy the A or alpha sheet from ever kit I download into the folder so it stays up to date.

I really hope you’ll jump on the band wagon with me and get your alphas organized! Especially now that I figured out some ways to save time, not make mistakes and do it more efficiently! Let me know how your process goes or if you have any questions!

Woohoo, fantastic progress Natalie! I’ve been wanting to do this for forever and you’ve definitely answered some of the questions I had! Have a question for Natalie? Feel free to ask it in the comments.

Can diabetes cause erectile dysfunction

POSTED IN The Great Computer Spring Clean-a-thon 2012, Tips from Team Awesome, Digital Scrapbooking

How To Organize Your DigiScrap Supplies Using Adobe Bridge

POSTED ON March 21, 2012 IN The Great Computer Spring Clean-a-thon 2012, Tips from Team Awesome

Happy Great Computer Spring Clean-a-thon Day 3 everyone! Today’s post is being brought to you by one of my awesome Creative Team members, Inga! She’s going to share a peek into how she organizes her digital scrapbooking supplies using Adobe Bridge, so take it away, Inga!

Hello fellow digi scrappers!

Today I will tell you a  little bit about how I use Adobe Bridge to organise my scrapbooking supplies.

Why I Decided to Use Adobe Bridge

There was that day, you know. That day when I realised, my titles needed to get better and that maybe it would help, if I could find my alphas. And not just use the same three over and over again, because I liked them and knew where they were. Or that questions like “Which summer kit would match those photos?” or “Didn’t I have a perfect mask set for this?” shouldn’t be that hard to answer.

It was the day, I knew I needed to think about organising my supplies.

For a few glorious seconds I thought, I might tag everything. Oh envision the joy of scrapping, if I can just search for a red and pink patterned paper and all options appear! Then reality kicked back in and I reminded myself, that a) I rarely search for these things, but scrap mostly with kits. And that b) I would fail miserably. Tagging all of my existing stuff like that and keeping it up? Hahaha, good joke.

So I started with the most important thing, if you want to get organised. I figured out, what I really wanted and what would really be helpful for me. Working full time and juggling family activities and household work at the weekends, my free time is precious. I definitely didn’t want to spend as much time organising as scrapping. Also, I have a folder system that is ok for saving things, just not great for browsing through them (it’s pretty much shop/designer/kit). With that in mind I came up with a list of what I wanted and what I expected from the program, I intended to use for it:

  1. I scrap with kits mostly, so I just want to be able to browse all my kits in one place easily
  2. I want to find alpha options by seeing all my alphas
  3. Same goes for my templates
  4. I need a certain category for helpful little extras like masks, frame packs, date stamps, tape sets ect.
  5. The program needs to show previews of PSD files
  6. I want to add to my categories by drag and drop, so I can assemble my categories quickly
  7. It needs to be fairly simple
  8. If possible, it should work well with Photoshop
  9. I don’t really want to spend money on it.

 
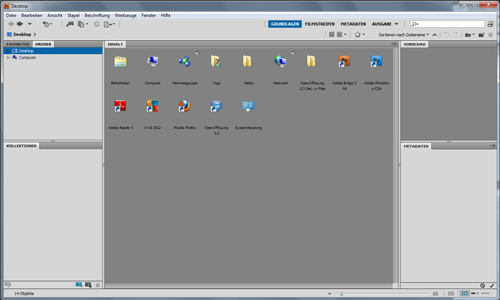
I looked around a bit, before I realised I already own the right program for me. If you buy Adobe Photoshop, it will usually come with a program called Adobe Bridge. It’s an image browser/organiser that works just great with Photoshop.

Inga Image1

In fact, you can directly start the program from the PS work space. I found that to be a nice little bonus, that I do not have to swich to my desktop or program list. If you go the Datei/File menu in PS, you will see an option called In Bridge suchen/Search with Bridge. If you click it, Bridge will open.

Btw, I apologize for all the German screen shots. I will always give you button and menu names in the way German/English translation. I’m sure you will be able to figure them out in the English version, even if my translation isn’t exact.

Inga Image2

How Adobe Bridge Works for My Scrapbooking Needs

Right, so how did Bridge work with my scrapbooking needs? From my list I knew, I just needed very few categories: Kits and element or paper packs,  alphas, templates, quickpages and extras. All of this categories I wanted to browse very quick or very detailed, depending on my purposes.

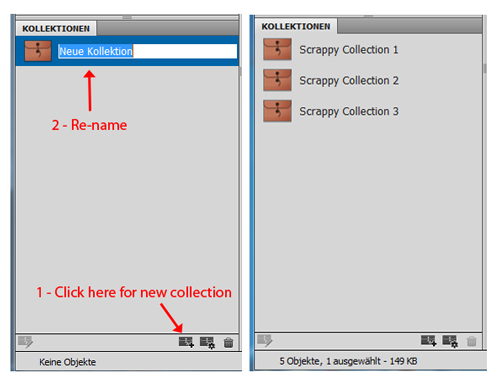
In Bridge the easiest way to achieve that, are the so called Kollektionen/Collections. The collections allow you to quickly assemble certain files into themed collections. Perfect! I quickly set up my desired collections. For this tutorial I have done some sample collections.

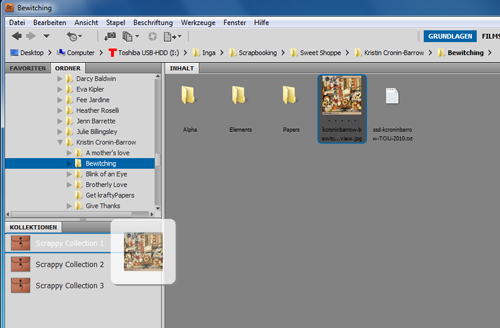
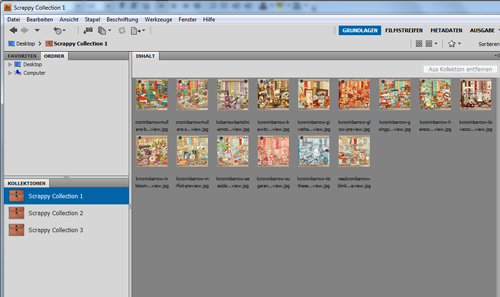
Now it was time to fill them. This is done super easy. You just use the browsing function, click trough your folders and drag and drop the files into the collection. A big help with browsing was the “back” button in the top corner. Here I added previews of all my kits by the talented Kristin Cronin-Barrow to “Scrappy Collection 1”.

Inga Image3

Inga Image4

Back then I systematically browsed through my folders and added previews. The only exception was my alphas, where I added an example letter. I originally thought it would take me weeks to get the initial organising done, but all it took was maybe four evenings with one to two hours each.

The collections allow me to scan my stash very efficiently now. If I’m not sure which kit to use, I will just have a look at all my kits in one place. Same for alphas, templates or quickpages.

You can of course make collections for specific scrapping needs like “Christmas kits” or “Designer XYZ”. However, you cannot make sub-collections to an existing collection. So this approach is only practical, if you want a very basic and simple organising structure. As I wanted to keep my organising a reasonable minimum, it worked great for me.

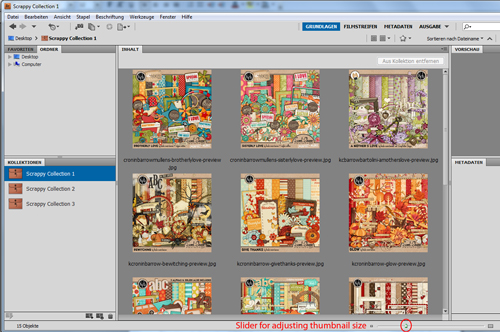
You have many different viewing modes, from full screen previews to lists, thumbnails or the very fun Überprüfungsmodus/Review mode. I mostly use thumbnails for quick browsing, adjusting the size of them to my needs by a simple slider at the bottom.

Inga Image5

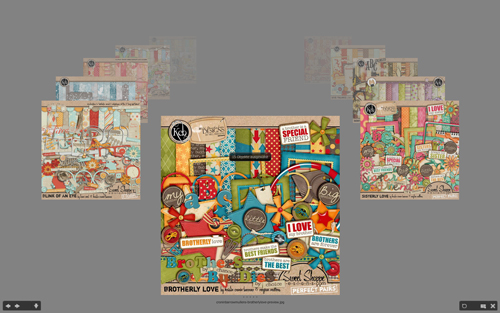
Überprüfungsmodus/Review mode is great for relaxed browsing through all the images. I use it a lot, when I want to look at kit options and don’t have anything specific in mind. It will show you each image in a sort of gallery reel.

Inga Image6

As you can see this very simple set-up pretty much covers everything, I had on my wish list. It helped me a great deal with my scrapping, but didn’t cost me a lot of time.

Maintaining My System & Backing Up

Now, how do I keep it up?

When I download supplies, they automatically end up in my download folder. Every few days… or directly if I cannot wait to see and use them… I move them to a folder in my scrap supply folder system called “to be sorted”. I unzip them all (I use a freeware called 7-zip, but I know many prefer WinRar) and then there they sit until I do a short organising session next time. Those sessions include me putting everything nicely sorted into my folder system.

Once I’m done with that, I open Bridge and browse through the folders, adding all the new stuff to the collections. I will usually remember, if I just put something new in a certain shop or designer folder, so that doesn’t take long. Sometimes I do two sessions in one week, sometimes one in a month. It depends on how much I buy, how motivated I am and when the filling up “to be sorted” folder starts to annoy me. I never tried to establish any kind of schedule for it. I’m all about guild-free scrapping and organising.

But how about back-up? To make sure, my collections won’t get lost when I back up and/or re-install my system, I use the Stichwörter/Key words option. They are practically tags written into the meta data of the image files. But as I don’t want anybody to hurt themselves by falling asleep and off their chair (if that hasn’t happened already…), I will just tell you, that there is an option. If you wish to use Bridge for your organising, please feel free to contact me about it!

This is my organising system wrapped up. I hope it might give you some useful ideas for your own way of getting organised. Bridge does have a ton more options, that are great for photos. Things like filters, more complex keywords/tags, rating with a star system, doing batch re-naming, using zoom windows in review mode as well as options, that work with Adobe Camera Raw. I haven’t tried it out much, but I will likely do so in the future, when I start using Bridge for my photos, too. But so far I just love using it as a slightly abused scrap supplies organiser.

Inga

Thanks so much Inga! Awesome tips! I haven’t done much with Adobe Bridge but I’ll definitely be checking it out! Have a question for Inga? Feel free to ask it in the comments section of this post.

Can diabetes cause erectile dysfunction

POSTED IN The Great Computer Spring Clean-a-thon 2012, Tips from Team Awesome, Digital Scrapbooking

Downloads, Documents & NettioDesigns: The Great Computer Spring Clean-a-Thon Day 1

POSTED ON March 20, 2012 IN The Great Computer Spring Clean-a-thon 2012

Woohoo, Day 1 of the 2nd Annual Great Computer Spring Clean-a-thon is in the bag and I’m feeling good! And even more excited to see so many of you jumping on board with this crazy idea! It’s been so fun to read all your goals!

I am happy to report that I managed to cross not 1 but 2 goals off my Computer Spring Clean-a-thon list for this week. Which of course means I’m only left with the biggest most daunting task but uh, we’ll just forget about that for right now, shall we?

To recap, here are my goals for this year’s Computer Spring Clean-a-thon:

1) Clean out my Downloads, Documents and Current Projects folders. I set these up last year and have mostly kept them updated so they should only need a little work.

2) Reorganize my NettioDesigns folder. This folder is a hot mess right now. And not in a template-y goodness kind of way.

3) Get started organizing my photos in Aperture. This is a major major task and definitely not one I will complete this week but I am going to get started on it and see what I can get done. Started is better than nothing, right?

Which means I’ve managed to clean out my Downloads, Documents & Current Projects folders as well as the NettioDesigns folder. Oh and just because I was on an organizing roll, I also did a little cleaning out of my DigiScrapping folder too. Woohoo, go me!

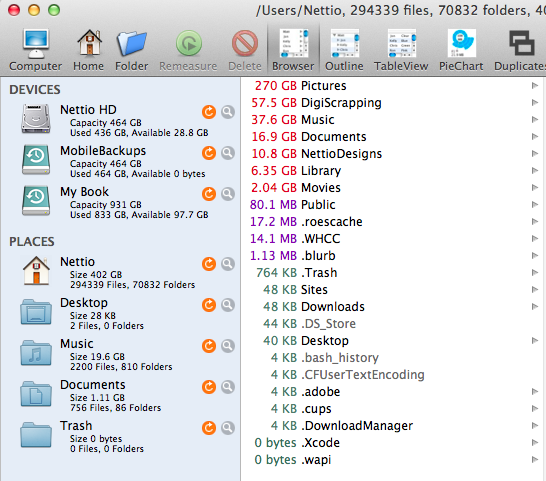
But before we get into the details of all that, I think it’s best we start with some numbers so you can see just how bad things have gotten for my poor compy lately. I mentioned he was in need of a major diet and I definitely wasn’t kidding…

Nettio cleanathon start

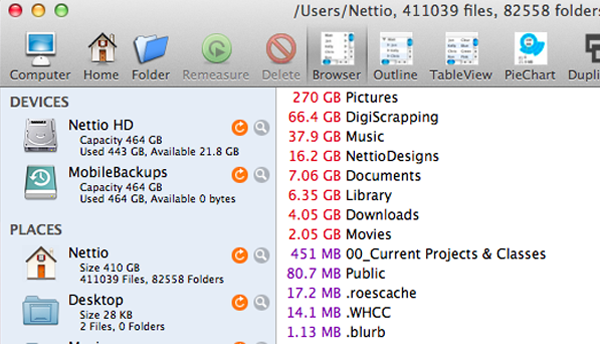
This is the current breakdown of the space available on my 500GB hard drive and no, that 270GB(!!) of photos is not a misprint. There’s a reason photos are number 3 on my goal list for this week – it’s bad!

But the key thing here is really the amount of space, or lack of space really, available on my poor compy’s bloated hard drive. Of the 464GB total on my hard drive, only 21.8 GB of that is free. (Random nerd fact: 464GB equals the true amount of space on a 500GB hard drive. The 500GB number only exists in advertising.) Which might sound like a lot but in reality works out to around 4.5% but considering 10% tends to be the absolute minimum to keep things running nice and error free, clearly I’m in “Danger, Will Robinson!” territory right now.

Clearly a major spring cleaning was long over due.

Now if you’re wondering why I don’t just move the photos off my laptop hard drive and onto an external hard drive, it’s partly personal preference but there’s two main reasons for me:

1) I’ve found internal hard drives to be a bit more reliable than EHD (they tend to give you more warning when things start going south).

2) Since I work on a laptop and have an online backup that runs continuously, I prefer not to have an EHD plugged in all the time. I do have one I use for scrapbooking supplies but I care much more about my photos than those supplies so for now this works for me. Or it does when I actually delete photos on a consistent basis.

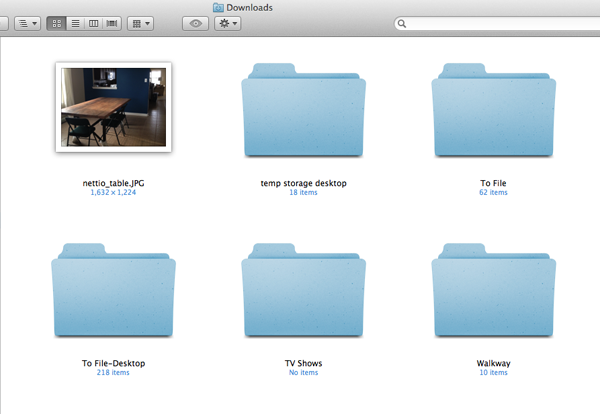
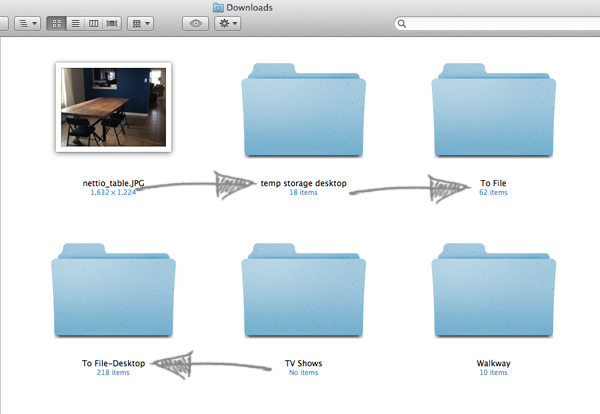
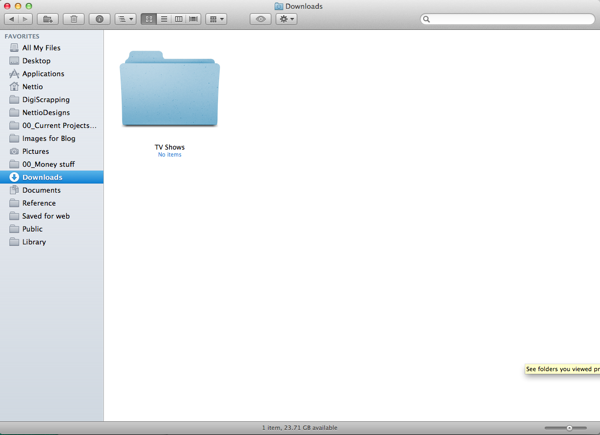
But photos will be an update for later this week so for now let’s get back to the Downloads folder which started out looking like this:

Nettio downloads before

Which yes, if you look closely, in fact is home to not 1 or 2 but 3 different “To File” folders.


Oops.

So I cleaned all those out and eventually ended up with this. Ah, free space…much better I think!

Nettio downloads after

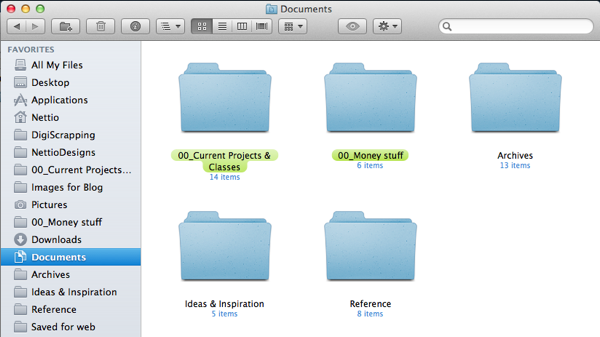
Then it was on to the Documents folder which luckily was still in pretty good shape from last year’s Computer Spring Clean-a-thon.

Nettio documents before

Mostly it involved cleaning out the Current Projects folder which I would show you but uh, there’s top secret info in there.

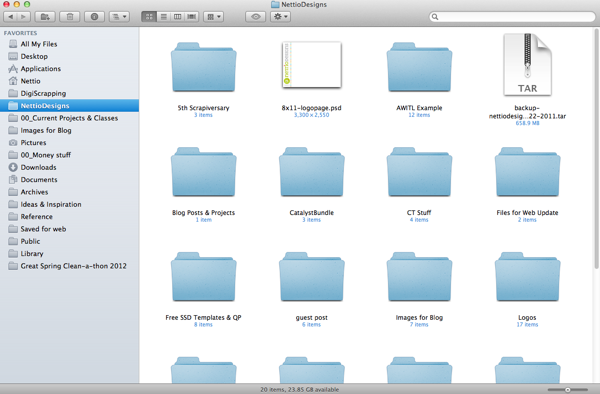
Since these two tasks proved easier than expected, I decided to move on to the NettioDesigns folder which was a big old mess of randomness, partly due to files being moved from other places and partly because it was a mess already.

Nettio nettiodesigns before

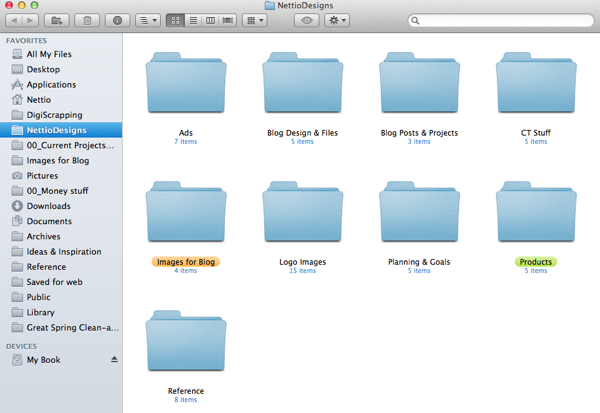
But now it’s much more simplified and organized…

Nettio nettiodesigns after

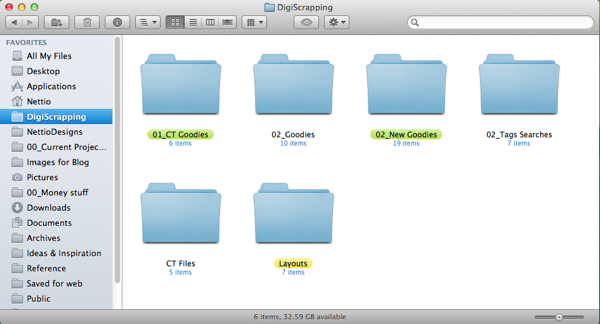
My final task was going through the Goodies folder in my DigiScrapping folder and deleting any old kits and products I didn’t want anymore. I’m pretty good about keeping up with this through out the year so there wasn’t much but hey, every bit counts, right?

Nettio digiscrap

So at the end of Day 1, how much hard drive space did I manage to free up? Well, let’s see…

Nettio cleanathonday1 after

I managed to go from 21.8GB to 28.8GB of free space for a difference of…7 pounds, er 7 GB! Which puts my total free space at over 6%. Not exactly mind-blowing but definitely a step in the right direction! (Anyone else picturing The Biggest Loser right now? I’m totally imagining my compy up on their crazy scale waiting to find out his weekly weight loss, haha.)

I’ll be back later this week with another update but for now I’d love to hear how Day 1 went for you! Any good progress to report?

How Can Customers Lower Their Remedy Costs

POSTED IN The Great Computer Spring Clean-a-thon 2012

The Key to Matching Your Organizing Style to Your Scrapbooking Style

POSTED ON March 20, 2012 IN Memory Keeping, The Great Computer Spring Clean-a-thon 2012

Welcome to the 2nd Annual Great Computer Spring Clean-a-thon Day 2! If you’re just popping in for the first time, be sure to check out Monday’s post explaining the details of this week-long organizing event! I’ll be back this afternoon to share my Day 1 progress but in the meantime I wanted to share some tips about the importance of matching your organizing style to your scrapbooking style.

As scrapbookers, we all understand this idea of finding your scrapbooking style – that common thread that runs through each of your layouts and makes them “yours”. But have you ever stopped to think about how your scrapbooking style relates to your organizing style?

I can tell you as a newbie scrapbooker, I never did. And as a result, I wasted a LOT of time following the organizing advice of much more established scrapbookers than I, building systems that didn’t mesh with the way I scrapped. Even though I felt like my supplies were technically “organized,” there were times when I felt like I couldn’t find anything! But what I learned overtime was it wasn’t that their advice or system was bad or that I had done anything wrong, it’s just what they were doing wasn’t right for me.

The Key to Organizing Anything

And ultimately that’s the key to organizing anything. It’s not about finding the perfect solution or system, it’s about finding the perfect solution or system for you.

Easy peasy, right?

I know, you’re probably thinking, yeah right Lynnette, if it was so easy we’d all be organizing gurus by now.

So perhaps easy isn’t the right word, but there is a simple key to organizing anything and that is this:

Before you begin organizing anything, whether it be scrapbooking supplies, photos or anything else, you need to first understand HOW you actually LOOK for those items. What goes through your head in that moment?

Because once you understand how you look for things, you can then tailor your organizing system to help you find things in a way that matches how your brain works.

How to Match Your Organizing Style to Your Scrapbooking Style

Let’s take for example scrapbooking. When you’re working on a layout and find yourself in need of something, say an element, what runs through your head?

For me it’s two things:

1) The basic type of element – ex: a flower

2) A color – ex: red

Essentially, I’ll think, I would really love to add a red flower right here.

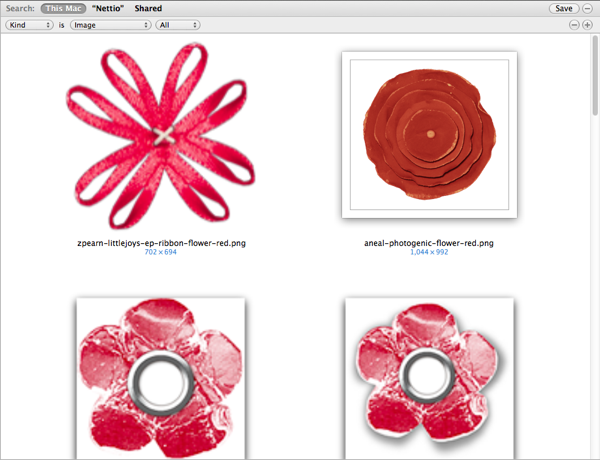
Which means for me, organizing my elements into fairly broad categories like flowers, ribbons, etc and then tagging those elements by color so I can narrow them down is probably the way to go. Since I don’t ever think, say, I need a red gingham ribbon or I need a piece of twine not string, it’s probably not the best use of my time organize my elements to that level of detail.

Nettio organizingelements

The Key Questions to Ask Yourself Before Organizing

But of course we all think about things differently when it comes to our creative process, so how can you determine how the key to matching your organizing style to your scrapbooking style?

Well here’s a couple of questions to ask yourself:

  • Are you a kit scrapbooker or do you like to mix and match?
  • Do you look for supplies by designer or store?
  • Do you think about color? Style? Pattern?

The more detailed you can get about HOW you look for things, the easier it’ll be to know how to organize your files and more importantly how detailed to get in your organizing. No point tagging all your files when you only scrap from kits, right?

And, the same key to organizing holds true for your photos. Ask yourself, what are the most common types of photos you look for?

For me it tends to be people, seasons and themes because of my CT requirements, but for you it might be something else. Maybe you’re big on chronology or maybe you’re not. Do you think in terms of seasons or months/years?

Choose a Style That Works For You

Ultimately, what it comes down to is this: there is no right or wrong way to organize your supplies.

Yes, you heard that right.

There is no right or wrong way to organize your supplies. There is only a right or wrong way to organize your supplies for YOU. And the more attention you pay to your scrapbooking style and how your brain works when looking for things, the better and more efficient your organizing system will be.

Well, I hope you found today’s organizing tip helpful! I’d love to hear your thoughts about matching your organizing style to your scrapbooking style so feel free to share in the comments.

How Can Customers Lower Their Remedy Costs

POSTED IN Memory Keeping, The Great Computer Spring Clean-a-thon 2012, Digital Scrapbooking, Tips & Tricks

  • 1
  • 2
  • Next Page »
HI I'M LYNNETTE. Graphic designer, tech-lovin’ memory keeper and lover of bold colors & patterns, good food and the great outdoors. Here at Nettio Designs, I share a behind the scenes peek at my own creative & life adventures. Read more...

KICKSTART YOUR CREATIVITY


By popular demand, photo book templates are back! Grab all three sets in the shop.
ADVENTURES IN ORGANIZING
GOAL-SETTING
MEMORY KEEPING
PROJECT LOVE
LIFE ADVENTURES
TIPS & TRICKS
BEHIND THE SCENES

POPULAR PROJECTS

TO SEE ALL MY PROJECTS, CLICK HERE

MUST READ POSTS

  • WHY EVERY SCRAPPER SHOULD SCRAP A FAVES PAGE
  • HOW TO CREATE A SCRAP-WORTHY MAP WITH PHOTOSHOP
  • REMEMBERING THE IMPORTANCE OF TELLING YOUR STORY
  • WHAT DOES IT MEAN TO CREATIVELY CAPTURE YOUR LIFE ADVENTURES?
  • BROWSE BY CATEGORY

    BROWSE THE ARCHIVES

    GET IT FOR FREE

    Copyright © 2025 ·Dynamik Website Builder · Genesis Framework by StudioPress · WordPress · Log in