Nettio Designs

Design + Creativity + Adventure = LOVE

  • HOME
  • JOIN THE 2023 MONTHLY FAVES
  • THE SHOP
  • ABOUT
  • CONTACT
You are here: Home / Archives for Memory Keeping

Scrapbook Saturday 03 | How I Use the History Snapshot Tool In My Creative Process

POSTED ON January 31, 2015 IN Memory Keeping, Scrapbook Saturday

Digital Scrapbook Layout by Lynnette Penacho for Scrapbook Saturday - How I Use the History Snapshot Tool | NettioDesigns

As part of my word OPEN this year, I’m focusing on being more of an open book about why I do what I do when it comes to my creative adventures and design process. So to kick things off, I’ve started a new semi-regular feature called Scrapbook Saturday where each week I’ll share my most recent scrapbooking layouts as well as a little bit of my thought process behind those pages.

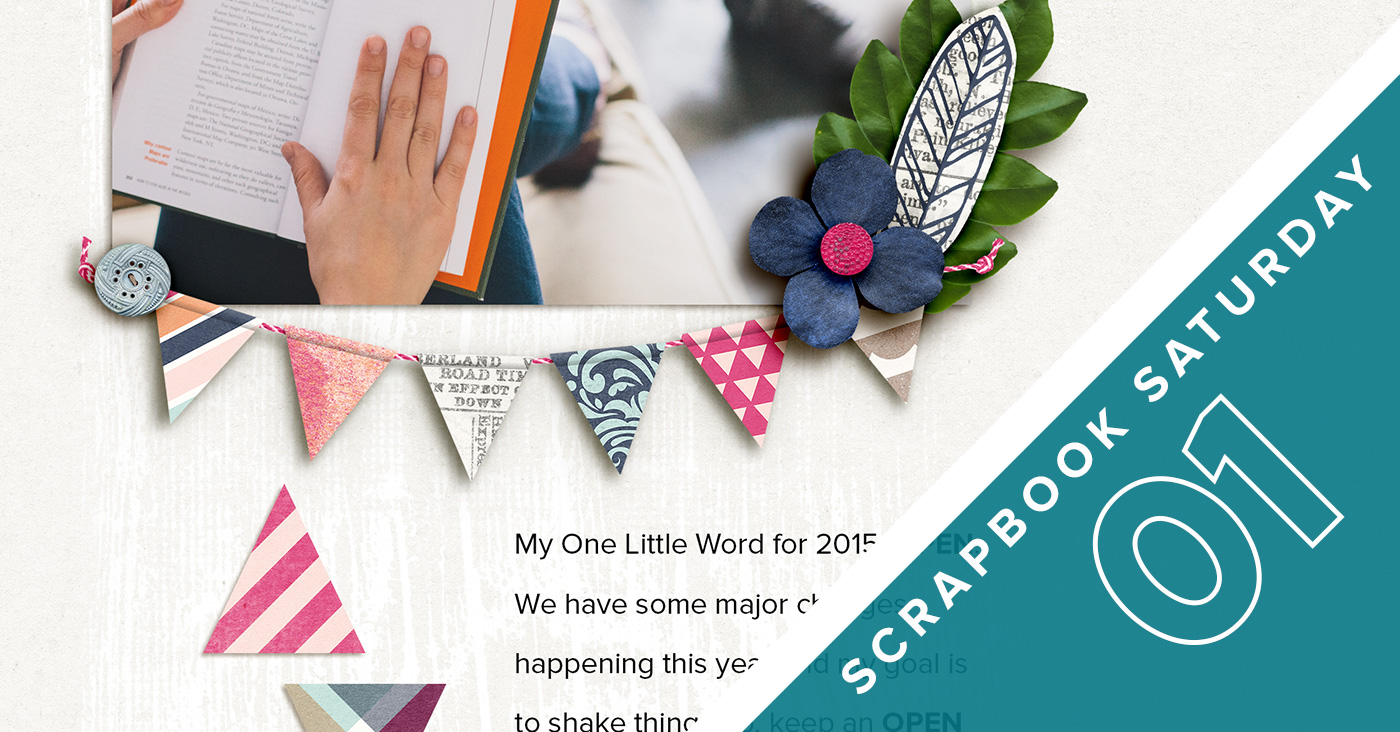
This week’s layout is a layout I created for the Sweet Shoppe Designs Bingo challenge. If you haven’t checked out the new Bingo challenge format yet, you totally should! It’s so fun and easy and to be honest, it’s my favorite format we’ve done…ever.

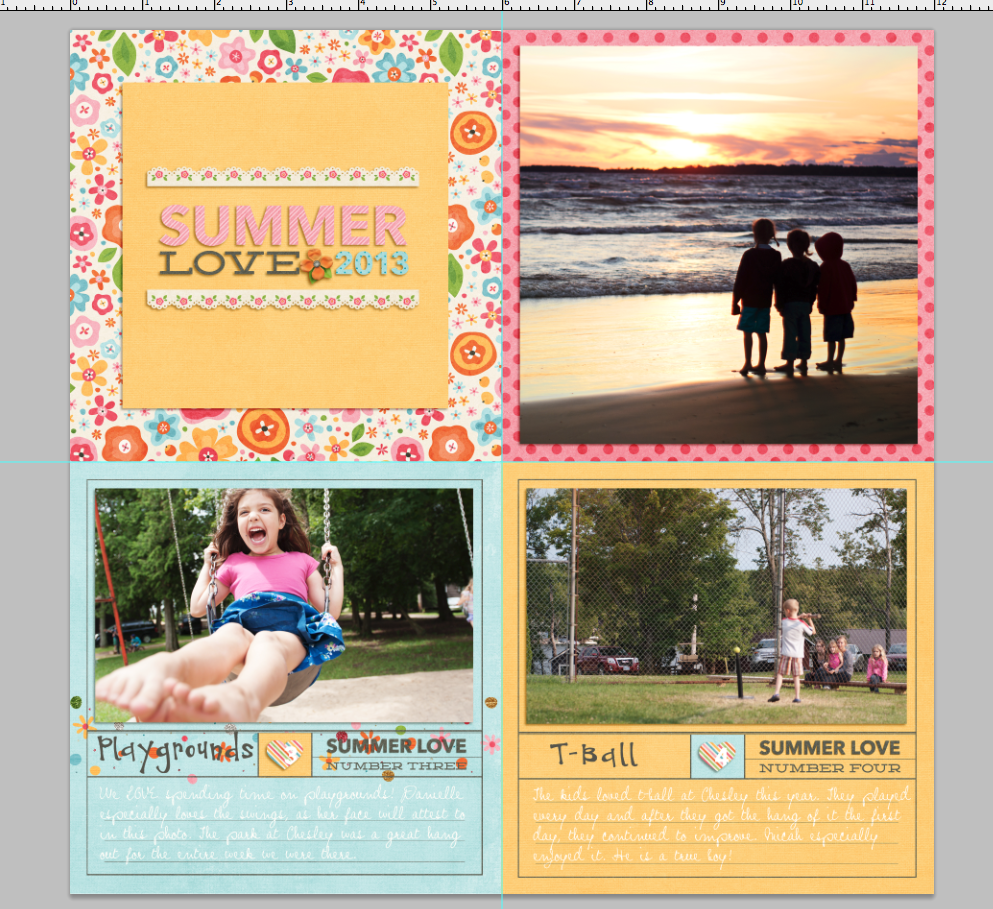
For my layout, I chose the challenge “Make 1/3 of your page a really big title.” I love bold type and typography but it’s not something I often do on my layouts so I thought it would be fun to give it a shot. Not gonna lie, I feel like my design style has been a bit all over the place so far this year but I’m so in love with how this layout turned out that I don’t even care!

Digital Scrapbook Layout by Lynnette Penacho for Scrapbook Saturday - How I Use the History Snapshot Tool | NettioDesigns

Credits: To the Moon and Back by Kristin Cronin-Barrow; Every day: Cherish Hearts by Lauren Grier. Font is Lulo Outline. Photo by Captured Simplicity.

The idea for this layout was heavily inspired by Kristin’s new To the Moon & Back kit. As soon as I saw this kit I just had to use it. I mean, blues, greens and golds? Oh yeah, sign me up.

The design for this layout all started with the title which I took literally from the title of the kit. The large background photo was actually a happy accident. I dragged my black & white photo onto my canvas with the intention of scaling it down to fit within the smaller frame but as soon as I saw it behind the type, I knew I wanted to figure out a way to make it work.

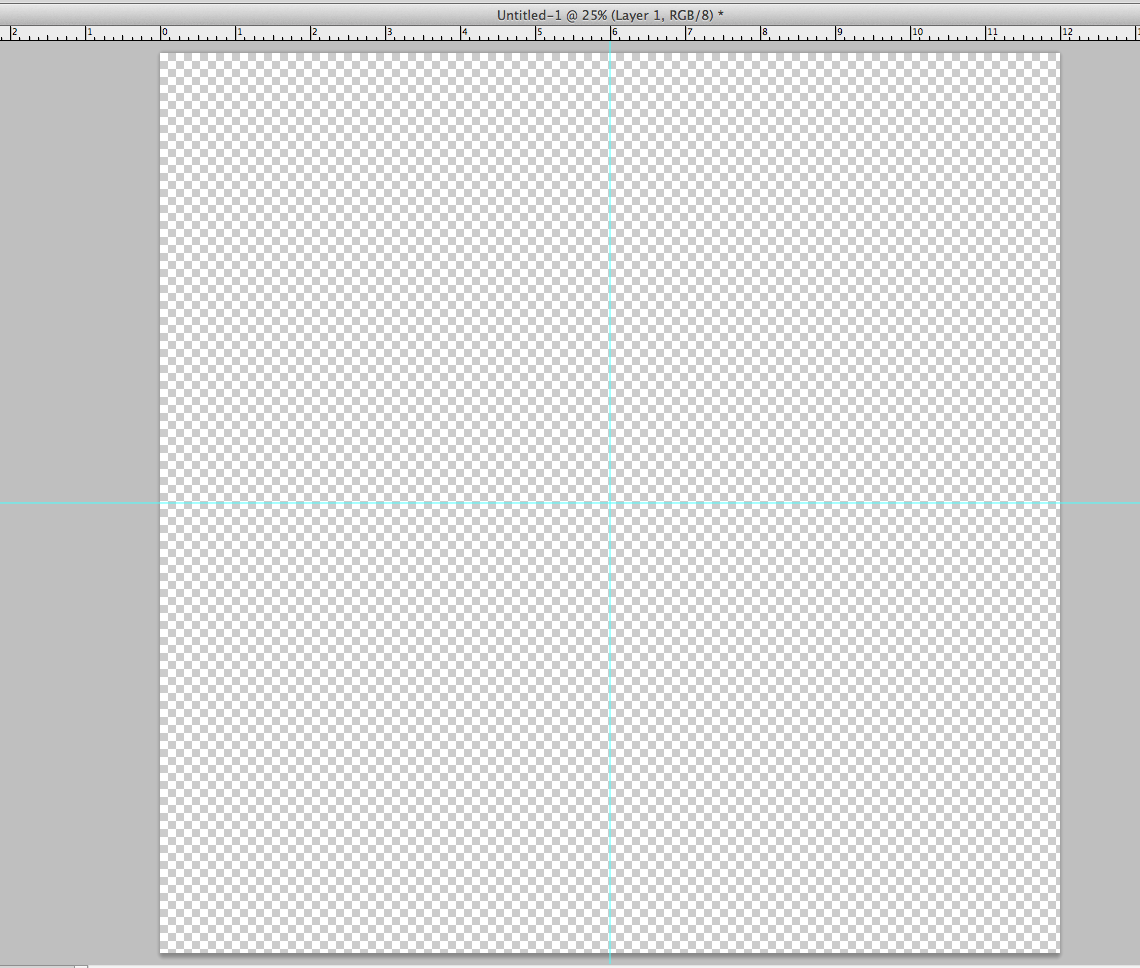
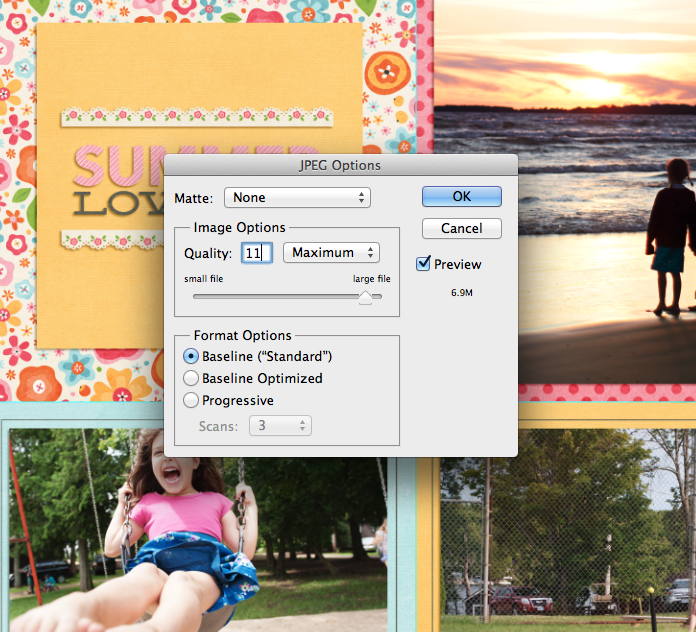
Since I feel like the design process for a layout can sometimes feel a bit magical, like “Poof! Blank page to amazing layout!”, I thought it’d be fun to break down for you how this layout came together courtesy of one of my most used Photoshop tools, the History Snapshot.

If you’ve never used the History Snapshot tool, you can find it in the History panel (Window>History) – it’s the little icon at the bottom of the panel that looks like a camera. When you click on it, it saves a snapshot of your document at that point in time, layers and all.

As I am the type of scrapbooker who likes to tweak and make changes until things are just right, I use the snapshot tool a lot to change things up and then toggle back and forth between snapshots to decide what option I like best.

Digital Scrapbook Layout by Lynnette Penacho for Scrapbook Saturday - How I Use the History Snapshot Tool | NettioDesigns

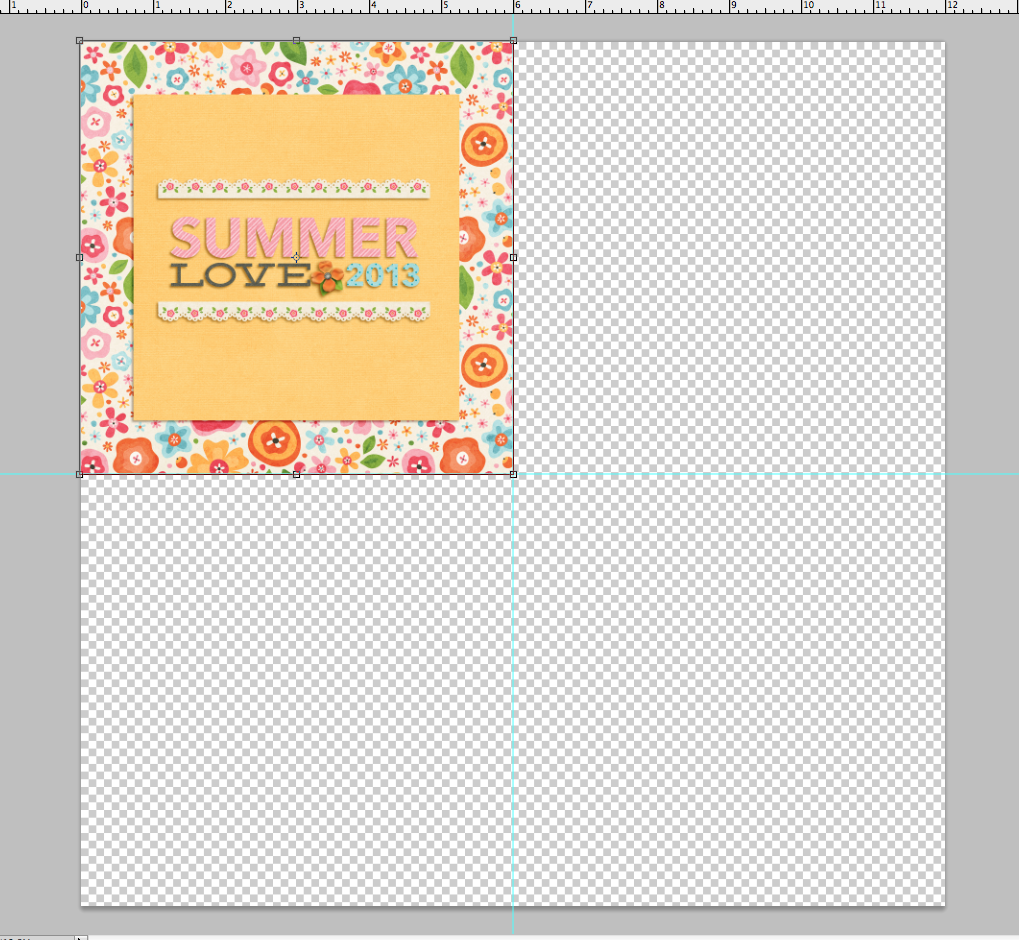
For this layout I took 19 snapshots, 16 of which are shown here because in the others, the changes were too subtle to show up in the scaled down format.

As you can see I started by playing around with the type and the hearts, adding them on, off and then back on again. There’s a big jump in the second row because I don’t tend to take snapshots when things are flowing and I’m happy with where the layout is headed. I started taking snapshots again when I started playing around with what I wanted to do with the large photo – trying out different blend modes and papers until I had a look I was happy with. Then I added papers and embellishments until I had a design I liked.

If it looks like the bottom row is mostly the same, that’s because the only thing I was changing at that point was the placement of the blue flower and leaf. That’s not unusual for me – often the changes I debate over the most are the small details. On more than one occasion I’ve switched between two snapshots and asked Adam which one he likes better and he’ll ask “What changed?” haha.

After nine years, I’ve accepted this as part of my creative process but if you pride yourself on speed, it’d probably drive you nuts! I think it helps that I’m more focused on the creative side of scrapbooking than I am on scrapbooking all my photos or creating 30+ layouts every month. For me the design process is my favorite part so I’m happy to take the time to get it right.

What about you: are you a fan of the History Snapshot? Do you have any of your own scrapbooking quirks?

Disclaimer: All Sweet Shoppe Designs products were given to me free of charge as part of my Sweet Shoppe Creative Team responsibilities. All thoughts and opinions are my own.

Want more scrapbooking inspiration? Check out all my Scrapbook Saturday posts here. 

Fraudulent Drugs Are A Huge Global Problem

POSTED IN Memory Keeping, Scrapbook Saturday

Scrapbook Saturday 02 | How To Use a Template as an Embellishment

POSTED ON January 24, 2015 IN Memory Keeping, Scrapbook Saturday

Scrapbook Saturday 02 Scaling Down a Template | NettioDesigns

As part of my word OPEN this year, I’m focusing on being more of an open book about why I do what I do when it comes to my creative adventures and design process. So to kick things off, I’ve started a new semi-regular feature called Scrapbook Saturday where each week I’ll share my most recent scrapbooking layouts as well as a little bit of my thought process behind those pages.

This week was an interesting week as Adam traveled for work which always means two things: I lose my pre-baby morning work hours and I stay up way too late in the evenings. Thursday night I decided to put my late night adventures to good use by scrapbooking this layout using Ru (Studio Basic Designs) & Krystal’s new kit, Be Mine 4 Ever.

Digital Scrapbooking Layout by NettioDesigns | Scrapbook Saturday 02 Scaling Down a Template

Credits: Be Mine 4 Ever by Studio Basic & Krystal Hartley; Single 81 – I Heart U 7 by Cindy Schneider; Green leaves from Free Spirit by Shawna Clingerman; Straight Line Stitched White No. 2 by Anna Apnes. Photo by Captured Simplicity.

A couple of fun facts about this layout…

1) I used a template again…sort of.

As I’ve mentioned before, I’m generally not a big template user outside of my own templates, because my brain follows a certain pattern when I scrapbook and using another designer’s template makes me feel like I’m trying to read someone else’s mind as I scrap.

But as soon as I saw this new template from Cindy, I instantly knew I wanted to scale it down and use it as an accent on my layout rather than the foundation of my layout – and I love how it turned out!

I built the entire design of this layout off the scaled down template. For the photo, I duplicated the paper mat from the template so my photo would be the same size and then centered both on the page. Then because I’m always looking for more ways to add patterned papers to my layout, I used the shape tool and two of my own scallops shapes to create my own super patterned paper background.

I didn’t realize it at the time but the LOVE template was actually made up of a bunch of paper layers (each triangle section is it’s own paper shape) so I could have easily filled it with patterned paper and used a solid background instead. But I’m happy with how this turned out.

2) Where are the ribbons?

One surprise I had as I was creating this layout was when I discovered the Be Mine 4 Ever kit didn’t include any ribbons. No ribbons in a girly Valentine’s day kit? That kind of threw me for a loop. I made it work with a paper strip and some additional stitching but I’m still missing the extra subtle texture that ribbons add to the design. It helps balance all the patterned paper and I feel like I’m missing that here.

Since this is a creative team layout, I did my best to stick with what’s in the kit (which is why I didn’t pull any ribbons from another kit) but I did end up grabbing a green leaf from Shawna’s Free Spirit kit (which I used last week) because the greenery in my photo was standing out like a sore thumb. Once I added the two leaves, the whole layout finally came together – sometimes it’s the details that make the biggest difference.

3) The photo/word strip combo cracks me up.

Do you ever have moments where you don’t notice something about your layout until you’ve uploaded it to a gallery? And then you have that internal debate with yourself whether to fix it and reupload or just go with it?

That’s what happened to me when I noticed the irony between the “happiness starts here” word strip and the look on Ryan’s face. If that’s the look of happiness, I’d hate to see what his unhappy face would look like, haha. To be fair he was cold and a bit unsure about the whole photo taking thing rather than unhappy but the combo of the two together on this layout totally cracks me up.

Well that’s it from me for this second installment of Scrapbook Saturday. What have you been up to this week? Did anything that happened this week surprise you?


Disclaimer: All Sweet Shoppe Designs products were given to me free of charge as part of my Sweet Shoppe Creative Team responsibilities. All thoughts and opinions are my own.

In need of more scrapbooking inspiration? Find all my Scrapbook Saturday posts here. 

How Can Customers Lower Their Remedy Costs

POSTED IN Memory Keeping, Scrapbook Saturday

Scrapbook Saturday 01 | Welcoming In the New Year

POSTED ON January 17, 2015 IN Memory Keeping, Scrapbook Saturday

nettiodesigns_Scrapbook-Saturday-01-header-small

As part of my word OPEN this year, I’m focusing on being more of an open book about why I do what I do when it comes to my creative adventures. So to kick that off, I’ve decided to start a new semi-regular feature called Scrapbook Saturday where each week I’ll share my most recent scrapbooking layouts as well as a little bit of my thought process behind those pages.

Since I’m not the most prolific scrapbooker in the world (slow would be a better description, haha), I can’t promise there will be a post every Saturday but I am hoping that sharing more layouts like this will encourage me to scrapbook more. And since a large chunk of the layouts I do are for Sweet Shoppe Designs New Releases, if you check out the post on Saturday, there’s a good chance at least some of the products I use will still be on sale in case there’s something you just have to have.

Ok, let’s get to this first installment of Scrapbook Saturday!

This week I have two layouts for you, both themed around the start of the new year. I admit, I’ve been feeling a little rusty with my scrapbooking so far this year, partly I think because I’m still shaking off the holiday scrapbooking dust and partly because, since having my son Ryan last year, I still haven’t figured out exactly the direction I want to go with my scrapbooking.

What I do find interesting about these two layouts is that they ended up being much more similar than I’d intended. Both feature stock photos (from Death to Stock Photo) and both feature white backgrounds that give them a brighter/fresher more modern look then my usual style. That’s a style I’ve been drawn to a lot lately (thanks to Pinterest) so I’m excited to play around with it more this year.

Layout No. 1 | Thoughts On the New Year

nettio_201501-NewYear-nd-1400

For my first layout of 2015, I decided to scrapbook about my love for the start of the new year. Even though it’s true it’s technically just another day, I love that feeling of starting fresh each year.

When I pictured this layout in my head, I knew I wanted to use the sparkly gold alpha from Lauren Grier but I was feeling a little stuck when it came to the rest of the design until I saw Brook’s ABC’s of Me template and realized I could use the paper blocks from the template as my background.

In general, I’m not a huge template user (outside of my own) but pulling out individual pieces of templates is one of my favorite ways to use digital scrapbooking templates because it saves me time and gives me a jumping off point for the rest of the layout without tying me down to a specific design.

Credits: Happiness Is: New Beginnings by Tickled Pink Studio and Meghan Mullens; All A Glitter Alpha by Lauren Grier; Doubles 01 – ABCs of Me by Brook Magee (paper squares only). Photo from Death to Stock Photo. Font is Proxima Nova.

Layout No. 2 | One Little Word: OPEN

nettio_201502-Open-nd-1400-new

For my second layout I chose to tell the story behind my One Little Word for the year, OPEN.

I initially thought about pulling the text directly from this post, but since it was long and I scrapbook 8×8 it felt like to much to include on one layout. So instead I decided to give a brief overview of why I chose my word and then used the design to reinforce the feeling of “open” by using white space, a white background and a more open font (Lulo Clean Outline) as my title.

The layout itself was feeling a little sparse to me at first so I added some paper triangles (my current geometric love) down one side of the design, because you know, my paper lovin’ self must have patterned papers on the layout.  I also added some really subtle white paint underneath the design to add some dimension.

The paint was something I toyed with for quite awhile, trying it on a darker blue background first, then with a gradient to make it less in your face, before finally settling on plain white paint on the white background. This for me is when the History panel in Photoshop always comes into play because I’ll take snapshots of different ideas then cycle through them until I have one that feels right. It’s one of the benefits of digital scrapbooking for sure!

Credits: Free Spirit by Shawna Clingerman. Photo from Death to Stock Photo. Fonts are Lulo Clean Outline and Proxima Nova.

And that’s it from me this week! What about you: what have you been working on lately? Have a question? Ask it in the comments below.

Disclaimer: All Sweet Shoppe Designs products were given to me free of charge as part of my Sweet Shoppe Creative Team responsibilities. All thoughts and opinions are my own.

In need of more scrapbooking inspiration? Find all my Scrapbook Saturday posts here.

Benefits Of Using Canadian Pharmacy

POSTED IN Memory Keeping, Scrapbook Saturday

Holiday Gift Guide For Tech-Lovin’ Memory Keepers & Digital Scrapbookers

POSTED ON December 17, 2014 IN Memory Keeping

I don’t know about you, but I’m pretty sure 90% of my family and friends have no clue what I’m talking about when it comes to digital scrapbooking. Sure, most of the time they know it involves a computer and they occasionally see the end result – but how exactly I get from A to B? Not so much.

Which makes this tricky this time of year when it comes to gift giving and list making.

So I thought I’d do a round up of some of my favorite things to give those perplexed gift-givers in your life a helping hand. Everything on this list is either something I own or something I wish I owned, so you know it’s good stuff.

nettiodesigns_Holiday-Gift-Guide-Digital-Scrapbookers


  1. Totally Rad RabLab | Because editing photos should be a snap
  2. Black Rapid Rapid Strap | Because camera straps shouldn’t get in the way
  3. Photojojo iPhone lenses | Because you use your phone more than your DSLR
  4. Kelly Moore Camera Bag | Because you want to carry your DSLR in style
  5. Mobi EyeFi Card | Because uploading photos instantly is awesome
  6. Joby Gorillapod | Because you deserve to be in your photos too
  7. Seagate External Harddrive | Because you love all your digiscrap goodies
  8. Silhouette Cameo | Because hybrid scrapbooking is the way of the future
  9. Oh Snap! Print | Because your scrap space deserves to be pretty
  10. Instax Printer | Because instant mini prints are fun
  11. Persnickety Prints | Because your layouts deserve to be in an album
  12. Spyder 4 Express | Because what you see should match what you get
  13. AdoramaPix Gift Card | Because lay-flat photo books are awesome

Can I take Levitra if I am taking other remedies at the same time

POSTED IN Memory Keeping

Summer Love Mini Course | Printing Your Summer Love Mini Album

POSTED ON July 30, 2013 IN Guest Posts, Summer Love 2013 Mini Course, Tips from Team Awesome

summerlovemini-logoWe’re nearing the end of our Summer Love Mini Course which means it’s time to start thinking about finishing touches, like printing. Today Team Awesome member Amy is sharing her tips for printing your Summer Love Mini Album. Take it away, Amy!

By now our Summer Love Mini Album is getting close to being finished which means it’s time to start thinking about on important aspect of any album: printing!

There are so many different album printing options to choose from, but the main two are printing as a bound photo book, or printing on photo paper and putting in an album. Both are great options, but it’s up to you to decide how you want to gaze upon these lovely summer memories you’ve compiled in the coming seasons and years.

Photo Book Printing

First we’ll look at some photo book options available. The Summer Love Mini templates are designed to print at 6×6 inches so it would be important to make sure the company you choose has that size available. Both AdoramaPix and Artscow offer 6×6 photobooks.

If your photobook printer of choice doesn’t offer 6×6 photobooks, 7×7 or 8×8 would also be acceptable as long as you save your layouts at the highest quality possible. You could also add a simple border to your 6×6 pages to make them 7×7 or 8×8 as well.

This site has a breakdown of the top ten photo book printing services: 2013 Best Photo Book Services. That website provides you with the links to those 10 service websites, so take a look at the comparison charts and see if there is an option or two for you there.

Two services not on that list that are still worth looking into are Blurb and Mpix. Lynnette has previously published articles sharing her experiences with both companies so be sure to check out the following helpful links:

  • It’s Blurbtastic
  • Designing a Hybrid Mini Photo Book (and printing with Mpix)
  • Video Tutorials on Creating a Photo Book and Uploading to Blurb

The Daily Digi also has a great review of 12 photobook printers here.

The only service I’ve personally tried is Blurb, and I am a happy customer so I have not seen the need to try anything else 🙂

What to Look for in a Photo Book Service

The things you want to keep an eye out for when you’re choosing a photo book service are:

  1. Good quality printing and paper options. Upgrading your paper option will cost more, but it’s usually worth it. Your pictures really pop when they are printed properly and on great paper.
  2. The ability to create a custom cover. I love my Blurb books all the more since I was in charge of the design process from start to finish, including the cover created by me in Photoshop!
  3. The ability to customize the pages yourself. Some photo books will force you to use their pre-made templates, but for printing our Summer Love Mini Album, we need to be able to upload our layouts and have them print full bleed on every page.
  4. Fair pricing. Upgrades will cost you more money, so you need to figure out what’s important to you. Also, most printing companies are based in the USA so if you live in a different country, take shipping and customs costs into effect. Sometimes this can double the cost of your photo book! Before you order, check online for coupon or promo codes that can save you some pennies, or sign up for e-mail newsletter lists and order during the next sale.

Individual Page Printing

Your other option is to print your layouts on photo paper and insert into a scrapbook. This site has a breakdown of 10 printing services: 2013 Best Scrapbook Printing Services so that is worth checking out. Lynnette uses Persnickety Prints for all her prints (her review can be found here) but I personally print all my digital layouts at my local Costco. I find that printing on glossy photo paper really bring out the detail in my photos, elements and shadows.

There are many printers to choose from, but I will show you a quick way to prepare your 6×6 Summer Love Mini Album pages on 12×12 prints ready to go for Costco (in Photoshop).

How to Print Four 6×6 Pages on One 12×12 Page at Costco

Step 1: Create a new document at 300dpi and 3600×3600 pixels or 12×12 inches.

Screen Shot 2013-07-16 at 9.59.48 PM

Step 2: Create guides at the 6 inch (or halfway) mark vertically and horizontally.  You can do this by selecting the move tool, turning your rulers on if they aren’t already (shortcut is ALT+R on PC or Command+R on a Mac) and dragging out from the rulers to reveal a blue guide line.

Screen Shot 2013-07-16 at 10.03.20 PM

Step 3: Save your layouts at .jpgs and then drag them onto your 12×12 canvas, lined up with the guides you created.

Screen Shot 2013-07-16 at 10.17.35 PM

Screen Shot 2013-07-16 at 10.25.51 PM

Step 4: Once you have four of your layouts on the canvas, save it as a .jpg. I save at the highest quality possible, which was 11 for this print since Costco will not allow uploads to their photo site over 8mb.

Screen Shot 2013-07-16 at 10.30.12 PM

Step 5: Once you have your album set up into these 12×12 .jpgs, upload them to the Costco website software and order them as 12×12 prints. Like I said, I prefer glossy, and make sure you have the border option unchecked and don’t allow them to color correct your prints. Once you pick them up (or have them shipped to you), use a paper cutter to chop them up into individual layouts and insert into the 6×6 album of your choice!

As you can see here, there are a lot of different printing options out there. I hope this helps you narrow it down a little bit. Happy Scrapping!

Thanks so much Amy! If you have any printing questions, feel free to ask them in the comments section below. And if you’re looking for ideas for binding your non-photobook printed pages, I’ll be sharing some ideas for that next Tuesday.

Coming up next…On Thursday, August 1st, Team Awesome and I will be sharing our Summer Loves No. 7 & 8 and our summer currentlys. See you then!

[catalyst_hook_box name=”summerlovesignup”]

__________________________________________________________________

Previous Summer Love Mini Course posts:

  • Summer Loves No. 3 & 4
  • Silhouette Mini Album Tutorial
  • Summer Loves No. 5 & 6

View all Summer Love Mini Course posts here.

Can diabetes cause erectile dysfunction

POSTED IN Guest Posts, Summer Love 2013 Mini Course, Tips from Team Awesome

The Joys of Moving

POSTED ON May 29, 2013 IN From the Desk of Nettio Designs

From the Desk of Nettio Designs Issue No. 14

The past two weeks my husband Adam and I have been busy moving from San Antonio, TX to Houston, TX. Being a military family, we’re certainly no strangers to moving, especially considering this was move number five in just under eight years. But despite being one of the shortest moves distance-wise we’ve done – no new states or countries involved! – this move was by far on of our craziest.

But thankfully we’ve managed to dig ourselves out from the piles and piles of boxes and now that life is feeling a bit more settled, I’m starting to get excited about our new adventure and the creative opportunities hidden within.

One of the things I love most about moving is the opportunity to start fresh with a clean slate. There are few things more inspiring for me as a memory keeper than a new home in a new city, ripe with the possibility for new adventures, photo opportunities and memories. Moving pushes me to look at everyday life with fresh eyes and even the most mundane tasks, like taking a trip to Target or cooking dinner can suddenly seem interesting when paired with a new environment.

But let’s face it, unless you’re living a modern-day nomadic lifestyle like I am, odds are you probably aren’t going to be packing up and moving every few years. So how can you take advantage of a fresh start without the hassle and stress of actually moving?

Well here are a few ideas:

1) Switch up your scrap time

If you normally scrapbook first thing in the morning, try scrapbooking at night. If you’re a night owl, try scrapbooking first thing in the morning! The change in lighting and mood may just push your pages in a fun new direction.

2) Scrapbook from a different location

Do you always scrapbook from the same exact spot in the same room of your house? For a change of pace, try switching up your scenery. If you have the luxury of a laptop, go to a crop or spend an hour scrapbooking in a coffee shop. Desktop lover? Move your computer to a new room in the house for a little bit. Even if all you do is moving from the living area to the bedroom for a day, the new view can do your creativity good.

3) Go on a vacation

Vacations are one of my personal favorite ways to get a fresh start because they’re basically like a short, non-permanant move. Even if you don’t have the luxury of a three week trip to Europe or a seven day cruise to the Bahamas, spend a weekend camping at the lake or even an afternoon visiting a new-to-you place in your hometown. The downtime and break from your normal day-to-day routine paired with some fresh new memories is sure to jumpstart your creativity.

By nature, we are creatures of habit. Our brains love routine, repetition and pattern because let’s face it, it’s less work for them! That’s why starting with a clean slate can be so inspiring. Because it forces your brain to take a fresh look at your surroundings and see new ideas & connections. Even if you only step away for an afternoon or a day, it’s sure to give your creative process a quick boost.

Well now that you’ve heard a little bit about what I’ve been up to, I’d love to hear what you’ve been up to! Any other fellow movers out there?

Benefits Of Using Canadian Pharmacy

POSTED IN From the Desk of Nettio Designs

  • 1
  • 2
  • 3
  • …
  • 11
  • Next Page »
HI I'M LYNNETTE. Graphic designer, tech-lovin’ memory keeper and lover of bold colors & patterns, good food and the great outdoors. Here at Nettio Designs, I share a behind the scenes peek at my own creative & life adventures. Read more...

KICKSTART YOUR CREATIVITY


By popular demand, photo book templates are back! Grab all three sets in the shop.
ADVENTURES IN ORGANIZING
GOAL-SETTING
MEMORY KEEPING
PROJECT LOVE
LIFE ADVENTURES
TIPS & TRICKS
BEHIND THE SCENES

POPULAR PROJECTS

TO SEE ALL MY PROJECTS, CLICK HERE

MUST READ POSTS

  • WHY EVERY SCRAPPER SHOULD SCRAP A FAVES PAGE
  • HOW TO CREATE A SCRAP-WORTHY MAP WITH PHOTOSHOP
  • REMEMBERING THE IMPORTANCE OF TELLING YOUR STORY
  • WHAT DOES IT MEAN TO CREATIVELY CAPTURE YOUR LIFE ADVENTURES?
  • BROWSE BY CATEGORY

    BROWSE THE ARCHIVES

    GET IT FOR FREE

    Copyright © 2025 ·Dynamik Website Builder · Genesis Framework by StudioPress · WordPress · Log in