For the Sugarbabe September Portfolio challenge over at Sweet Shoppe Designs, I was tasked with creating a digital scrapbooking layout based on inspiration I had saved/favorited/pinned.
Since I have an love obsession with Pinterest, I turned to my scrapbooking pin board and selected this super awesome layout by one of my absolute favorite paper scrapbookers, Kelly Purkey. She’s a girl after my own paper-lovin’ heart with the way she rocks patterned paper!
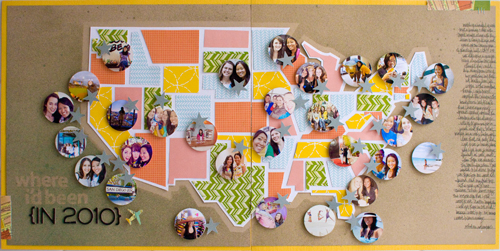
Specifically what inspired me about this layout was the graphic shapes she gave to the states and her bold use of patterned paper against the kraft background (no surprise there, haha). I also loved all her little circle photos representing all the places she had visited.
Now while I love to travel, I certainly don’t travel as much as she does, so I decided instead to theme my layout around all the places Adam and I have lived so far. Since we have yet to live on the East Coast (it’s on our short list of places to go next since it’s the one US time zone we haven’t lived in yet, haha), I decided to simplify my layout and do a single page featuring the Western half of the United States.
Here’s my finished layout featuring Zoe Pearn’s super adorable Sunshine & Lollipops kit:
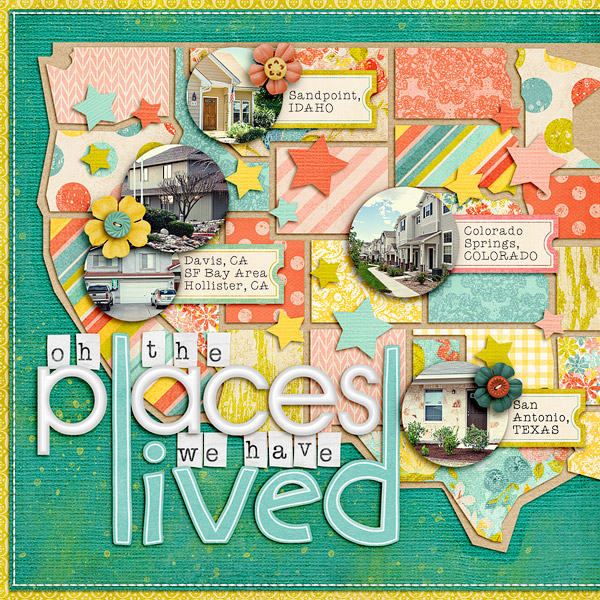
Since I posted this layout over in the Sweet Shoppe gallery earlier this month, I’ve gotten a some questions asking how I put this layout together. Kelly has an awesome tutorial over on her blog showing how she designed her map using paper, but since my layout is 100% digital, I’ve whipped up a little tutorial to show you how you can get this same look using Photoshop.
A little note: this tutorial was written based on Photoshop CS3 so it should work in other versions of Photoshop, but I haven’t tried it using Photoshop Elements. As always, there are a million different ways to do the same thing in Photoshop so I’m just sharing what worked for me.
Ok, on to the tutorial…
Step 1: The first thing you need to is find a map of your desired location. I took a screenshot from Google Maps for my map but any map image will do as long as it has the outlines of the states/countries on it.
Once you have your map, you need to drag it onto your scrapbooking canvas and resize it to the size you want your final map to be. I made my map fill the majority of the page. Don’t worry if your map image ends up pixelated, it won’t show in your final layout.
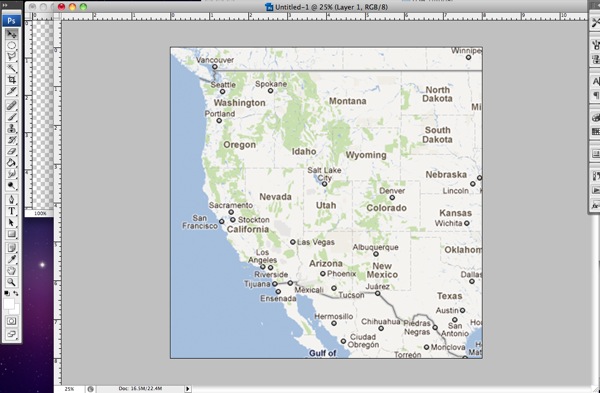
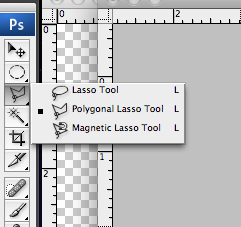
Step 2: Next, you want to grab your Polygonal Lasso Tool. You’ll find it under the normal Lasso tool – it’s the lasso with the weird angles on it.
Step 3: Now we’re going to use the Polygonal Lasso Tool to draw a shape around each state using the lines on the map as a guide. Don’t worry about all the little detailed areas, we’re going for the angular look of the shapes in Kelly’s inspiration layout so we want to keep the shape simple.
If you’ve never used the Polygonal Lasso Tool before, it’s really easy. You just point and click where you want to add a corner on your shape. If you want to draw an exact straight line between two points, hold down the Shift key and it will give you either a 90 or 45 degree angled line. To close off your shape, bring your arrow back to your starting point and move it around until you see a small circle. Then click to close the shape.
If you’ve done it correctly, you’ll end up with a shape surrounded by marching ants like this:
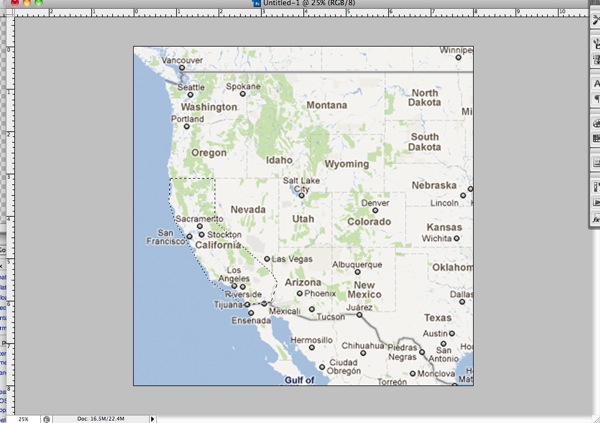
Step 4: Our next step is to fill the shape we’ve created. The easiest way to do this is to hold down the Shift+F5 key which will bring up the Fill dialog box that looks like this:
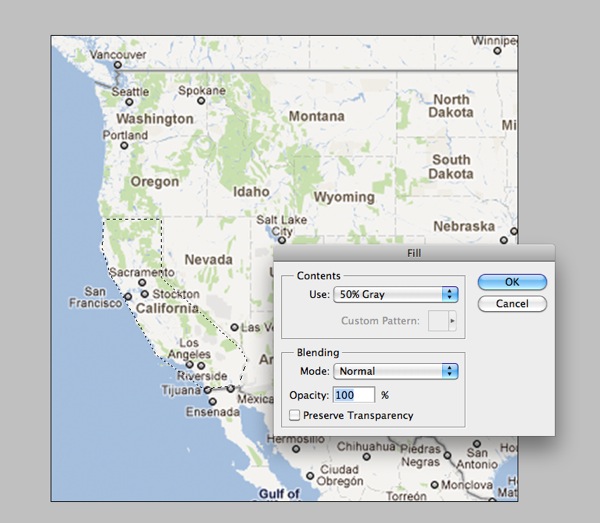
Step 5: Select a color for your shape (I went with grey tones but it doesn’t really matter) and then click ok. Your shape will now look like this:
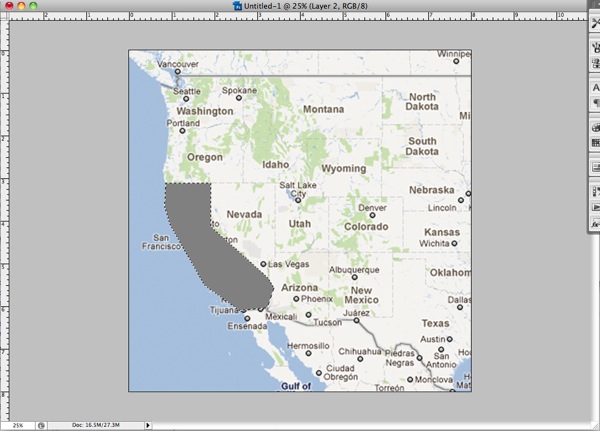
Step 6: Now you want to deselect your shape (Cmd+D on a Mac, Ctrl+D on a PC) and repeat steps 1-5 for ALL of the states or countries on your map. For my original layout this meant the entire Western half of the US but for the sake of this tutorial, I’m going to just do four states.
Here’s what your map should look like once you’ve completed all your shapes. Notice at this point there is no space between the shapes – they all fit together nice and tight. That’s what you want.
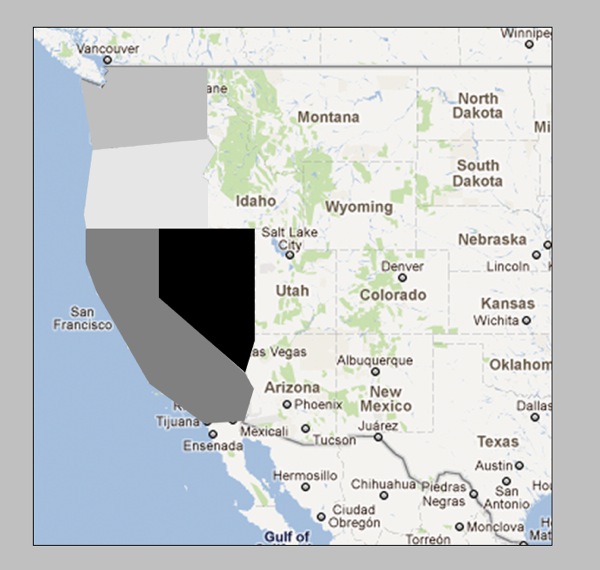
Step 7: Our next step is going to be to add space between the shapes so our mat layer will show through. (On my layout the mat is kraft, on Kelly’s layout the mat is white.) To do this we’re going to contract each shape down by the same exact amount.
First you need to get the marching ants around your shape again. A really easy way to do this is to hold down the Cmd/Ctrl key and click on the layer thumbnail for that layer in the Layer palette. Once you have your shape selected, go up to your toolbar at the top of your screen and choose Select>Modify>Contract:
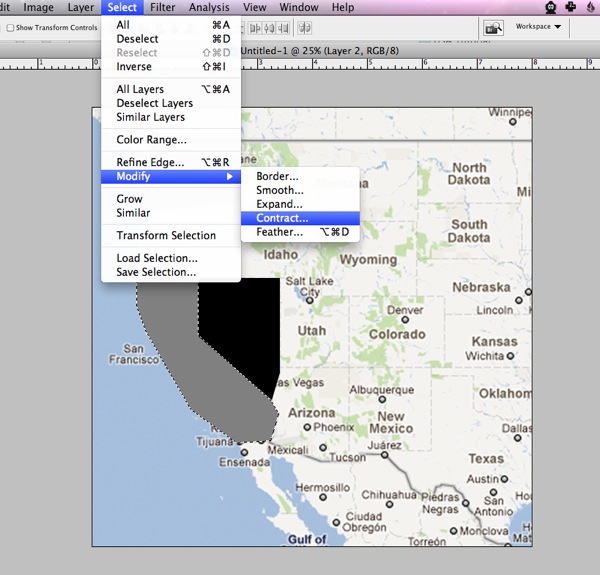
Step 8: We’re going to contract each shape by 10 pixels so enter a 10 into the dialog box and click ok.
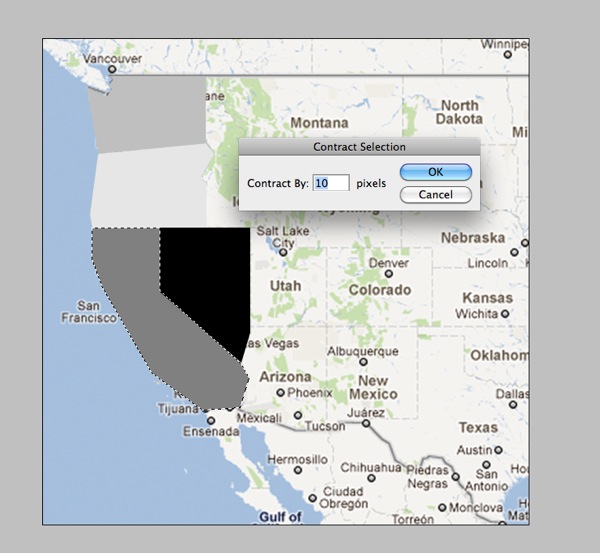
Your marching ants should now be slightly smaller than your original shape:
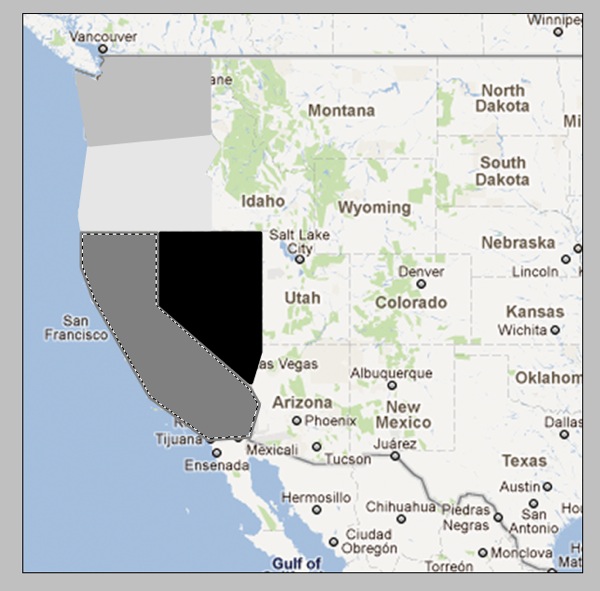
Step 10: Now we’re going to inverse the selection by hitting Cmd+Shift+I (Ctrl+Shift+I on a PC) and then hit the Delete key to remove the extra part of the shape like so:
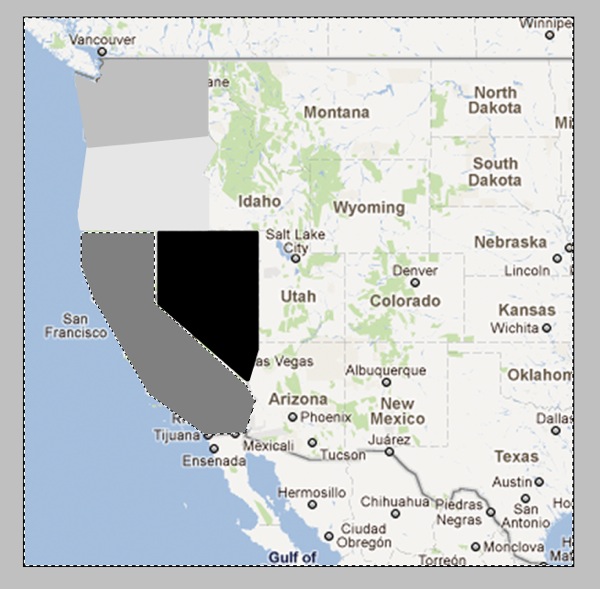
Now your shape should have an empty border around it that separates it from the surrounding shapes:
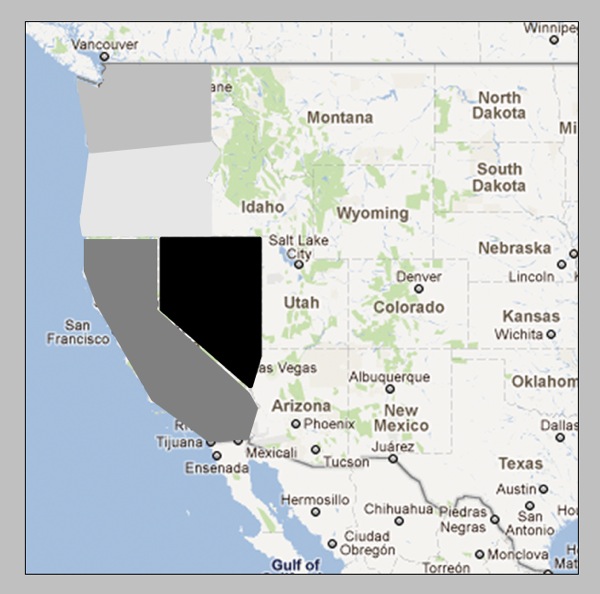
Step 11: Now you’re going to repeat Steps 7-10 for all the shapes on your map. As you contract each shape, you may find that you need to adjust the placement of some of the states. Since you have already drawn all your states, you don’t need to worry about the states lining up perfectly with the map layer anymore. How they relate to each other is more important. I just eyeballed the spacing based on what I thought looked best.
Your finished product should look like this:
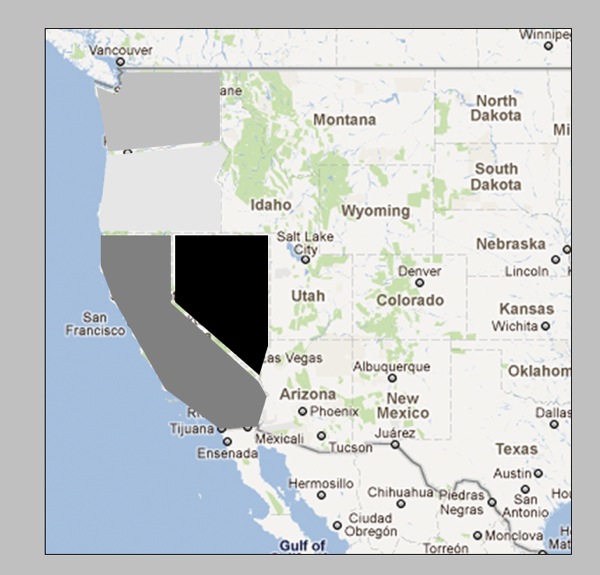
Which if we hide the map layer will look like this:
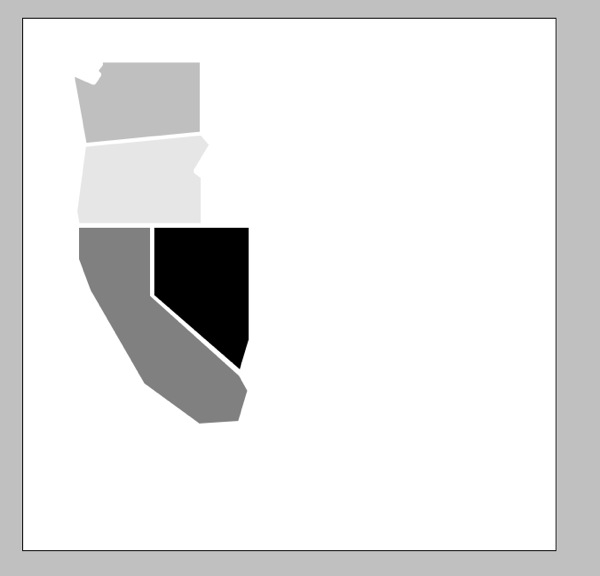
See, we have nice even borders between each of the shapes.
Now if you’re wondering why I essentially told you to create each shape twice rather than just contracting the original selection, the answer is because I found it much easier to draw out the shapes when they were all touching. I did try a few different methods for adding space between the shapes but ultimately the Contract & Duplicate gave me the best results. Yes it’s a little tedious this way but once you get into a rhythm it goes pretty quickly.
Step 12: Once you’ve got all your shapes drawn and contracted, the final step is use the Polygonal Lasso Tool to draw a shape for your mat layer. The steps are the same as how you originally created each state, just on a bigger scale.
I didn’t worry about the mat being the exact same size all the way around so I just eyeballed the border to get this:

And that’s pretty much it! You’ve created your very own map template! Now all you have to do is add in all your photos and papers and elements and you’re good to go.
The great thing is this method will work for any map so if you’re not in the US or are wanting to do something more country or even world focused, you can totally follow the steps in this tutorial to create a layout based on any map your heart desires.
Now I’m sure there are some of you who are reading the tutorial and thinking, “well that’s great, Lynnette, but it sounds like a LOT of work and I would much rather be pinning on Pinterest.”
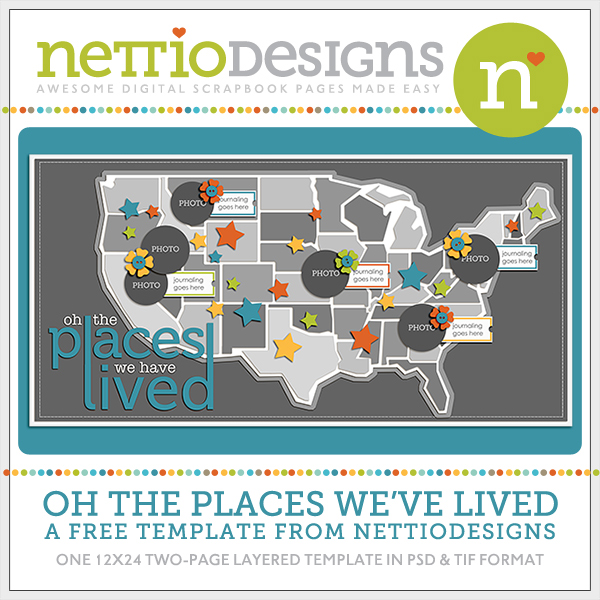
Which is why I also created a little something extra for all my fellow US-map lovers. And because I was feeling extra generous, I even included all of the Eastern half of the US for you as well.
And best of all?
It’s FREE!
Yes, that’s right I am offering up this awesome template for FREE for personal (non-commercial) use. If you’ve never purchased one of my templates before, here’s your chance to see what NettioDesigns is all about.
All I ask in return is you spread your love for the template on Twitter/Facebook/forums/blogs and let everyone know they can download it right here at NettioDesigns. Oh and if you post your layout in any gallery, please credit NettioDesigns and where allowed, include a link back to this post.
The template is a single 12×24 inch file so if you use the entire template you’ll end up with a two-page layout similar to Kelly’s layout or you can use your crop tool to crop the template to create a single page layout like I did.
Download here
I can’t wait to see what you create so if you use the template or tutorial, be sure to link me up to your layout!
Happy scrapping!
Thank you!!! This is awesome!
WOW!!! Thanks! This is awesome. I don’t travel much but I’ll figure out a way to use this!
lynnette!! thank you SO MUCH! LOL – as i was reading the tutorial i was totally thinking “oh i hope she puts this template up in her shop – i don’t have the patience to do it myself!” LOL! i cannot wait to use it! thank you thank you!
This turned out AWESOME!!! Love love love it sweetie!
This is fabulous!! Thank you so much!
me thinks that page is GREAT!! TFS! I’ll try to do a Brazil map for me using this great tut. Thank you! xoxo
OMG…how AWESOME is this…thanks!!!!!!!!!!!!!!
You are awesome! Thanks so much for the tutorial AND for the template freebie! 🙂
Oh WOW!!! This is awesome, thanks Lynnette!!!
This is awesome. Thank you!
Awesome – thank you! Can’t wait to play with this!
Oh thank you SOOO much Lynnette! I saw the layout that you did over at SSD and I was completely inspired by it! And now here you are offering this template – Oh I can’t WAIT to do a layout with it!! Thank you so much for such an amazing freebie!!! 😀 XOXO!
This is absolutely amazing, thank you so much for sharing this!
So cool! Thanks so much Lynnette! I don’t live in the US, but I have my passport and am eager to start a vacation album & will use this to mark where we’ve been! Thanks!!
Oh my word! THANK YOU! What an amazing template!!
OMG!!!!!!!!!!!!!!!!!!!!! I have been drooling over your LO at Sweet Shoppe.
You are the sweetest person on the planet! Thank you! Thank you! Thank
you! Thank you! Thank you! Acccckkkkkkk I can believe you did the
whole US – I’m off to scrap with it !!!!!!!! Seriously, you’ve made my week!
Oh my gosh I can’t believe this is free!!!!!!!!!!! Thank you so much Lynnette!!!! xoxo
Oh goodness gracious!! This is AWESOME!!! Thank you so much not only for the gift but for showing us how you did it. That’s so cool.
Woohoo! Thanks guys! So glad you’re enjoying it! Be sure to link me up to any layouts you do with it!
Thanks so much for the template, and the tutorial! I can’t wait to use it!
You are such a rock star!!
wow, what a great idea! love this! thank you so much!!
Oh, thank you so much… that must’ve taken a long time! I know I can use this for homeschool projects 🙂
Wow! This is awesome. Thanks so much Lynette!
oh Lynnette!! This is wonderful! 🙂
Thx Lynnette!! Off to retweet the temp!
THANK YOU so much for sharing this fabulous template!
Thank you SO much! I love the idea, especially since between the three of us, we have live LOTS of places. And my son (he’s five) will love seeing the visual. This is great! I might do one that shows all the places our extended family members live too.
I have been drooling over your layout since you posted it, and I love love love the freebie! Thank you! I also am happy you included a tutorial… our family hosts exchange students, and I would love to be able to make a cool Christmas gift for my mom with a world map featuring all of the places we’ve had students from. Now I can make one! 🙂
Oh my goodness gracious!! I saw this layout and I was HOPING you would make a template. But FREEEEEE??? I love you. 🙂
Wow, what an awesome freebie. And amazing tutorial too! Thanks!!
This is unbelievable!!! and a super duper thank you as we are home schoolers and this is just fun fun fun to play!!
Thank you!
Total awesomeness, Lynette! and free to boot too. You rock!
Tutorial should work exactly the same way in any version of PSE too. I don’t see anything that works differently from what you wrote. 😉
Oh good, thanks for letting me know! I haven’t ever used PSE so while I was pretty sure it should work, I didn’t want to promise anything.
Ok, I need to make one tiny correction on my statement…. shift+F5 isn’t working for me for filling the shape with a color-
(1) I use Alt+Backspace as the key command for that which fills it with your foreground color. I’ve used that key command for as long back as I can remember. Ctrl+Backspace fills it with the background color.
(2) Or you can right click on the workspace and choose ‘fill selection’ from the pop up menu,
(3) Shift+Backspace, or on the menu bar pick Edit > Fill Selection, and the Fill Layer box pops up, the PSE equivalent to what you show in your tutorial.
(4) or go to Layer> New Fill Layer> solid color and it will give you a layer mask with your foreground color (PSE9- don’t know if that is what works in previous versions off the top of my head).
Thanks for the update!
Oh, thank you so much, Lynnette! Its fabulous.
I’m so excited about this template!!!! I’ve been pinning some stuff for Geography for homeschool, and this will fit in perfectly {let alone a layout I can do with it!}! 😀 Thank you!!! 😀
Ok…so I totally love this whole contrast thing! I’m super excited to use that secret on all my paper piecing now! Yep, you’re awesome!
This is so awesome! I cannot wait to use it! Thanks a ton!
WOW!! Love this template! Thank you so much for the freebie and the tutorial 🙂
I’ve been digi-scrapping since 2004 and I have to say that this is my absolute FAVORITE template EVER. Thank you SOOOOOO much!!!! We are a military family, and move every few years, so this will soon become art on our wall!!!!! I greatly appreciate this!!!!!
Thanks for the AWESOME template and fab tutorial!
What an amazing template Lynette! Thanks so much for sharing!
Crazy awesome! I’ve lived in all of Louisiana and Arkansas, haha, but I’d love to do a page about the places I’ve visited! Thank you so much!
Ah, but Kellie, you were living somewhere much much different when I met you several years ago 🙂
Thank you for the template and tutorial!
Thank you so much! I LOVED your page. . . and now we can all benefit thru all your hard work and efforts~ You’re a sweetheart!
Wow how cool how you did the template!
Thanks for the amazing tut and your Amazing template!
my sweet friend pointed me out to this! THANKS!
— dalis
Ooo, nice! 😀 Saving this tut, though I think I’m gonna use your template for our last trip to the US 🙂 Thanks, Lynnette! 😀
Well, I guess I have no more excuses. I’ve just got to make a book about our move across the country! Thanks so much!
This is awesome…it had to have taken you FOREVER to do…thank you sooooo much for sharing!!
This is awesome Lynette. Thank you so much for the tutorial and the template!
Thank you so much! This is absolutely fantastic!!!!!
seriously….TY SO MUCH! Just wow!
Thanks so much Lynette! Amazing!
Thank you so much Lynette…You are the best!!!!
Haven’t scrapped in forever- but your templates always inspire me to get back into it. LOVE this- thanks SOOOO much! 🙂
MWAH! I LOVE YOU! This is amazing! Going to scrap it tomorrow!!
So generous, thanks so much!
Thank you Lynette! This is awesome. Loved the tutorial too!
This is absolutely amazing Lynnette!!! Must’ve taken you HOURS to do it!!! Thank you so much!!!
This is a lovely idea – thanks so much!!!
I appreciate the tutorial, since I’m not American I’ll try to make a template from a map of my country. Italy has a funny shape, it will be interesting 🙂
Ciao, Ari
Oh my goodness, thank you SO much!! I loved your layout when I saw it in the SSD gallery – I grew up an Army Brat so I can totally relate! Anyway, the template is fabulous and it is so generous for you to give it away free.
This is amazing. Love it. Thanks so much!
Can’t WAIT to used this template!!! I’ve been saving all the layouts I’ve found with map backgrounds for inspiration, but have yet to create my own… just seemed way to overwhelming to figure out how! Now I can scrap about our drive across the US with 2 kids under 2 AND about my life growing up in SE Asia! Thank you so much!!!
Thank you, thank you, thank YOU! This is such a cool template! Now I want to take a road trip so I can use it! Thanks for the tut, too!
THANK YOU!!!! I’ve shared it on facebook, twitter and pinterest. This is awesome!
This template is fantastic. My dad was in the Army when I was a kid, so I’ve lived lots of places. And now that I have my own family I want to stay put, but travel a lot. I think this template will make many appearances in my scrapping. Thank you!
That is awesome! Love the layouts! Love the tutorial! I’m definitely trying that!!
Thank you so much! So creative – i LOVE it!!
thank you so much, this is awesome!
First off – you have an awesome name!
I LOVE that LO by Kelly… I think I pinned it from you anyway! I am so excited to create a digi version of my own, thank you so much! You rock!
Woohoo! Lynnette’s with 2 N’s unite! I always get excited when I see other people who spell it “correctly” since we are few and far between, haha.
This is just wonderful!!! You pages are always so creative, so it was without a doubt so would be your creations. Thank you!
Thank you!!
Is there any possibility to get png files of this? I use SBC+ and can’t use *.psd files. 🙁
I hate to say it but at this point, no, I am only offering my templates as PSD and TIF files. Because my templates have so many layers (this one especially), it is a LOT of work on my part to save all the individual layers as PNG files and unfortunately, I haven’t found the demand for PNG files to be high enough to justify the additional amount of time it would take me. But thanks so much for asking and if this changes at some point, I’ll be sure to let everyone know. 🙂
This is fantastic! I’ve learned so much to use on other things too! THANK YOU so much!!
There is a action here, that will automatically export to png files.
http://www.pretentiousname.com/ps_exportlayersfast/index.html
I went and made all the png files for this manually. I only have PSE, so this action doesn’t work for me.
Wow, thank you for the amazing template!
What an awesome template!
Thank you so much for sharing it with us!!!
This is just AWESOME Lynette! Thanks 🙂
Thank you so much! I can see this is one template I will use!
Su
Thanks so much for the template and the tutorial! I loved your layout and wondered how you did that…now I know!
What a great way to use Photoshop! I can see the possibilities of applying this to different kinds of art as well. Thanks for setting my head spinning (in a good way) and thanks for the awesome template!! You go, Lynette!
VERY COOL!!!
Fantastic template and tutorial, thanks for sharing!
This template is exactly what I’ve been needing. Thank you so much for sharing your talent! 🙂
Jammie
Thank you, thank you. I was just thinking the other day that I wanted to make a map of the places I’ve visited in the US. I just made my first trip to No. Carolina last week. Sooooo excited to put this together.
Thanks again!!!
BRILLIANT. I loved the layout but wasn’t really looking forward to making the template. Thank you for being so generous.
Wow, this is such a great treat!! Thank you, thank you, thank you, it’s wonderful! 🙂
Wow-you made my day! I too, had seen your awesome layout at SSD and was so hoping that you would make up a template for it and was willing to hit your shop to buy it-and then you offered it for free! Thanks so much for your generosity and for the tutorial. I can use your template for the the US and the tutorial for making my own template for other countries I have traveled to. Thanks again!
How awesome! Thank you so much! I’m off to look at your other products!
Oh Lynette! This is fabulous!! I’m going to use it to make a layout showing where all our loved ones live (since we’ve only lived in 2 places and don’t get to travel much). I wonder if this hybrid girl can figure out how to make a little Maui island to add to the bottom left corner using your tutorial and Elements?? Fingers crossed. Thank you my talented friend! You rock!!
Oh, and P.S. I totally know how to spell your name. I typo’d on my stupid phone, LynNette!! 😉
Haha, no worries! Happens all the time!
You know, I actually had a little Hawaii at one point but then I couldn’t fit Alaska in too and it seemed weird to include one but not the other. But I totally think you’ll be able to do it, it’s pretty easy. 🙂
Wow! I have been wanting to do a page about state’s I’ve been to and this is awesome!
Wow. That’s awesome!!! Thanks for the tips & the template.
thankyou for the wonderful freebie!
This is awesome! Thanks so much!
Thank you from a fellow map lover.
Amazing! Thank you so much!!!!
You totally rock, Lynette . . . an endless font of inspiration – THANK YOU!
Great freebie! You’ve been featured on the Quality DigiScrap Freebies blog.
We hand select only the best digiscrap freebies for our readers.
Grab a brag button!
This is awesome! I love KP’s work too, but I not only plan to use this template for scrapbooking, but also for homeschooling; it will be computer, Geography, and an art lesson all in one!! FABULOUS! Thanks so much!
Wonderful – thank you. I’d love to try and follow the tutorial to make a detailed one of the UK counties but I’m guessing I’ll chicken out LOL Will use yours though for our USA trip photos! Thank you!
Oh my goodness! This is too AWESOME! This is good for all the family vacations too! Thanks a lot for the tutorial.. I should try this very very soon! ;D
Thank you so much for the awesome temp & tut!
This is so freaking awesome! Thank you for this cool template and tut!!!
This is awesome. Thank you so much!
thanks so much!
Thanks so much! Shared this link on facebook!
OMG, awesome gift. Thank you for the template AND the instructions. I just stumbled on your site and what a faboulous find! Have a great day!!
LOVE this template!! Thank you so much for sharing!!!
I saw a LO with your template and knew I HAD to have it. We take road trips all the time and I was always wanting to do a LO like this. Oh my gosh I am soooo excited. Thank you so much for doing all the time consuming work to put this together and then sharing it with the rest of us.
I would have HAPPILY purchased this. You’re amazing, Lynnette. Thank you!!
Oh wow! This is awesome!
Thank you SO much!
Thanks so much!
i found this through pinterest, I love it! thanks for the template. I’ll have to do a little addition to include my home in the middle of the sea… but so excited to use this template, THANKS!!! 🙂
OMGosh, I am sooo excited!! I couldn’t re-pin this fast enough when I first saw it on Pinterest and was secretly hoping you’d turn it into a template. 😉 Thank you SO much for your generosity!
Thank you so very much. I am so excited to have this template and am looking forward to using it again and again — both for myself and for my kids (and my grandkids as well). My husband is retired military, and we had 26 addresses in 25 years. We also lived in Hawaii and Turkey and were privileged to visit quite a bit of the world as well. With you directions, I “may” be able to pull off maps of other parts of the world. It is so generous of you to share this as I am also one who would have paid as well. Thank you, thank you, thank you. When I finally have the time to use it, I’ll be sure and let you know.
Hi, I just discovered you and love this template, but once I download and extract, all I get is the folder image. Is it gone at this point? ~Thanks
Nope, the template is still available! If you’re still having trouble, I recommend deleting the download completely (move it to your trash and empty the trash) and then try downloading the template again. Are you using a Mac or PC?
I am having the same problem. I tried everything to make it work, but there in no PSD in the file for me, just the folder image. Cynthia, Did you get it to work?
Hi Shannon!
The download definitely has the PSD file in it so you’re likely having either a download or extraction issue. If you haven’t already, I recommend deleting the download file by moving it to your trash and emptying the trash and then try downloading again. Are you on a Mac or a PC? What program are you using to extract the download?
I deleted everything and restarted my computer. Still not working. I have a PC and I use BitZipper to extract my downloads. It just keeps telling me that the file is a directory and it has just the folder image in it. I will try again tomorrow, and if it still doesn’t work… I have the instructions on how to make my map. Thanks , this template is such an amazing idea.
Hmm, I haven’t heard of BitZipper before. I’m on a Mac so I did include a Mac-specific icon on the folder which I suspect is confusing BitZipper which is why you’re only seeing the preview icon when you extract. Do you have another unzip utility you could try? Maybe something like WinRAR or even Winzip?
You made me smile first thing this morning. I downloaded Winzip and redownloaded your file. It worked perfectly. Thank You so much for all your help.
Woohoo! So glad you were able to get it to work!
I’m on a PC. I’ll try that. Thanks for the speedy reply! 😉
Lynnette, this is totally brilliant. I love it! Very generous of you to make the template free too! I’ve already pinned this on Pinterest so others can discover how great it is. Thanks for sharing it! 🙂
WOW I am so impressed . . . this is a very cool map . .
Since I have lived in ALASKA all my life I guess I will have to make
a map to match and use this one for places I have visited !!
Very cool . . . .
Visiting via Pinterest. Thank you for the template – this is fantastic!
Thank you! thank you! Loved the tutorial–I can see many possibilities for future layouts. 🙂
Thank you so much. I just saw a page created with this template. I came hunting for it.
How cool you are sharing with us.
hugs
m
thanks for this fabulous template! I saw it in the ScrapMatters gallery and came looking!
hi Lynnette! i found you via pinterest. LOVE how you did your week in the life album! its amazing!!
thanks for sharing this fabulous template! i was hoping to use it for a holiday layout 🙂
the file downloaded OK, but i’m getting an error when i try to unzip it. hoping you can help?
thanks!
charleigh
Aww thanks! If you’re having issues unzipping, I’d recommend trying a different unzip utility, something like Winzip perhaps? I’m on a Mac and included a Mac-specific icon on the folder which seems to confuse certain unzip utilities on PCs. It may also be that the file didn’t download correctly so if you still can’t get it unzipped, try deleting the file completely (move it to the trash and empty the trash) and then try downloading again. If neither of those things work, just come back and let me know and I can help you get it figured out. 🙂
I downloaded it onto my mac laptop & it worked just fine
thanks again!! 🙂
This is an awesome idea! And I love that you are sharing not only the idea and the tutorial but also the free template too! Lucky us!! Thank you so much. 🙂
This is an awesome post (I think I wrote that before). I’m now doing it for Europe – looks fantastic. I’ll send you a copy if you’d like.
Oh cool! I’d definitely love to see it when you’re done!
https://picasaweb.google.com/lh/photo/w-wlLWVnmVGjRjCxID9MlGmFZah7EsrjaOQuFFpOv_c?feat=directlink – Thank you again. Love this idea.
Oh that came out AMAZING!! Totally love it!
I saw your original left-sided page on Pinterest – and LOVED it!! Now Tip Junkie points out that you have a template – and YOU tell me it’s free?! Thank you for doing all this work for us! I don’t have immediate plans to use it, but I totally identify with your style of crafting (VERY much like my own – your SB page could have been one of mine!) …what you did to get the map is right with something I would probably do -you know, almost a neurotic level of craftiness and creativity – each page is a work of art…. So thank you, from the bottom of my heart, for your generosity.
Thank you so much! This is adorable….I can’t wait to use it!!!
Oh my goodness, this looks like a lot of work! Thank you so much for sharing! I would love to create one to frame for our master bedroom – I’ll just have to use your tutorial to add Alaska to the bottom corner.
Thank you, I repinned this on Pinterest and can’t wait to create my map!
I had pinned your sample LO a while ago but didn’t realize until today that it was a free template as well. Thank you so much!! It will be fun to make my own map. 🙂
Thank you so much, Lynnette!! This is fantastic!
Thank you so much!!! I’m not a digi scrapper but I’ve been looking for a map to pin places I’ve been in the US! This is perfect. Wondering out loud if I can use the trace tool in silhouette to cut them out on paper! Can wait to try. Will let u know.
Oh cool! Be sure to let me know how that turns out! I’d love to know if it works!
Thank you for sharing! Going to use to track places that I’ve visited. This is such a great idea!
I have been hoarding this in my to do pages file for ever and I finally got around to it! It turned out just as perfect as I’d hoped! Thank you so much for doing the hard part!
http://www.digiscrapsdrivein.com/gallery/showphoto.php?photo=23834
Oh SO fun! Thanks so much for sharing!! As a California native, I definitely agree you need to take a road trip out there. It’s one awesome state, hehe.
Thank you so much for sharing all your hard work! looks great!
WOW!! Thank you for sharing the template and for the technique! So many possibilities!!
I love and buy all your templates! Thanks so much for this fun free one. Here is what I did with it.
http://myscrapncorner.blogspot.com/2012/01/im-back-and-ready-to-scrap.html
Oh thank you thank you thank you!!! I loveeeee this so much I am so excited to scrap this template! Thanks for offering it as a freebie!
Thank you so much. I love the map template and have traveled to most of the 50 states. I am
looking forward to using the template.
Thanks – this is so perfect for a project that a friend & I were just talking about! I found it via Pinterest.
Thanks so much for this tutorial. I really love the idea and I guess I can create one with map of Brazil.
Fabulous tutorial and even more fabulous template! Thank you thank you thank you!!!! Like some of your other readers, we are a military family and this is SO awesome! Will send some friends your way 🙂
This is great. I can scrap my travels AND my Amateur Radio contacts! By the way I’ve been thru Sand Point in the winter. Amazingly beautiful with caution needed everywhere. Thanks for the map template!
Oh yes, Sandpoint is definitely beautiful in the winter but the snow can be a bit sketchy at times. We were up there for Christmas and luckily it wasn’t too bad the majority of the time but the first night the drive from the airport was just awful! Made for good skiing though!
THIS IS TOTALLY AWESOME!!!! I am so glad I discovered you and your blog – you have been added to my Favorites! Thanks!
Awesome template! Thanks!
Oh wow, this is genius!! Thank you so much!!
Thank you so much for this amazing template! And for the tutorial! This was a lot of work & I really appreciate you sharing your template with us! 🙂
Oh happy day! This will be uber perfect for travels!!!! thank you so much! And great tutorial – may try it for our overseas countries!
So great & it puts all state templates in one file that I can extract & use on my cutting machine! THANKS!
This is way too cool! Thank-you,thank-you!!!!
This is just absolutely AWESOME!! 🙂 THANKS so much for sharing this!
Thanks so much for sharing! This is the best template I’ve ever seen =]
Thank you so much.My 4 boys work takes them all over the US. and now i can make this for them in theire memory books i am making.This is great.
Thanks so much!
I blogged: http://amyowensphotographyanddesign.blogspot.com/2012/04/us-map-template.html
My blog automatically goes to my FB page as well.
omg! thank you so much for sharing this after all of your work. so wonderful!
Thanks for the free template. I came here because Lorilei of Studio Rosey Posey had a link from her Facebook page to her free Canada template based on your free US template! I had never been to your site before. Thanks again for the awesome template!
Thank you so much for the fantastic template and tutorial. I learned a lot of things from your tutorial that I didn’t know. I have never used the polygonal lasso tool before and can’t wait to try it. Now I’m off to check out your other templates and scrapbookking items.
Amazing template and tutorial! I am so glad I came across your blog!! Definitely going to look around. My own page would probably say”places I’d like to go!” Thanks so much!!
Great Idea! Thank you!
Actually, yes!!! I have wanted something just like this! THANKS so much for the template AND for the awesome TUTORIAL!
Just signed up for your newsletter and can’t wait to learn more from you.
Thanks so much!
fabulous!!!! thank you so much!!!
thanks so much this is SUPER !!!! We have kids who live all over the country and get to see them once in a while so this will be so much fun to use.
Thanks so much! I was not looking forward to doing that! This is awesome!
this is so cool –can’t wait to try it out!
This is an awesome template! I can’t wait to use it – thank you!!!
I’m so in love with this, and we travel all the time, I can’t wait to do layouts with this! Thank you so much!!!
Is this ever a FUN idea!.. Love love love it!.. Very creative of you to come up with this idea.
THANK YOU! (for both the tutorial and the download) I’m a total Map-o-holic and this is GREAT! Thanks again…..
Thank you, this is so great!!!
I cannot thank you enough for this free download. I have searched the internet for this layered PSD file for weeks!! Our kids collected photos of all the state license plates a few summers ago as we traveled on vacations, and I want to make a large country map of all their plates in the correct states as a surprise. Thank you Thank you!
AWESOME! Thank you so much!
Thank you! This is so great.
Speechless with gratitude. Can’t wait to play with this!
Love this…thank you!!!
Just popped over from Write Click Scrapbook – thank you so much! The tutorial and the template are FABULOUS!
Thank you so much for both the template AND the tutorial. I really appreciate it!
Thank yuo SO much for this amazing template!! This ROCKS!!! My husband and I are missionaries in Nigeria, and we take a long road trip when we’re back in the States, so this will be perfect to document it. I was so hoping I would be able to find something like this, but I had no idea I’d be able to find such an amazing one for FREE. Thank you, thank you, THANK YOU!!!!!!!!!!!!!!!!!!!!!!!
This is fantastic! Just had to stop by and say THANK YOU!!!
I finally learned how to convert PSD files to PAGE files for use with Creative Memories Storybook Creator. Now I can buy more of your templates! Thank you!
Awesome! That’s not an area of my expertise so I’m glad you were able to figure it out! 🙂
Finally got myself around to doing your template on Maps and Australia at least does’t have so many places to subdivide but still takes a bit of work, especially for myself as forget to delete the sea around the map so had to redo plus realised on a MAC had to hover my cursor over the actual layer to delete once Inversed but hey its all a learning curb. Thanks once again now I can work on a page. Your tutorial was really easy to follow and makes learning in PSE so much more enjoyable
Glad you got it figured out Sue!
Thank you – thhis is very generous!
This is truly fantastic! THANKS so much for sharing your hard work!
🙂 Mags / MagsGraphics
AWESOME template THANKS! We are a military family I will use this several Times to document moves!
This is so cool! I love it! Going to add where my best friends live instead of where I’ve lived 🙂
This is the cutest idea! Thanks so much for the template and the tutorial to make it.
Thanks for the cool freebies!
Thank you for this great freebie. I love it and will make use of it and give you credit!
I’ve downloaded this two times now, the first time the file unzipped but only had a preview. The second time it wouldn’t extract. ?? Any pointers? I really love them template and would love it! Thanks!
Hi Gina! I’m on a Mac so some programs don’t unzip Mac files properly. I recommend using WinRAR which can be downloaded for free online.
OH my gosh! That was it! THank you soooo much!! Now I also know my problem with a few other files! I really love this template! Thanks!!!
I can’t believe this template is still available but i’m so glad it is! we move soooo much with the military and have been all over the US. this template will definitely come in handy 😀
AWESOME does not do this gorgeous template justice! As someone who has moved across the country a few times I can think of lots of layouts that I want to do. As a genealogist I can’t wait to use it to document the lives of my ancestors and their travels through life. Thanks so much for sharing your incredible talents. I love your templates and the sense of wonder and whimsy you always pack into each one of them.
I can’t believe you are giving this amazing template away!! I have always adored your template style. Thank you for sharing your gift with us!!
This is a great template! Thanks for sharing it with us. I love the layouts I have seen using it.
Thank you for the template and tutorial. It looks perfect for a number of possible layouts!
This is awesome! Thank you very much:)
I just discovered you through a post at the Daily Digi. This template is awesome. I am just learning how to use PSE, so I was carefully reading through your tutorial. What seems so easy, often turns out to be a little frustrating; especially when I am trying to extract or make a selection using the lasso tools … so thank you so much for providing the template!! & I’m so glad to find that it is still available today. THANK YOU!
Thank you so very much – this is amazing and I love it! Just in time for our road trip to AZ!! Hugs!
Thank you so much! This is so awesome. xoxo