Nettio Designs

Design + Creativity + Adventure = LOVE

  • HOME
  • JOIN THE 2023 MONTHLY FAVES
  • THE SHOP
  • ABOUT
  • CONTACT
You are here: Home / Archives for Template-y Goodness

New Release | Life Captured Photo Book and Bits & Bytes Templates

POSTED ON September 7, 2013 IN A Week In the Life, Shop News & Releases

Woohoo, happy Sweet Shoppe Saturday everyone! I am super excited to share today’s new releases with you because they are designed around one of my absolute favorite scrapbooking projects I’ve ever done: Week In the Life.

In case you haven’t heard, Ali Edwards is running a new round of Week In the Life starting on Monday, September 9th. I played along with her Week In the Life back in 2011 and I loved the end result so much I’ll be playing along again this year (and of course sharing my progress here on the Nettio Designs blog).

You might think the hardest part of Week In the Life is the capture week, but in reality, snapping photos and jotting down a few notes is the easy part. The challenge comes in actually getting your photos and story from the computer into a completed album. Odds are if you’ve started Week In the Life before but didn’t finish, THIS is the point where you got stuck.

One of the lessons I learned while doing Week In the Life in 2011 is that having a design plan in place from the get go makes Week In the Life SO much easier to finish. Not only does it simplify the capture process because you know exactly how many photos/stories you need to capture (snapping 15 photos in a day sounds a lot easier than 75, no?) but it also takes out the guesswork once you’re ready to create your album.

So I wanted to design products this week that would make the entire process ridiculously easy for you. Because seriously, having a completed album showcasing a week in your life right now is something you’ll treasure more than you know.

It’s amazing to me when I look back at my album just how many big things have changed (new house, new city) but also how many little things have changed without me even thinking about them, like the food we eat or the phones we use. Capturing these little moments are exactly what Week In the Life is all about and I would hate for you to miss out on the magic of that just because the process seemed overwhelming.

Which brings me to this week’s new releases…

Life Captured: 8×10 Blurb-Ready Photo Book Templates

My first release this week are the Life Captured: 8×10 Photo Book Templates. These Blurb-ready templates have been custom designed to work with Blurb.com’s 8×10 Standard Hardcover Image-wrapped Photo Book. No need to worry about bleed or trim when you’re ready to print, I’ve done all that work for you!Just add your photos and stories to the templates, crop the two-page templates into single JPGs and upload to Blurb using their online Bookify or downloadable Booksmart tools. It really couldn’t be an easier.

For each day of the week, I’ve included three two-page templates for a total of six pages in the album. You can use all three or if you have a day with a few less photos, you can leave out the second template and use only four pages. It’s totally up to you and what works for your life.

Here’s a look at the Monday template in action using photos from my 2011 Week In the Life…

In addition to the 21 day templates, I’ve also included 4 highlights templates designed to give you an overview of your week as well as capture a week in your life of fashion, technology and home decor. These highlights pages are some of my favorite to look back on from my 2011 photo book so it was a no-brainer to include them this time as well. What can be more fun than looking at your fashion choices from two years ago and realizing you still wear ALL of the same things which uh, totally did not happen to me, no not at all.

Life Captured Photo Book FAQ

Here’s a few answers to the questions I’ve been asked most commonly about these templates:1) Will you be releasing a square version of these photo book templates as well?This year, unfortunately, no. I know square pages are the norm for scrapbooking layouts but that’s exactly why I love the 8×10 Portrait size so much. It’s not only makes this album feel that much more special but it really feels like you have your very own real book of your life.

2) Why Blurb?

I used Blurb.com for printing my 2011 Week In the Life Photo Book and I was so impressed by the quality and ease of the process that it was a no-brainer to me to double-down on Blurb this time around. For the size, quality and price, they’re hard to beat.

3) What will the finished size of my photo book be?

The Life Captured: Photo Book Templates have been custom-designed based off Blurb’s exact dimensions for their 8×10 Standard Portrait Image-wrapped Hardcover Book. The finished size of the cover pages are 8.433 x 10.267 inches and the inside pages are 7.877 x 10 inches. If you use all 29 included templates, your finished photo book will be 52 pages long.

Any other questions? Email me at nettiodesigns at gmail dot com and I’ll be more than happy to help you out.

Of course, if you’d like a square or pocket-scrapbooking friendly Week In the Life version, I’ve got you covered as well…

Life Captured: Bits & Bytes

My second release this weekend are the Life Captured: Bits & Bytes Templates. These mini templates include 3×4 and 4×6-inch cards perfect for capturing a week in your life pocket-scrapbooking style.

Here’s a peek of these templates in action. I chose to stick with a black and white color scheme so my photos would really pop but each element of the templates comes on it’s own layer for easy customization.

Here’s a closer look at each page. The great thing with these is you could easily do a spread or two and be done!

Life Captured: The Complete Set

Of course, if you’d like the best of both worlds, you can pick up Life Captured: The Complete Set which will give you all 50 templates included in the Life Captured Photo Book and Bits & Bytes sets for only a few dollars more than buying the Photo Book templates on their own…

SAVE 20% thru Saturday

As with every Sweet Shoppe Saturday you can save 20% off all new releases thru Saturday….

Spend $10 & Get A Free Kit!

And finally, my time as the Sweet Shoppe Designs Featured Designer has come to an end but I’m happy to pass the baton onto the lovely Ju who’s designed this gorgeous Learn & Grow kit which you can pick up for FREE with any $10 purchase in the shoppe.

Want to save 20% off this weekend AND get a free kit with your purchase?

Pick up the Life Captured Templates today!

Phew, that’s it from me today! I hope to see you all around next week for Week In the Life! I will be sharing my progress and how I’m using the Life Captured templates here at Nettio Designs and I can tell you, it’s going to be a blast. I can’t wait!

Can I take Levitra if I am taking other remedies at the same time

POSTED IN A Week In the Life, Shop News & Releases, Template-y Goodness

New Release | FAVE-O-RITES 2013: August Faves

POSTED ON August 24, 2013 IN Shop News & Releases

Happy Sweet Shoppe Saturday everyone! This week’s release heralds month number eight of one of my absolute FAVE (pun-intended) scrapbooking projects: the Monthly Faves! We’re on the home stretch now, second half of the year baby!

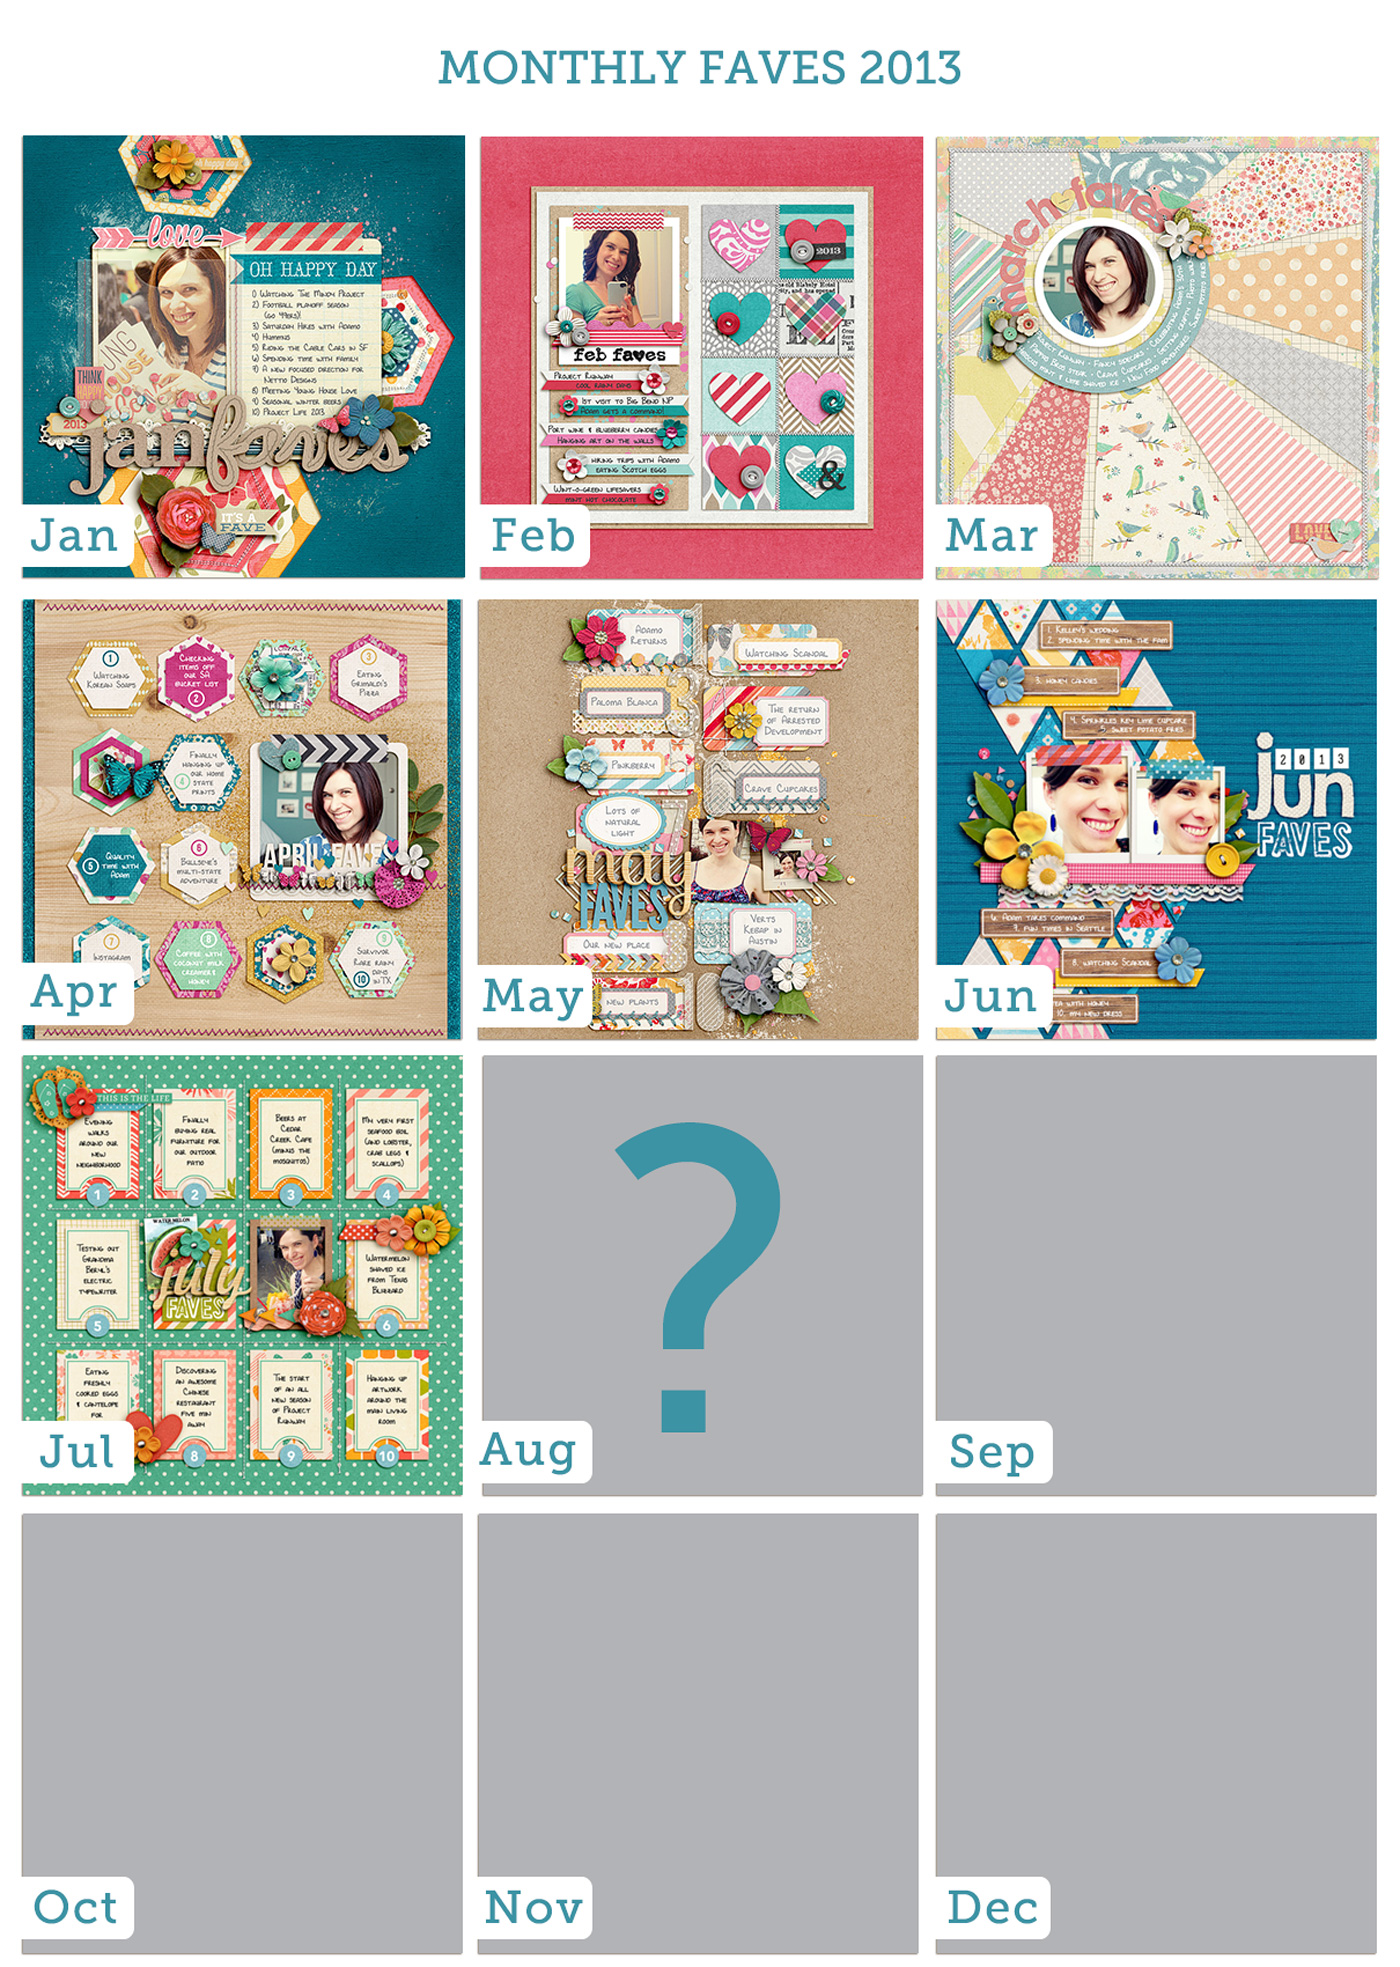
For those new to Nettio Designs & the Faves, my Monthly Faves project is a year-long scrapbooking project where each month you scrapbook one layout documenting your top-ten favorite things from that month. Your faves can be anything: events, food, tv shows, technology, clothing – the sky’s the limit!

I’ve done my Monthly Faves project twice before, once in 2009 & again in 2011, and I love it so much I’m doing it again here in 2013. I can’t even tell you how much fun it is to look back on those layouts and see what’s changed and what’s stayed the same. It’s like a mini time-capsule of your favorite things from way-back-when.

Here’s how my 2013 Monthly Faves layouts are shaping up so far this year…

nettiodesigns_faves2013-aug

I’ve written before about why I believe everyone should scrap a Faves layout but here’s the cliff-notes version:

  • Because scrapbooking lists is fun
  • Because you don’t remember nearly as much as you swear you do
  • Because it captures an easy snapshot of your life at the moment
  • Because it’s the easiest All About Me layout you’ll ever do. Seriously.

And this year I wanted to make it even easier for you to creatively capture your faves. So on the last(ish) Saturday of every month, I’ll be releasing that month’s Faves layout as a new Sweet Single template. Which should give you plenty of time to capture your Faves for that month before the new month arrives.
Which brings me to this week’s release…

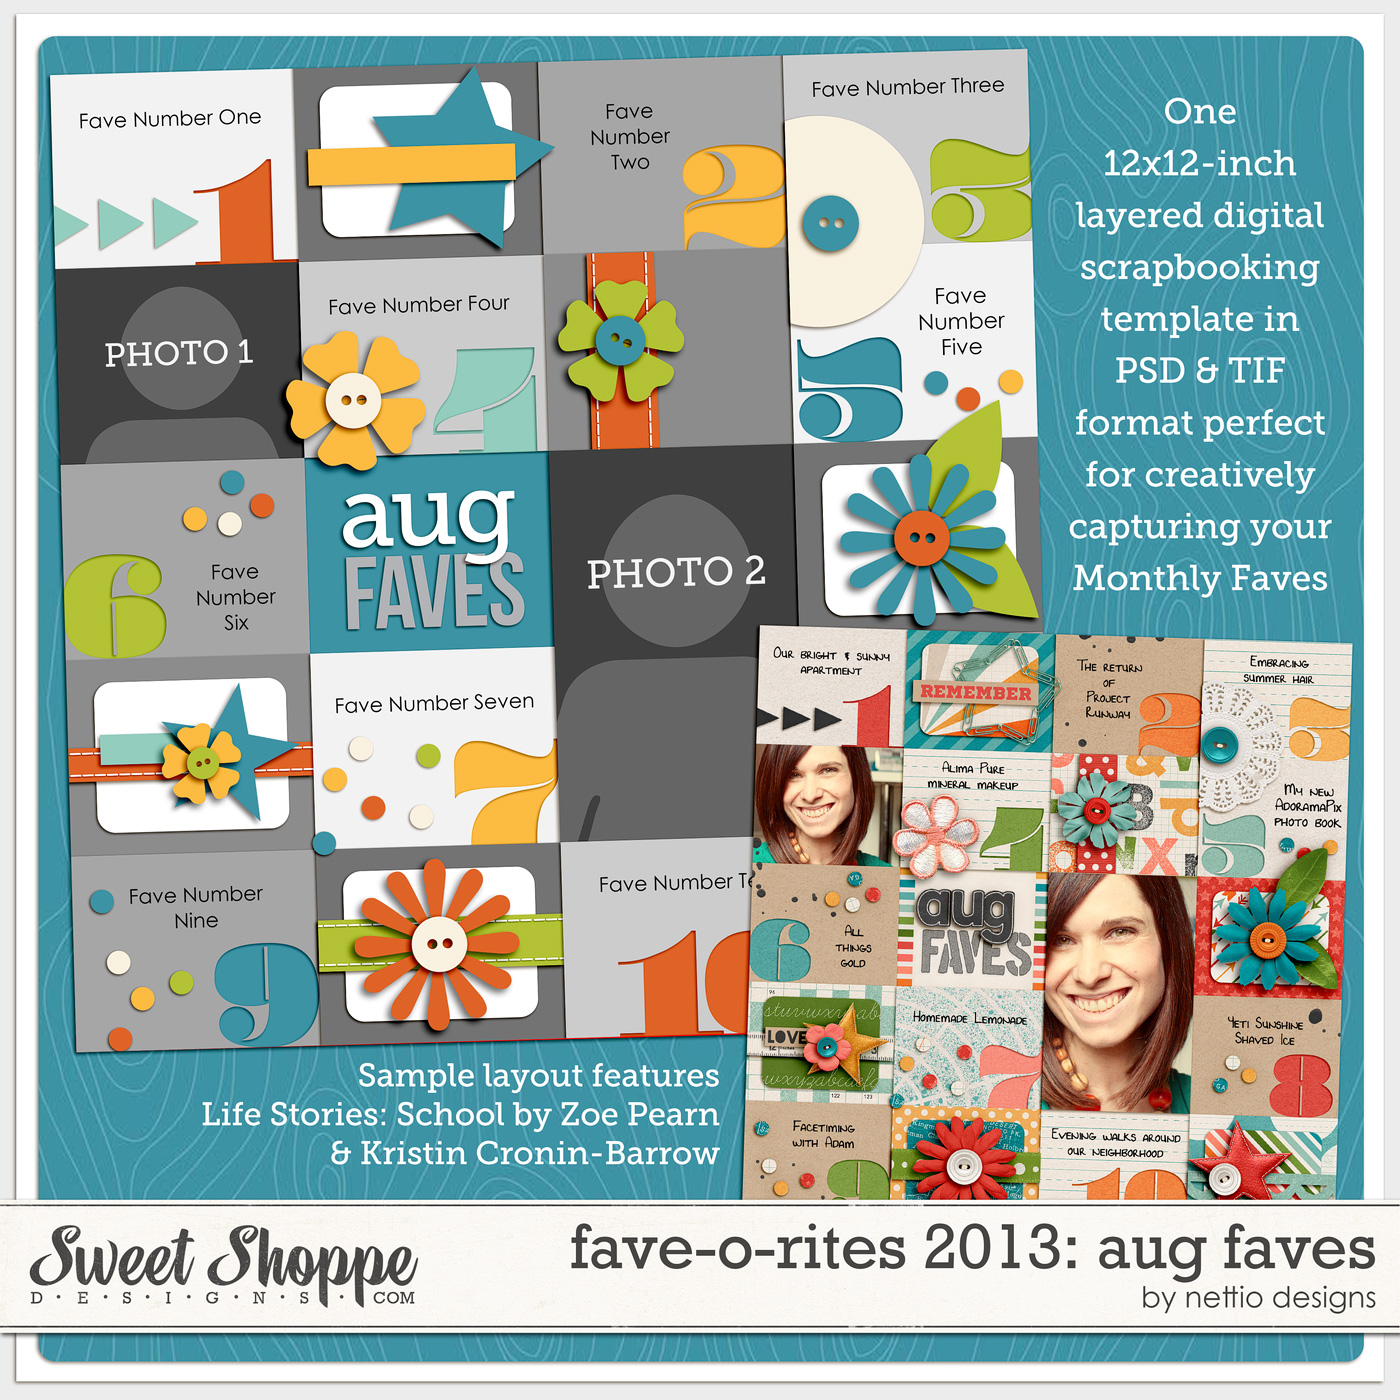
FAVE-O-RITES 2013: Aug Faves

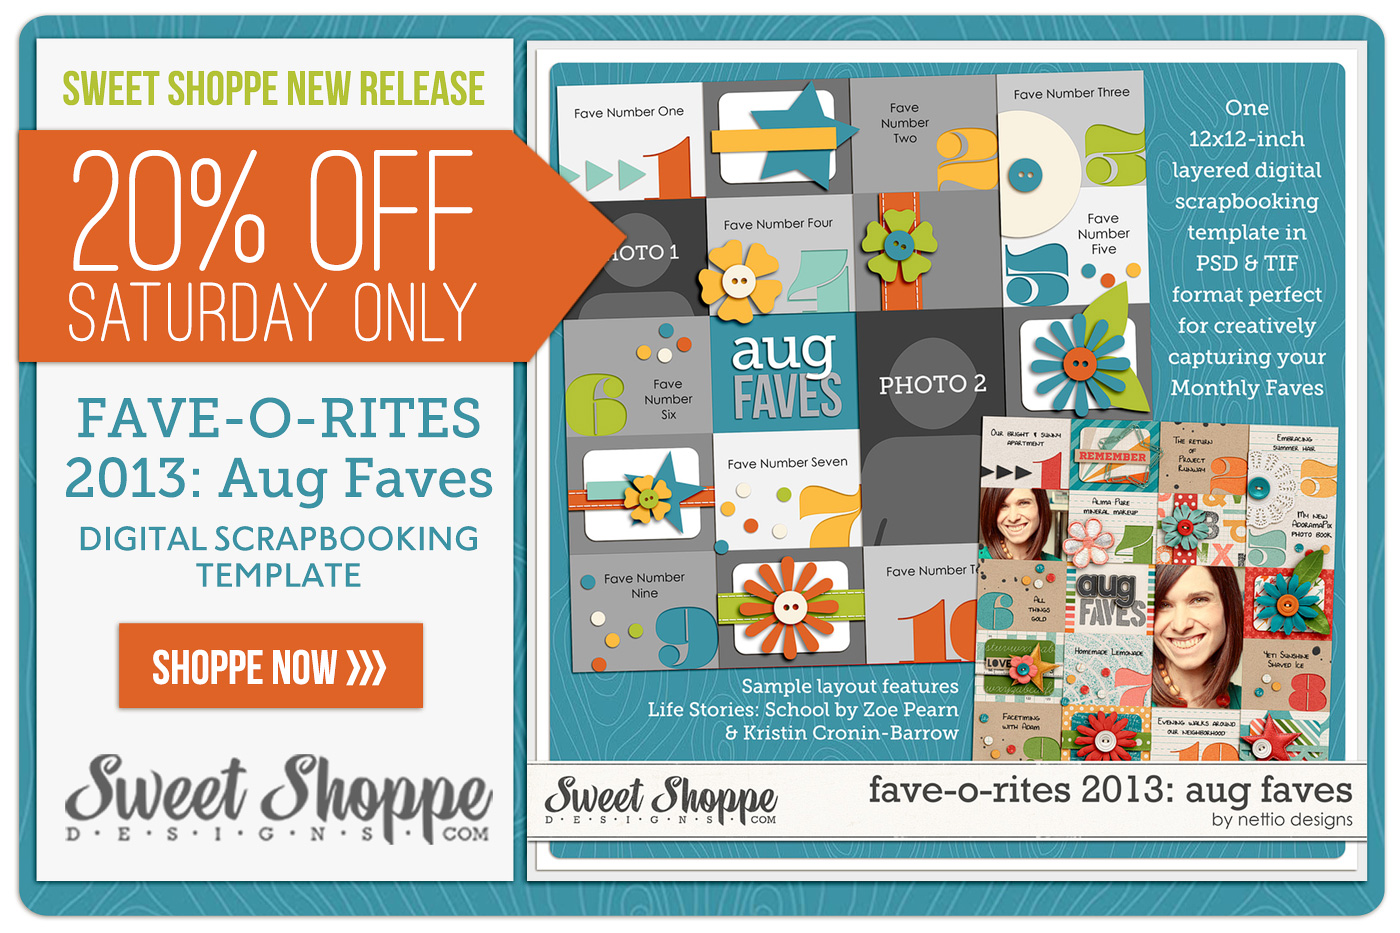
This week’s release is the eight FAVE-O-RITES Sweet Single digital scrapbooking template of the year, FAVE-O-RITES 2013: Aug Faves. It features one of my absolute favorite things – a paper-lovin’ grid-based design – which makes it easy for you to dress up or down with your digi goodies however you’d like.

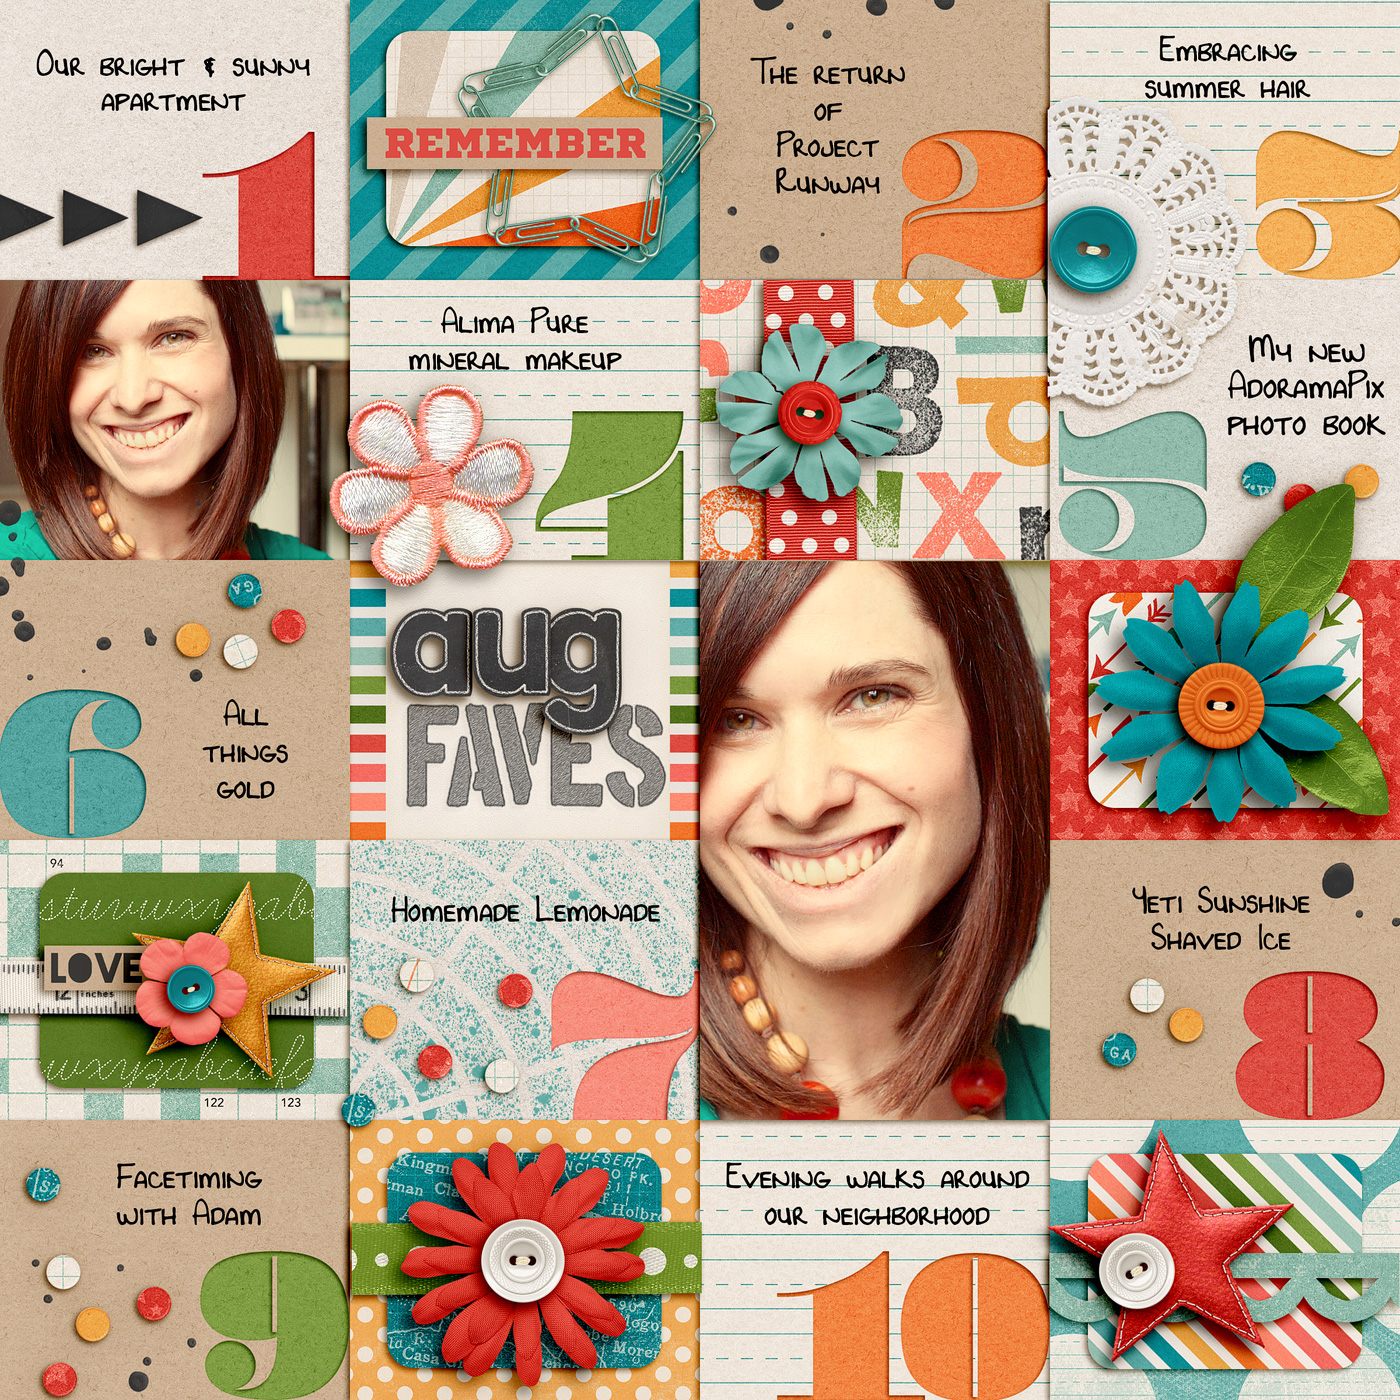
nettiodesigns_FAVE-O-RITES2013_08AugFaves-prev-1400

Here’s a bigger look at my 2013 Aug Faves layout that inspired this template. As you can see, my faves list is super random, which is exactly what I love! It’s not something you have to stress out over: make a list of 10 things, scrap it and boom, you’ve captured an easy snapshot of YOU in your scrapbooks. Just think how much fun it’ll be for you or your kids & grandkids to look back on one day!

nettio_19-2013Faves-08Aug-1400

Team Awesome Inspiration

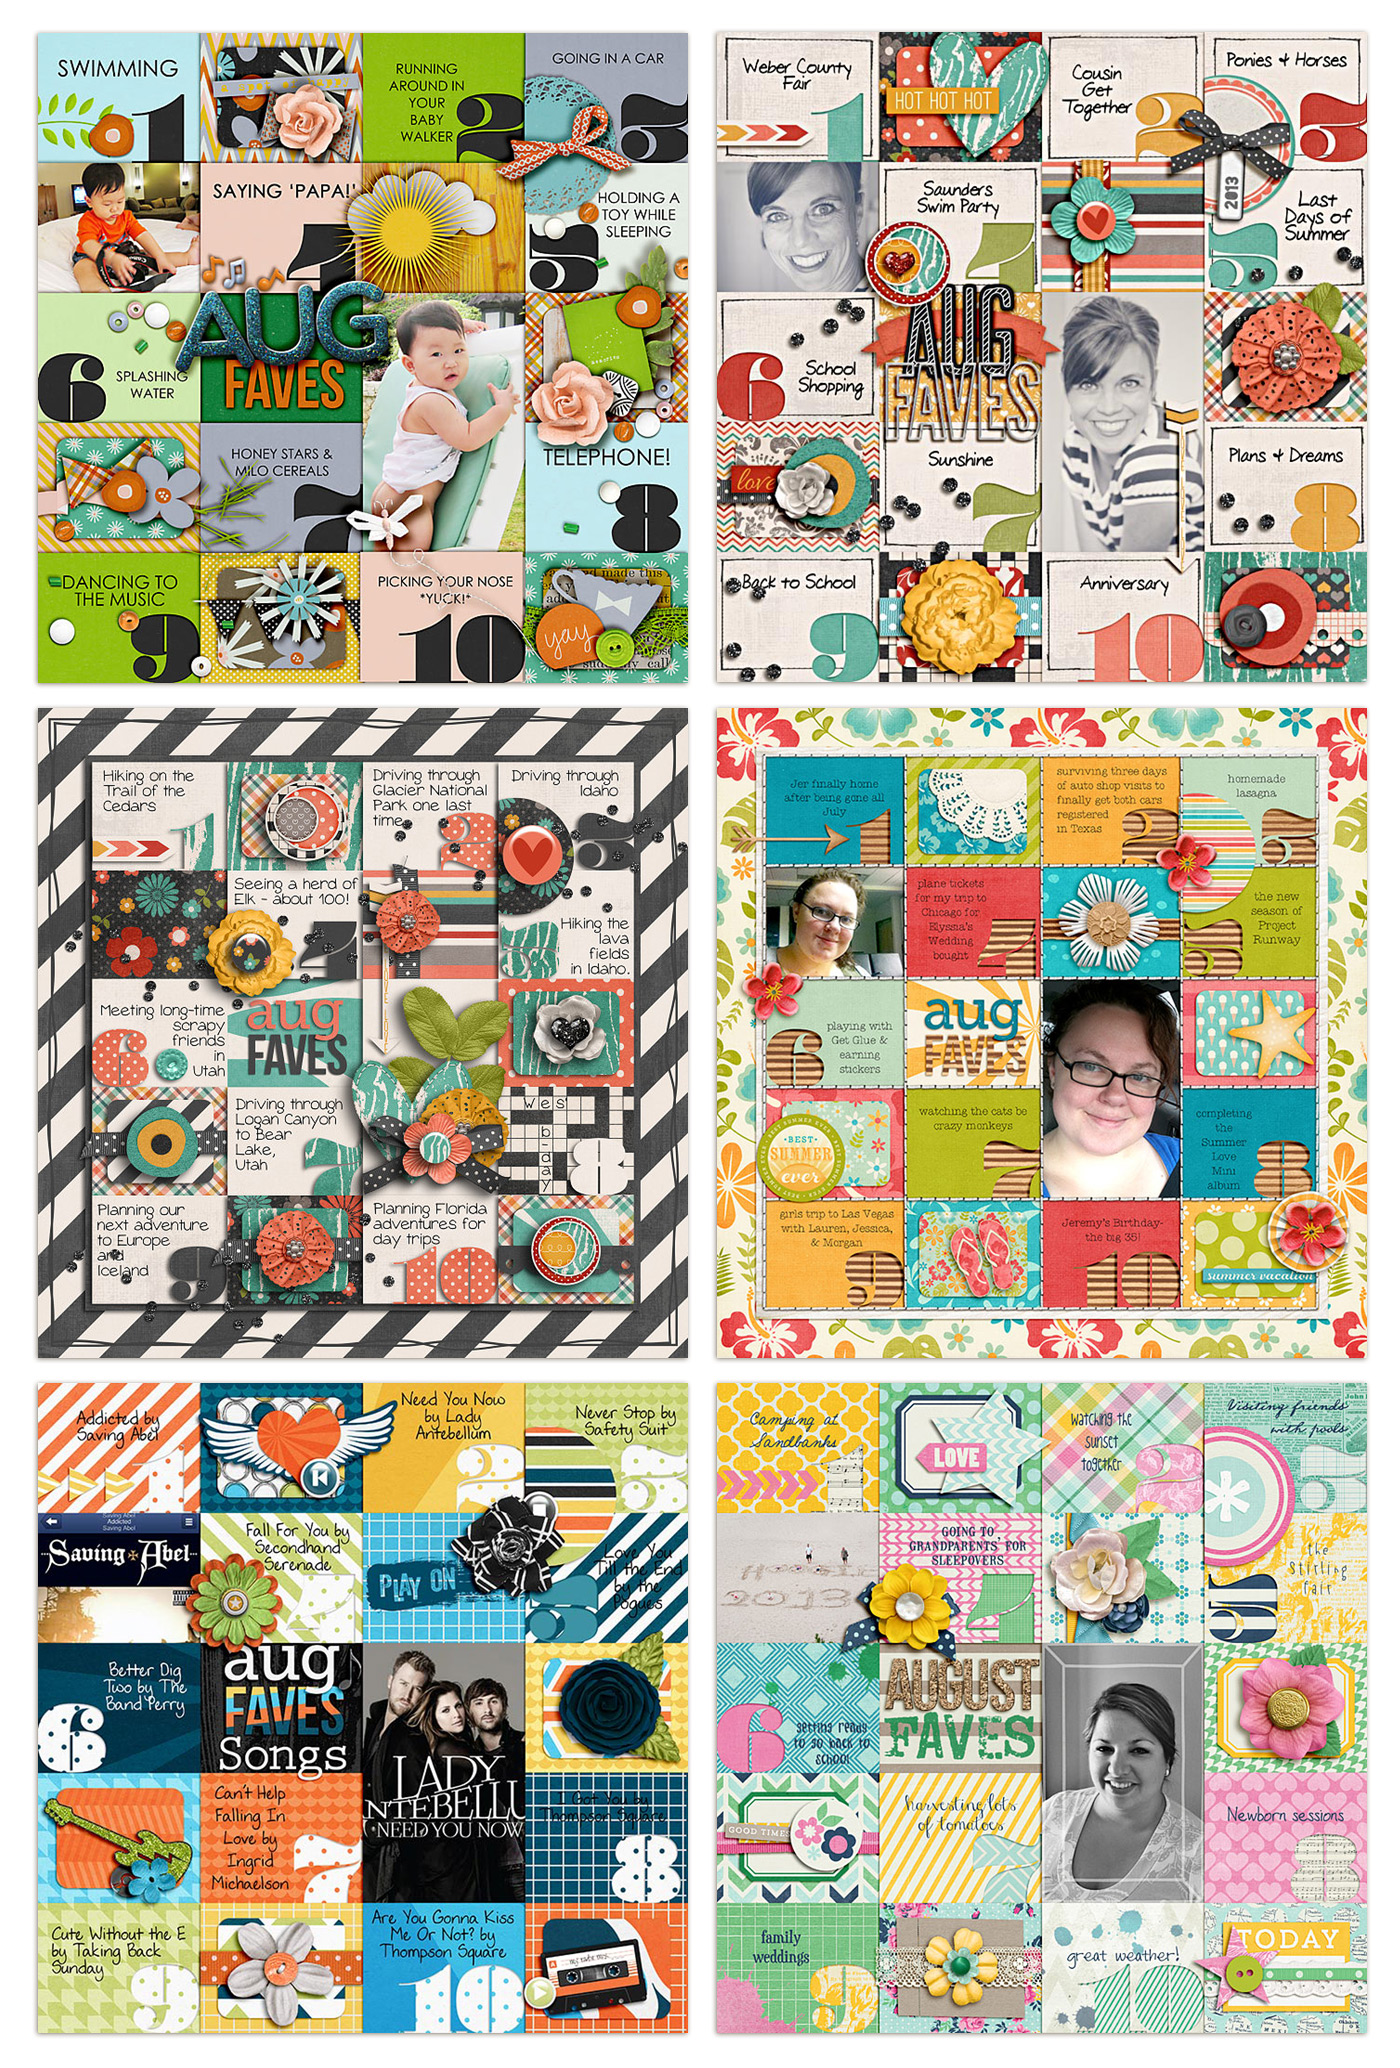
Of course my team had a ton of fun this month scrapbooking their own take on the August Faves:

nettiodesigns_augfaves-CTLOs

New Release Discount: SAVE 20% thru Saturday

And of course, as with every Sweet Shoppe Saturday, you can save 20% off all new releases thru Saturday.

nettiodesigns_AugFaves-20off-1400

Spend $10 & Get Free Templates from Me!

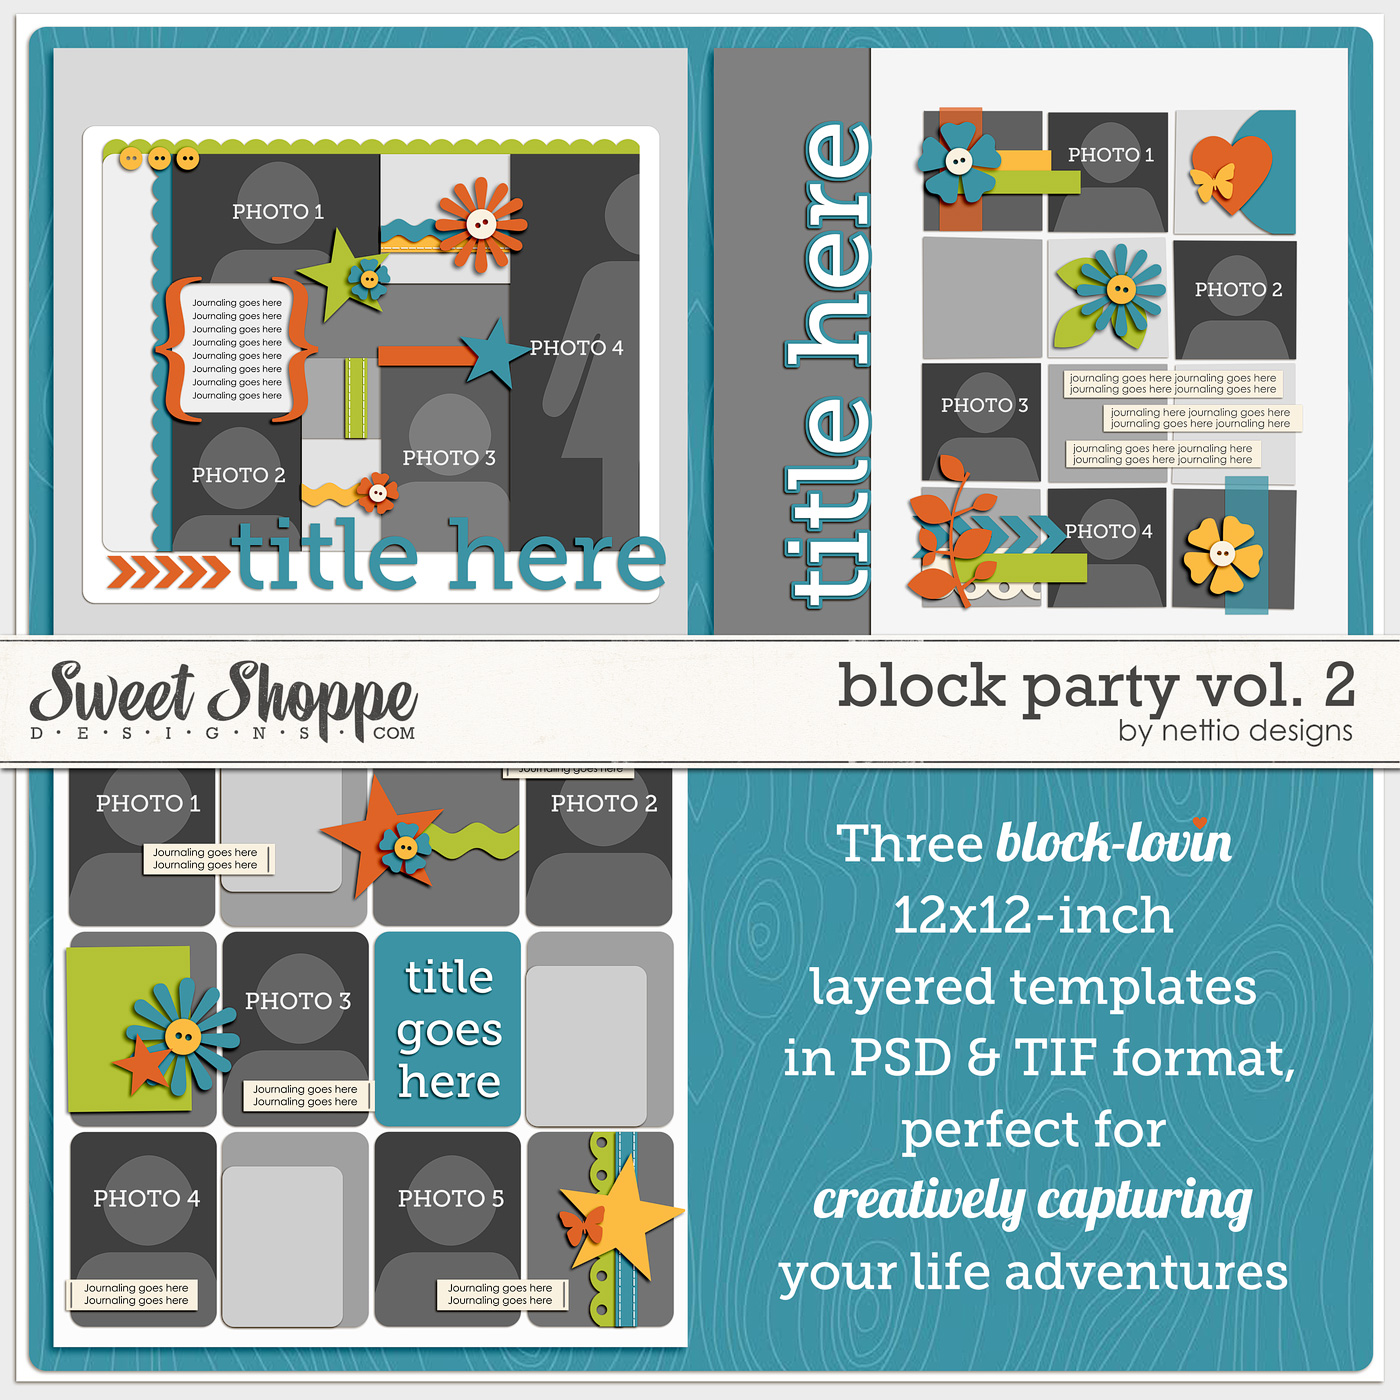
And in case you missed it last weekend, I am the SSD Featured Designer for the second half of August, which means between now and August 31st, you can pick up my brand-new Block Party Vol. 2 Templates for FREE with any $10 purchase at Sweet Shoppe Designs.

nettiodesigns_BlockPartyVol2-preview-1400

Want to save 20% off this weekend AND get free templates with your purchase?

Pick up FAVE-O-RITES 2013: Aug Faves here today!

Well, that’s it from me today! Have a great weekend everyone!

How do I purchase Levitra without going to the doctor

POSTED IN Shop News & Releases, Template-y Goodness

How To Design Type For Your 10 Things I Love About You Mini Book

POSTED ON February 5, 2013 IN 10 Things I Love Mini, Memory Keeping

Over the weekend at Sweet Shoppe Designs I released my 10 Things I Love About You Mini Photo Book Templates based on my Valentine’s Day mini photo book I wrote about last week. One of my favorite things about this album are the text-based pages. Not only are they the bread & butter of the book’s sentiment but they’re fun to design as well! So today I wanted to share a little tutorial about how I styled the text in my 10 Things I Love About You album.

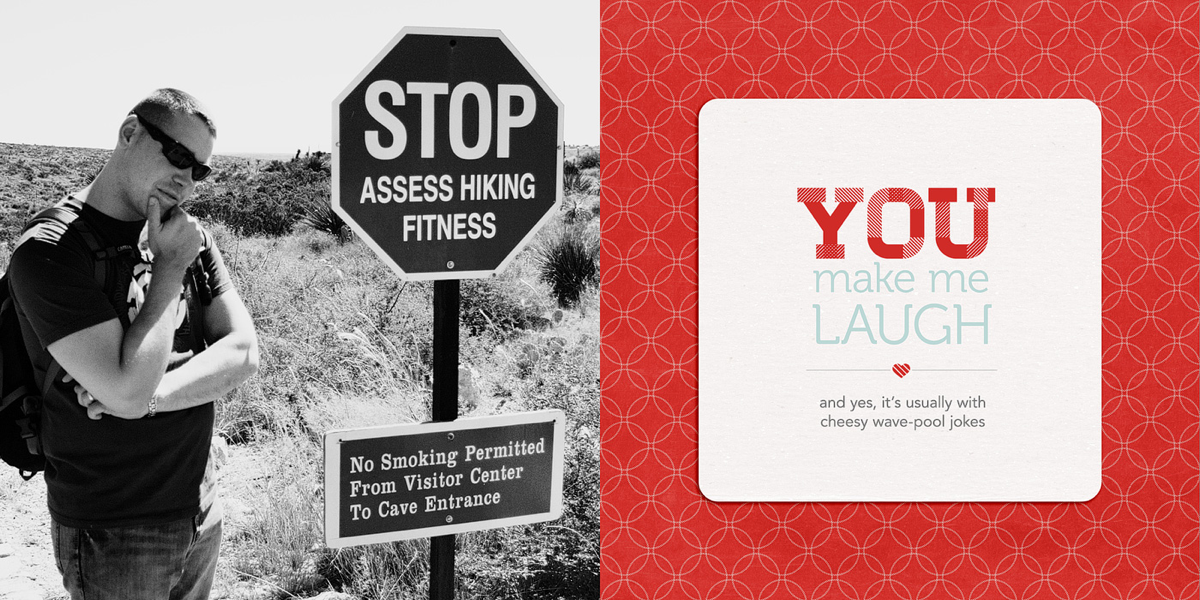
Here’s a look at the text in one of the spreads in my album. In this tutorial I’m going to show you how I designed the title & journaling on the right page.

Nettio 10Things Text Tut Completed Page

Here’s a little closer look at the text:

And here’s how I designed the text…

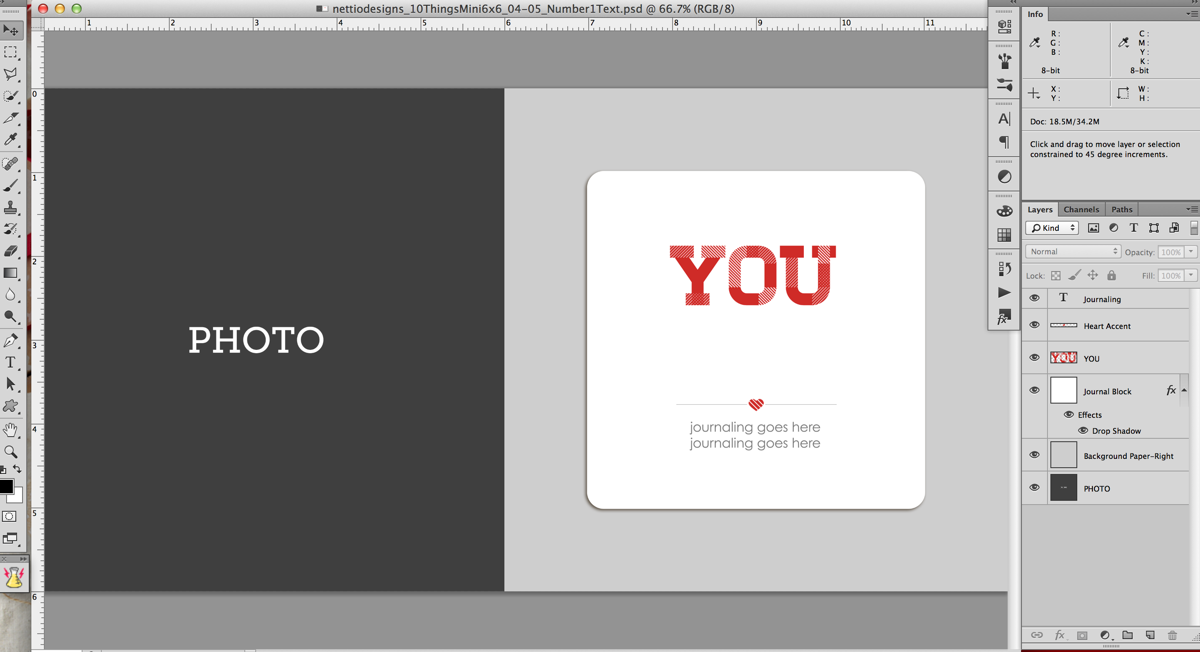
Step 1: Open the template file. It’ll look like this. The large YOU text is included as part of the template but the area below is left blank for you to fill with your own sentiment.

Nettio 10Things Text Tut Step1

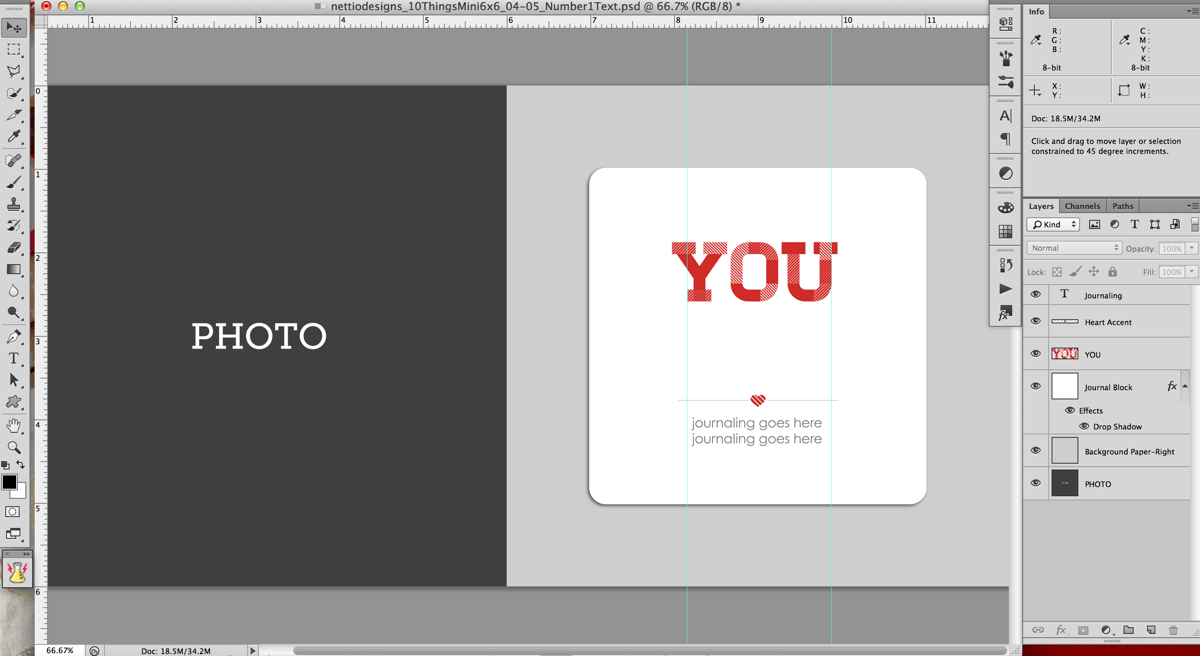
Step 2: Turn on your Rulers if they aren’t on already. Ctrl/Cmd+R will turn them on for you or you can go to View>Rulers in the menu bar. They should show up around the edges of your window.

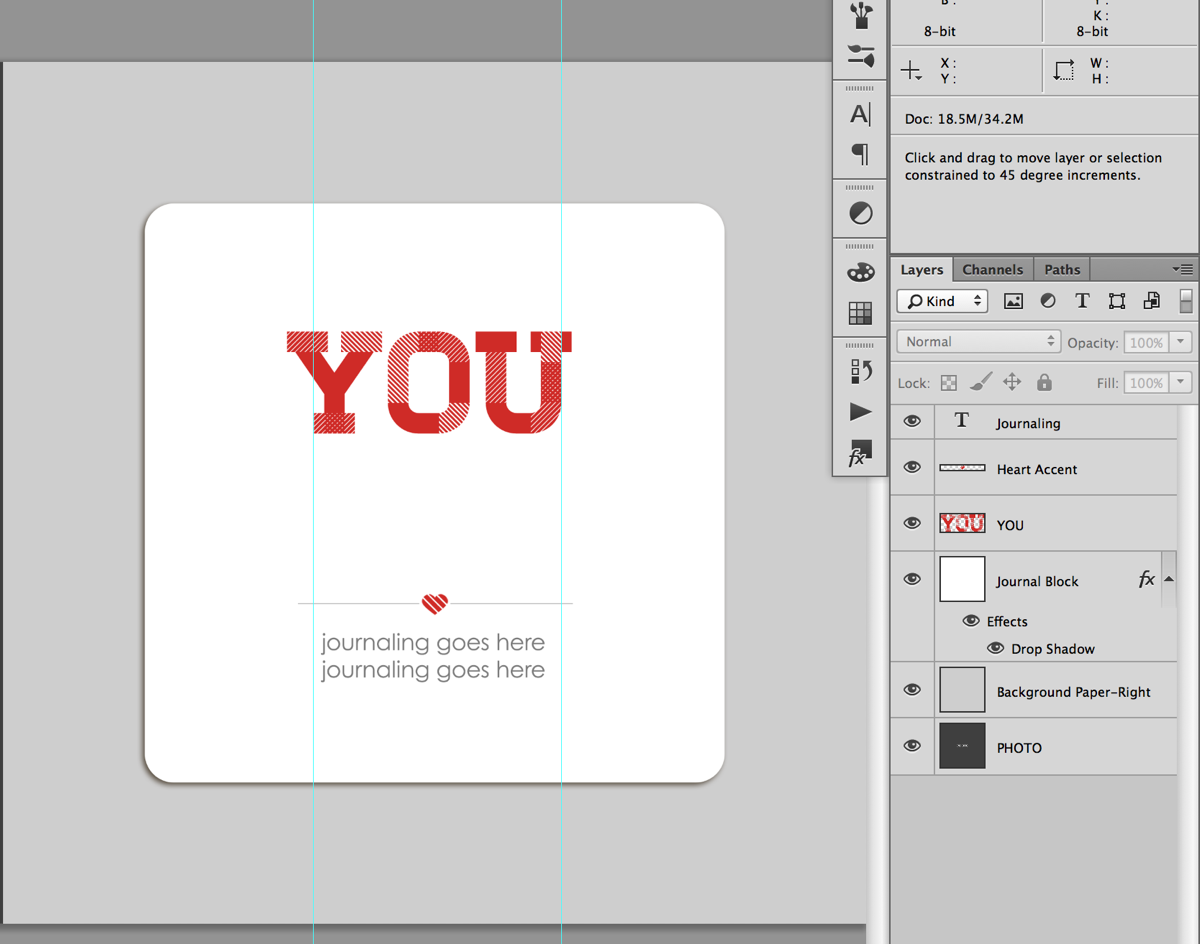
Step 3: Drag two guidelines out from the rulers – one to the left side of the bottom of the Y and one to the right side of the U. These are going to be your guides for aligning your text.

Nettio 10Things Text Tut Step3

Here’s a closer look. Notice the left guide is lined up with the bottom left edge of the Y, not the top left edge of the Y.

Nettio 10Things Text Tut Step3b

Step 4: Decide what phrase you want to use for your text. I used a post-it note to write down a list of general ideas and then tweaked my exact wording once I was in Photoshop. Keep in mind that for the design, we will be splitting the text into multiple lines, so it tends to work best with a phrase that has some more & less important words as part of it.

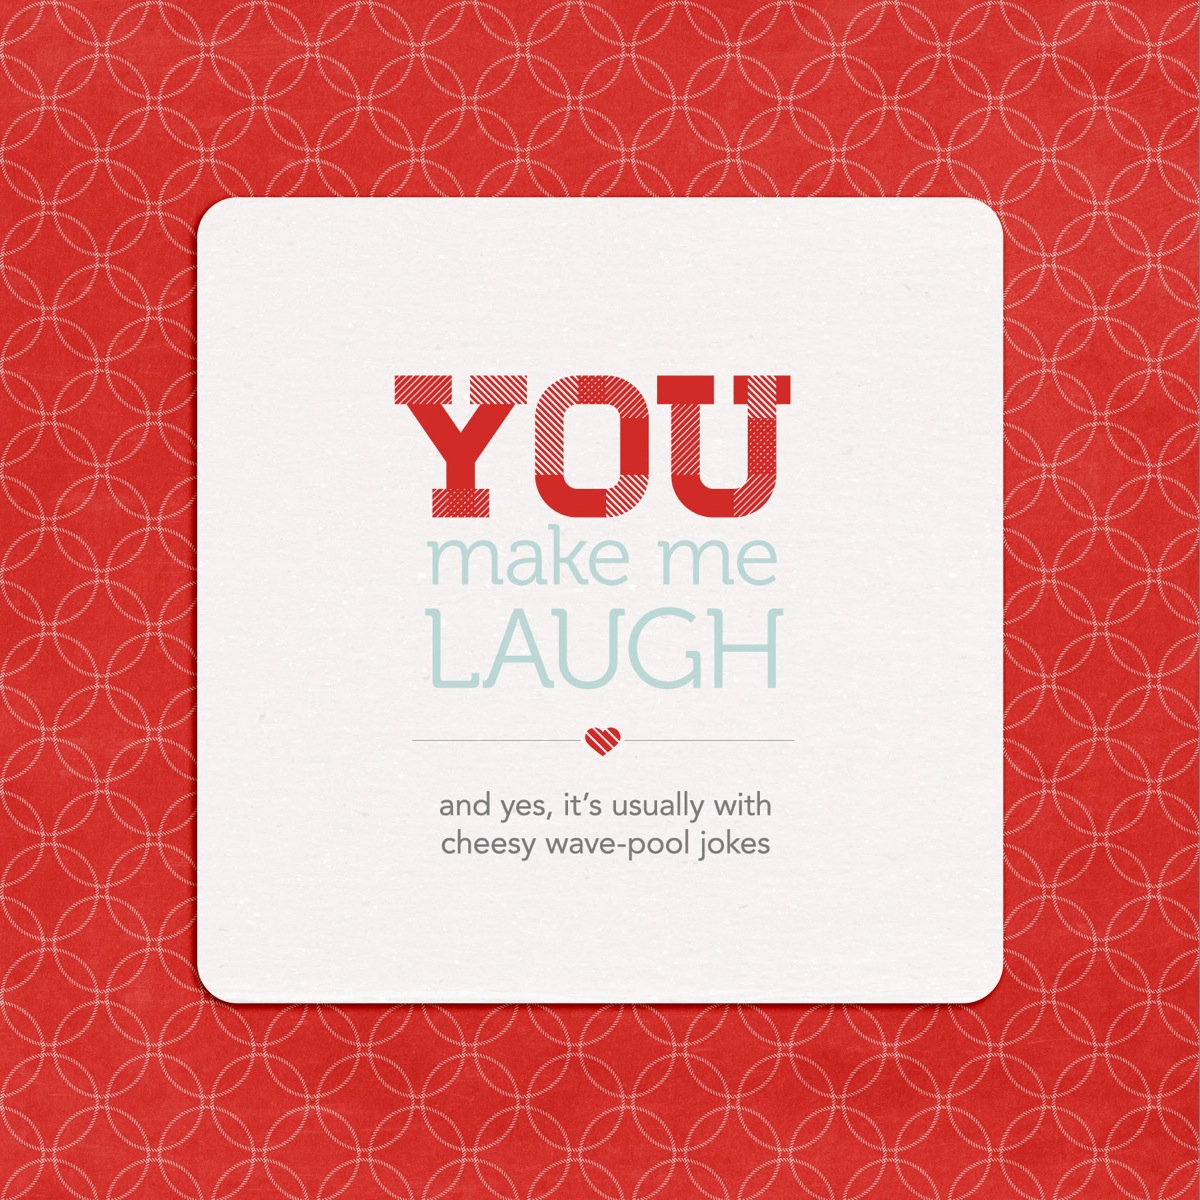
For this example I’m going to use “You make me laugh.”

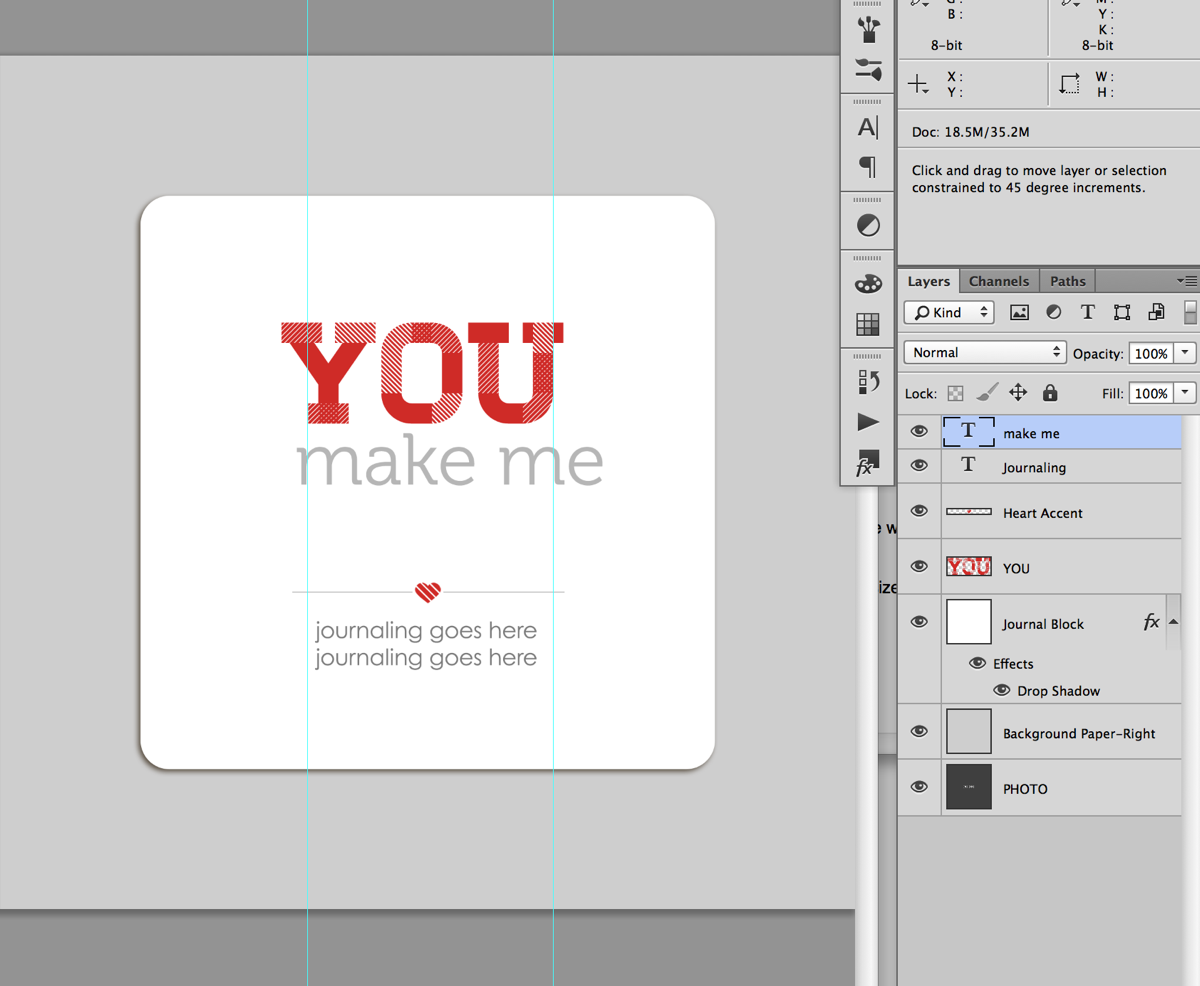
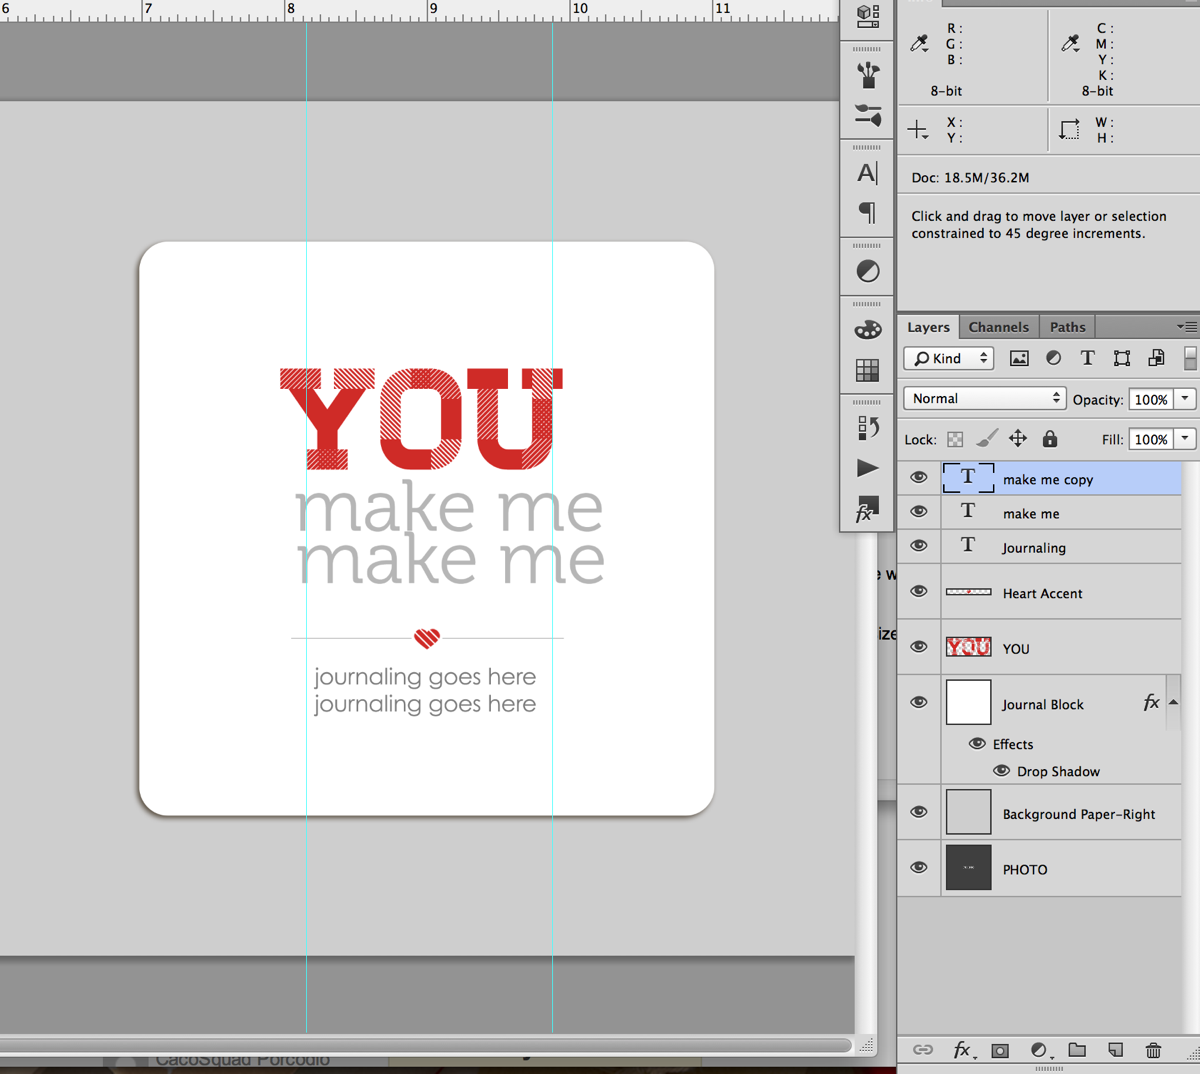
Step 5: Type your text into photoshop, dividing it in to multiple lines as you go. Don’t worry too much right now about which words goes onto which line since we can change it in the next step. Just get all the words in there so you can see what you have to work with.

For my album I used the font Museo which can be downloaded for free here.

Nettio 10Things Text Tut Step5a

Quick tip: An easy way to create multiple lines of text to type the first half of your phrase first, duplicate that layer (Ctrl/Cmd+J or hold the Alt key & drag) and then replace the text in the duplicated layer with the second half of your phrase. If you need an additional line, you can repeat this process.

Nettio 10Things Text Tut Step5b

Nettio 10Things Text Tut Step5c

Step 6: Nudge your text layers so the left edge of your text lines up with the left guideline.

Nettio 10Things Text Tut Step6

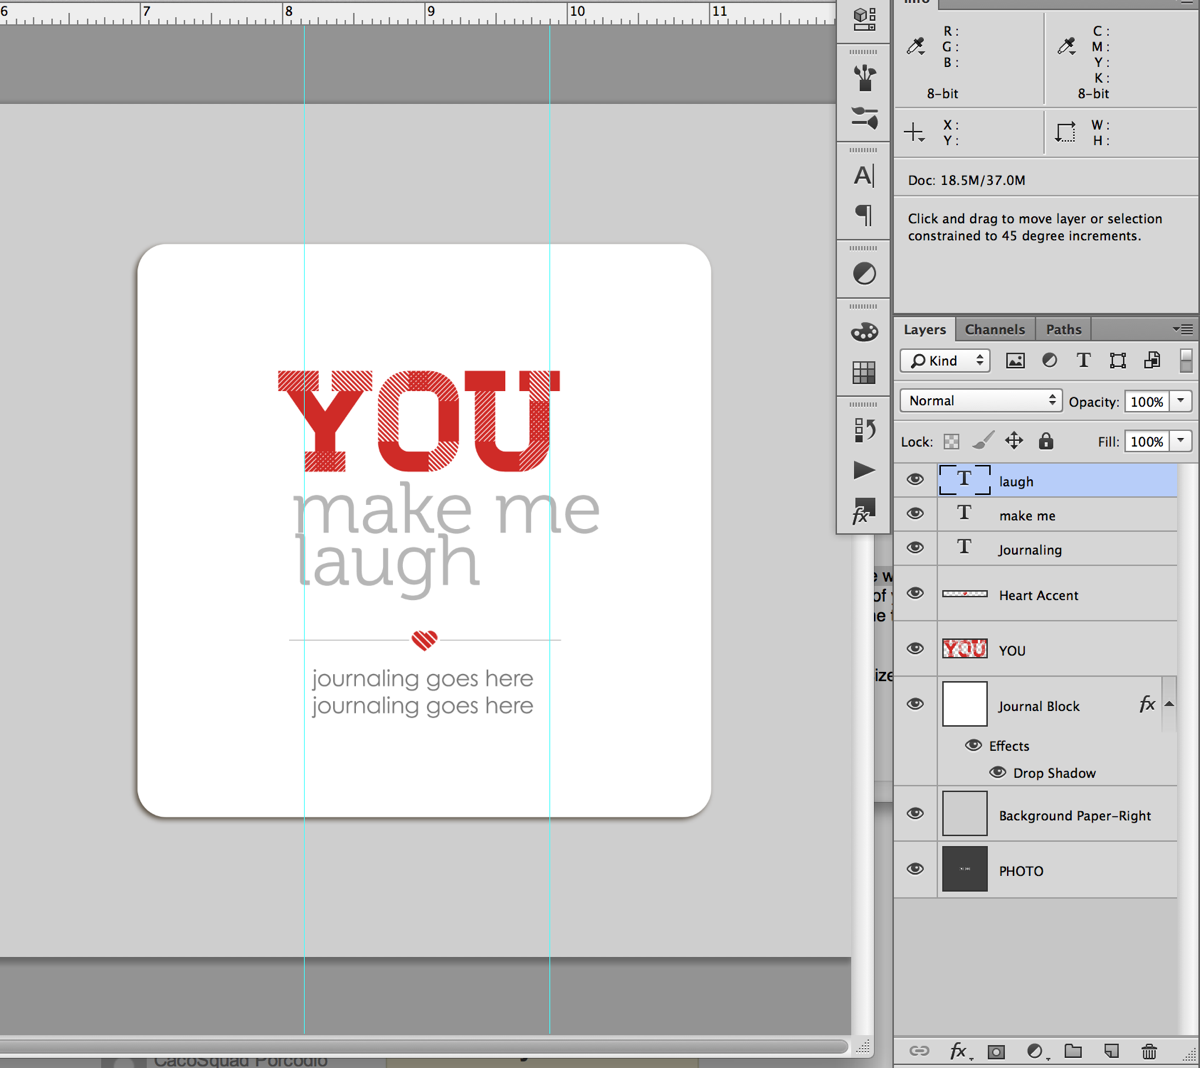
Step 7: Decide on the word (or words) you want to emphasize. For my example I chose to emphasize the word “laugh.”

Quick tip: If you’re having a hard time deciding what word you want to emphasize, try saying your phrase out loud, paying attention to which words you naturally emphasize when you speak. Yes it’ll feel silly, haha, but it helps!
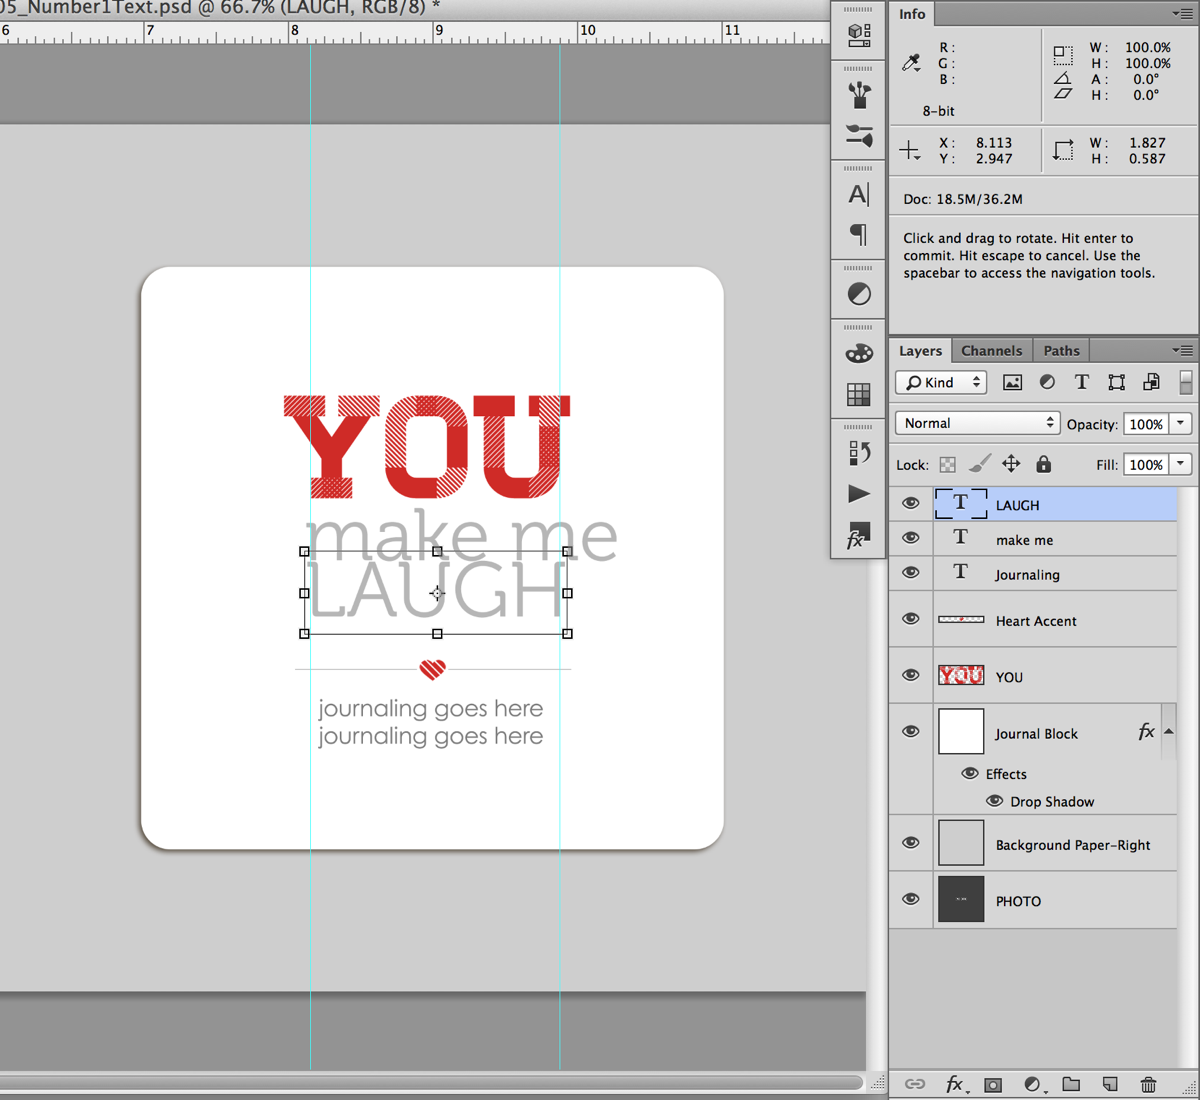
Step 7: Select the text layer of the word you want to emphasize with your Text tool (T) and retype your word in all caps.

Nettio 10Things Text Tut Step7

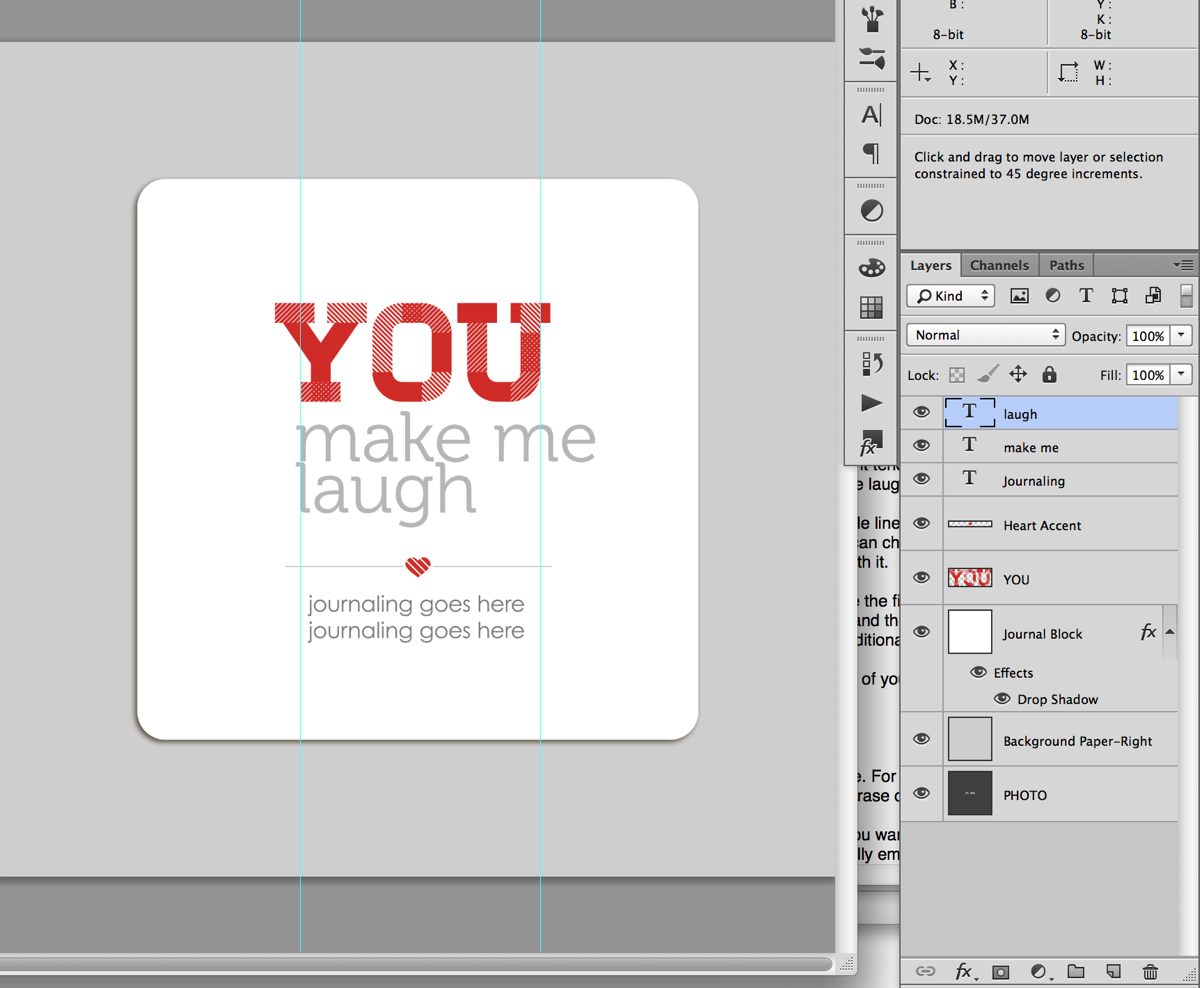
Step 8: With your text tool still selected, hit Ctrl/Cmd+T on your keyboard to Transform the text so the right edge lines up with the right guideline we drew earlier. Depending on the word you chose, you’ll be sizing your text larger or smaller. Once you’re done transforming your text hit the enter key.

Nettio 10Things Text Tut Step8

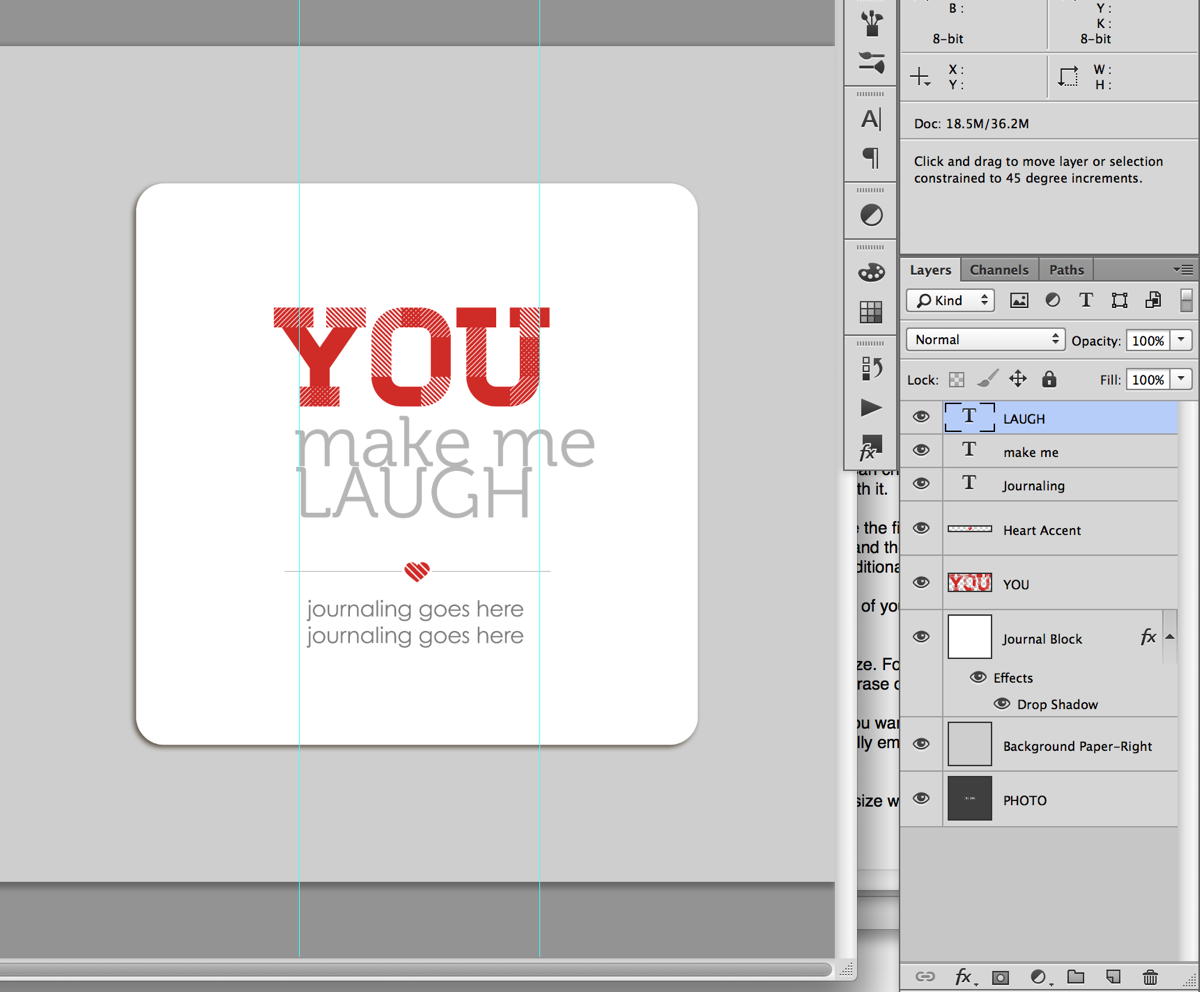
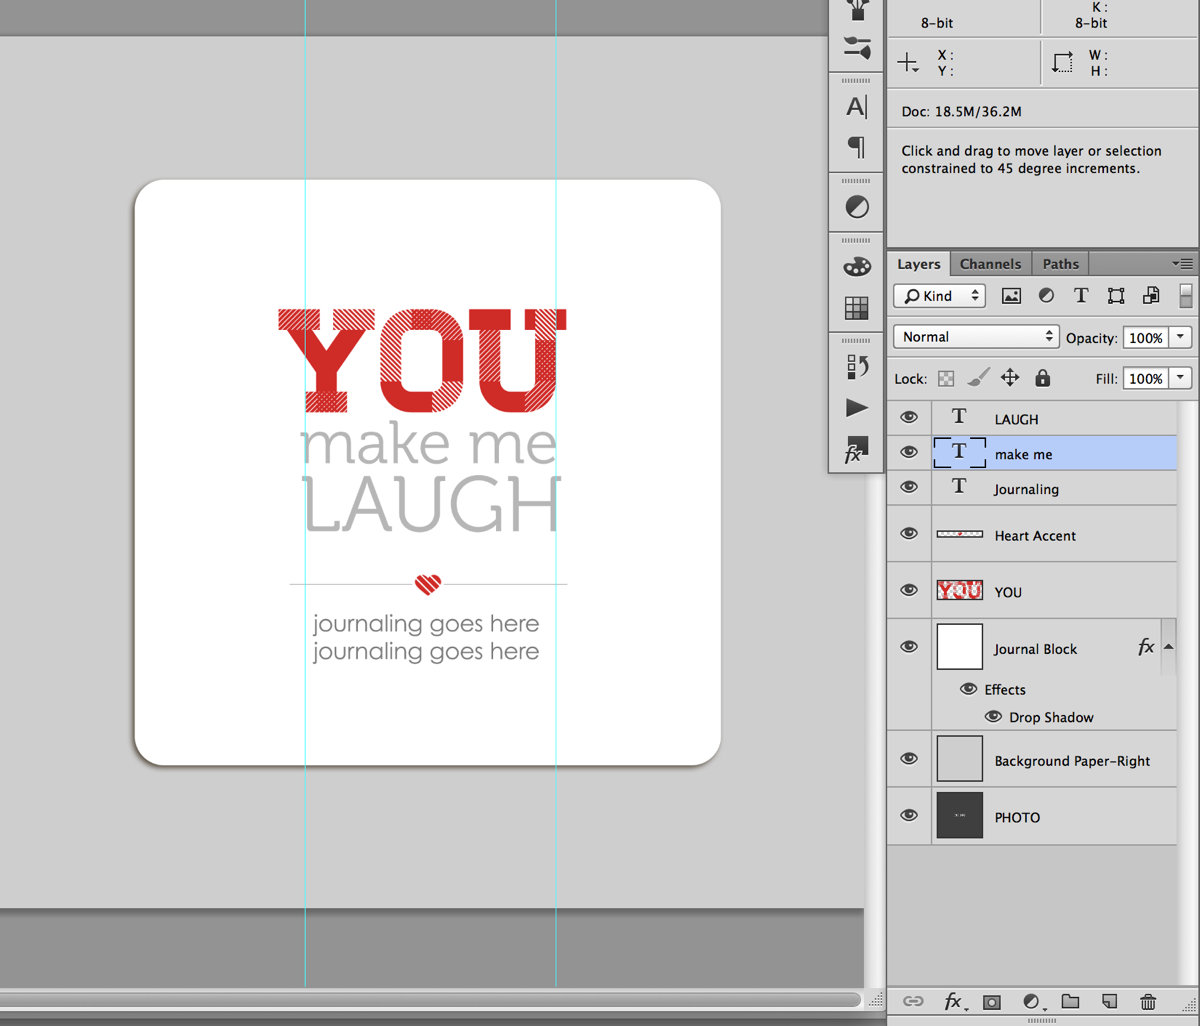
Step 9: Now we’re going to do the same thing with the text we want to demphasize. Select the text layer for the text in the Layers panel and with your Text tool selected, Transform your text (Ctrl/Cmd+T) so it lines up with the right guideline. If you have more than 2 lines of text in your phrase, repeat this step for each line of text.

Nettio 10Things Text Tut Step9

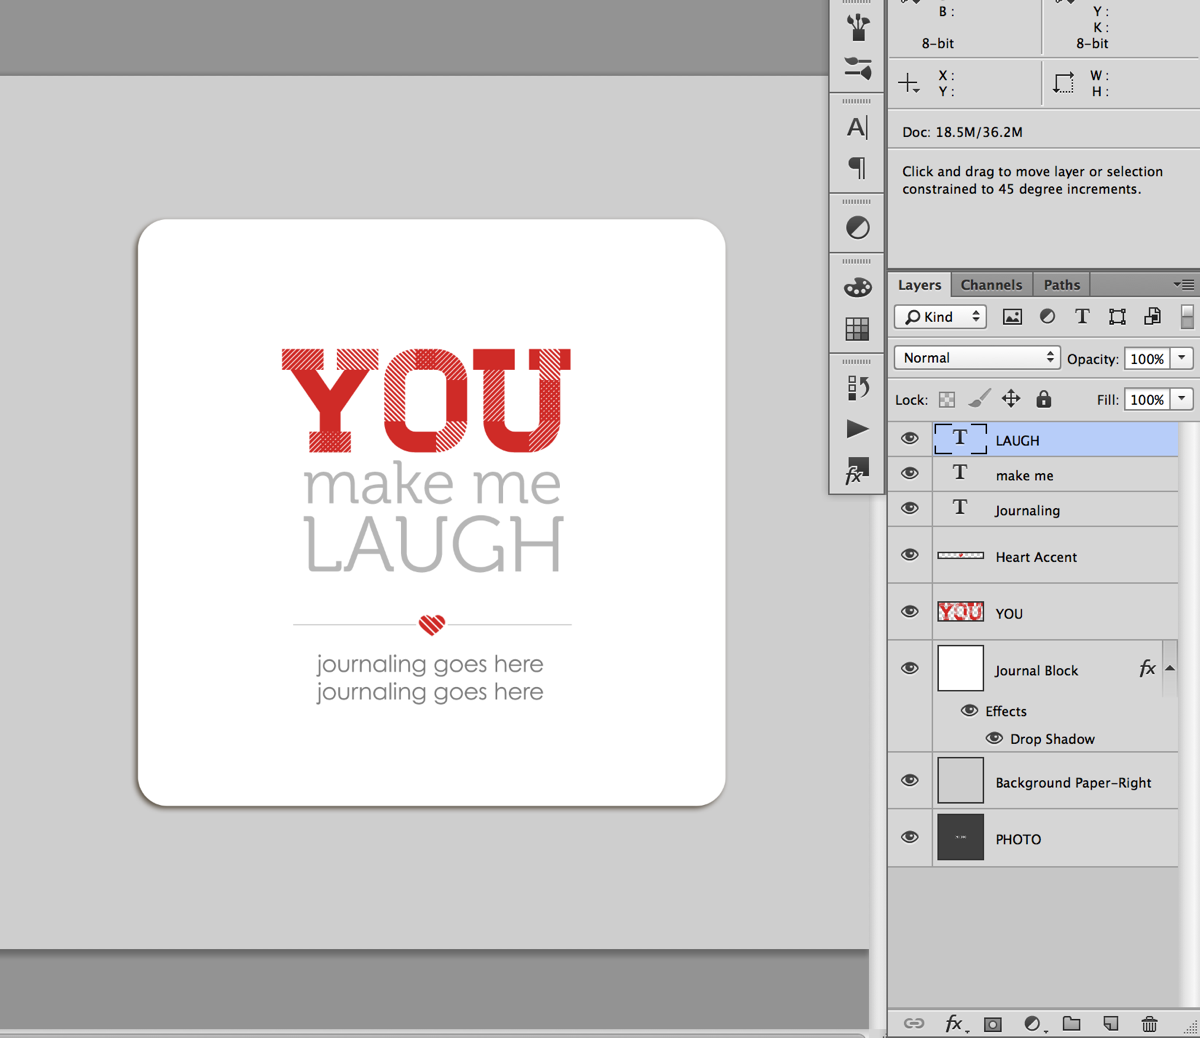
Step 10: Turn off your guidelines (Ctrl/Cmd+;), take a look at your text and see how you’re liking it.

Quick Tip: This is the point in the process where it may take a little trial and error to get a look you like. Try different combinations of words, caps vs no-caps or separating your lines of text differently. Sometimes all it’ll take is a little nudge of the words up or down or right or left to get it to look good to your eye. I usually end up turning the guidelines on and off a few times until I get a look I like.

Nettio 10Things Text Tut Step10

I’m liking how this looks so I’m going to move on to the next step.

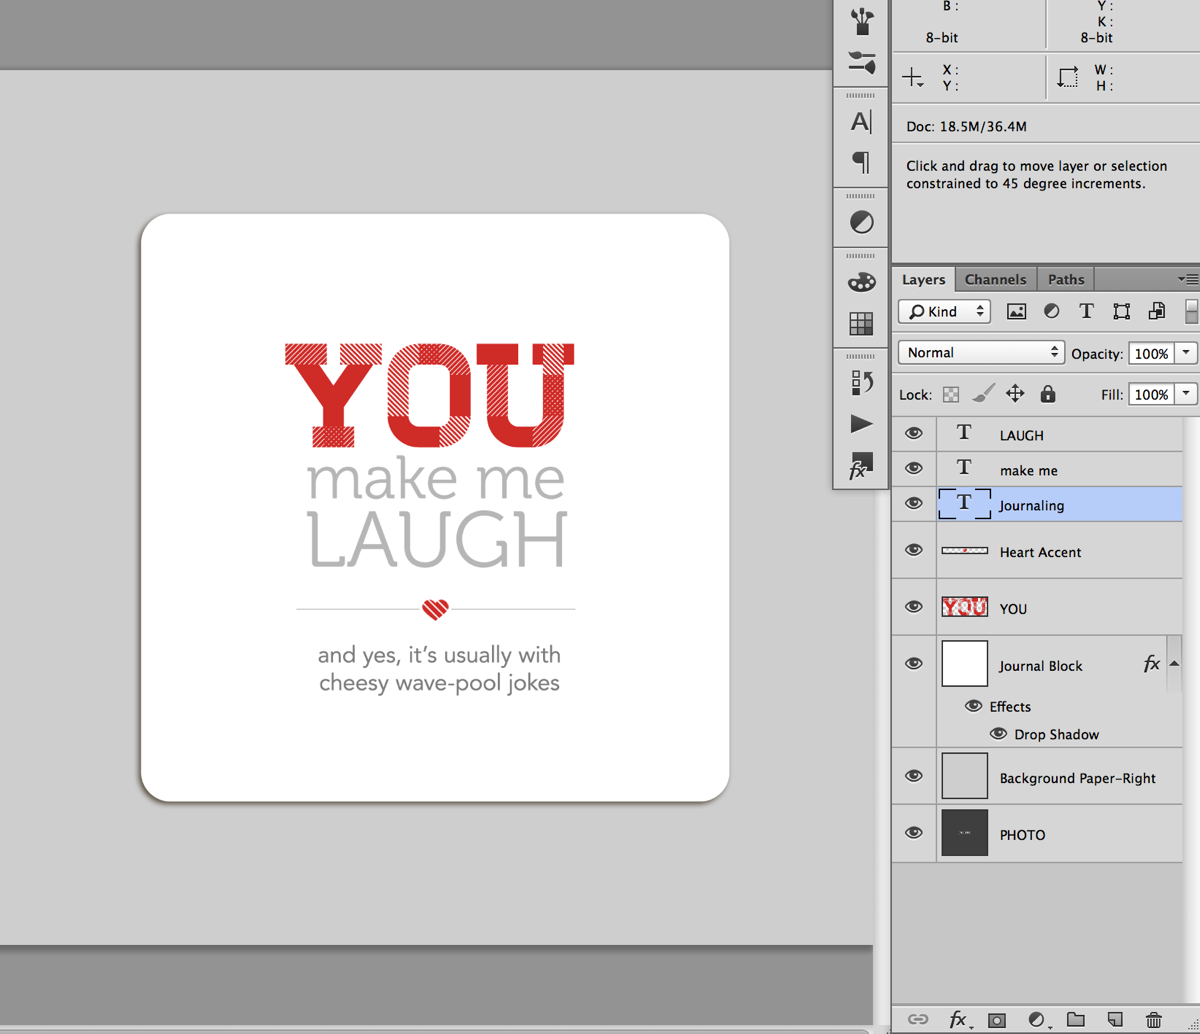
Step 11: Once you have your main title text placed the way you would like, add in your additional journaling below the heart accent line and adjust the spacing between the text as needed.

Since my phrase was fairly short, I moved my accent and journaling up just a tad so everything was evenly spaced. If your phrase is long, you may need to move the entire block up text up just a smidge to keep it centered vertical in the journaling block.

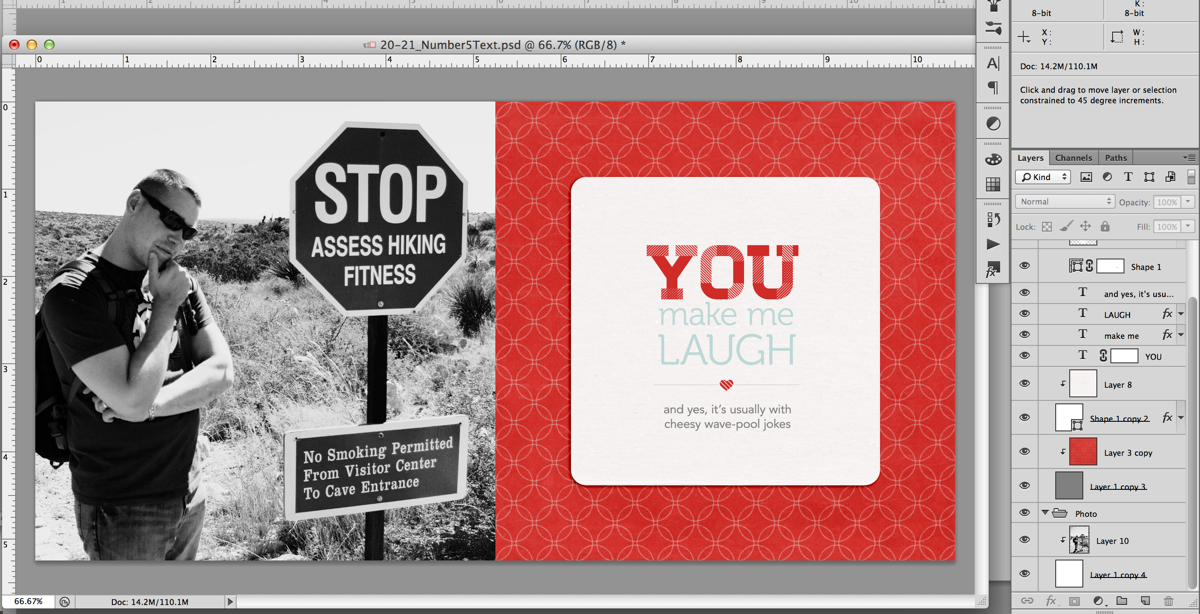
Nettio 10Things Text Tut Step11a

And here’s what my completed page looked like once I added my photo and papers:

Nettio 10Things Text Tut Step11c

A closer look at the text page:

Nettio VDayMini 21No5Text

And my full completed page as printed:

Nettio 10Things Text Tut Completed Page

Of course if you’d like to add your text using something other than a font say like a digital alpha, here’s a great example from Team Awesome member Jen using the alpha from Talk Nerdy To Me:

Fun, right? I hope this gives you some tips & ideas for designing and styling your own mini book text. And of course, if you’d like to make your own version of this lovey-dovey mini, you can pick up the 10 Things I Love About You Mini Photo Book templates right here.

Any questions about this tutorial? Feel free to ask away in the comments section below and I’ll be happy to help you out.

Fraudulent Drugs Are A Huge Global Problem

POSTED IN 10 Things I Love Mini, Memory Keeping, Digital Scrapbooking, Hybrid Scrapbooking, Mini Albums, Template-y Goodness, Tips & Tricks

New Release | 10 Things I Love About You Mini Photo Book Templates

POSTED ON February 1, 2013 IN 10 Things I Love Mini, Shop News & Releases

Happy Friday everyone! Surprised to see me?

In honor of Sweet Shoppe Designs’ 7th Anniversary this month, we’re kicking off February a little early with a special Sweet Shoppe New Release Friday this week. Which is awesome for me because I can’t wait to share this week’s new release with you!

I don’t know about you but Valentine’s Day and I are not exactly friends. I’m not the most mushy person in the world to begin with so I always have a hard time coming up with meaningful gifts for Valentine’s Day. I mean, candy, hearts, chocolate, it’s all so generic. So this year I decided I wanted to come up with a more creative & unique way to show a little love to the most important people in my life.
Which brings me to today’s release…

10 Things I Love About You Mini Photo Book Templates

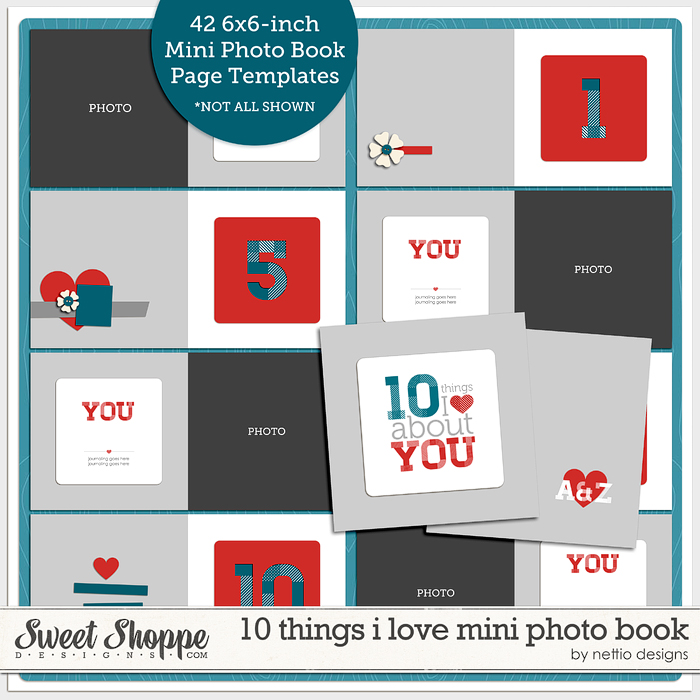
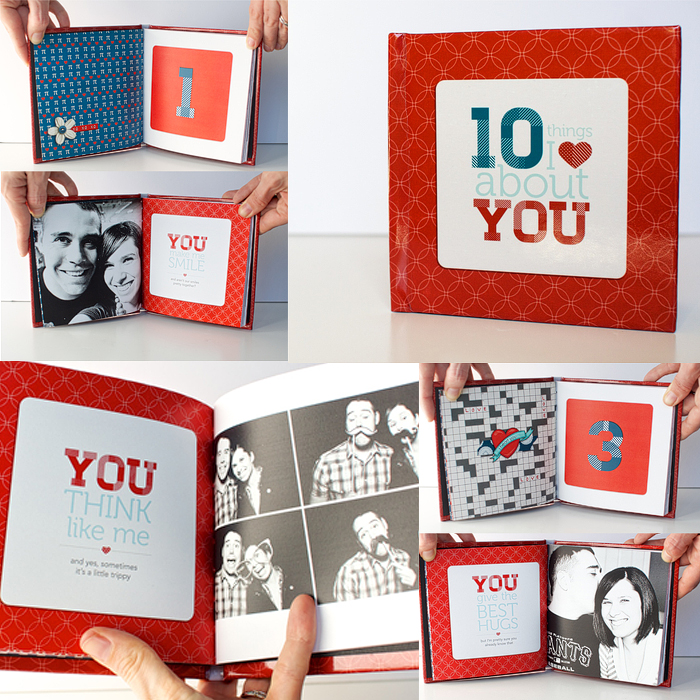
This week at SSD I’m releasing a brand-new set of photo book templates, the “10 Things I Love You” Mini Photo Book Templates. These mini-sized templates are perfect for designing your own list-lovin’ 6×6-inch or smaller photo book or mini album.

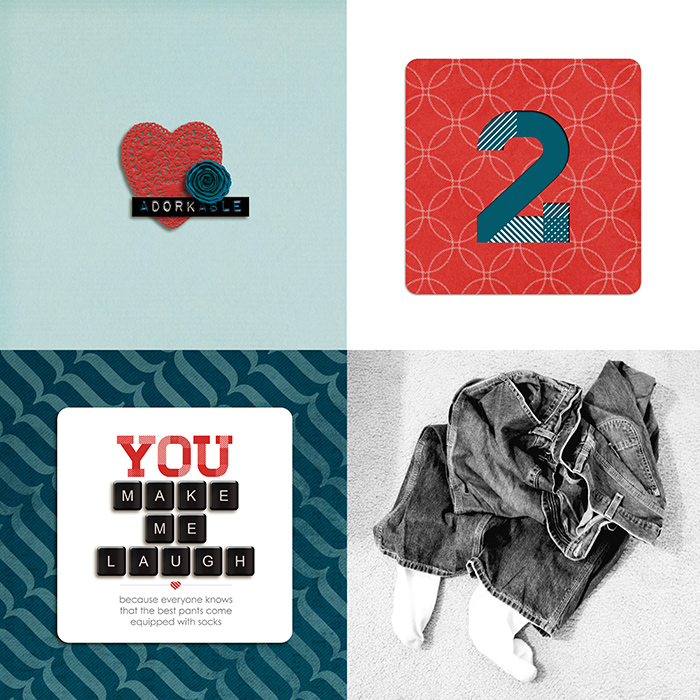
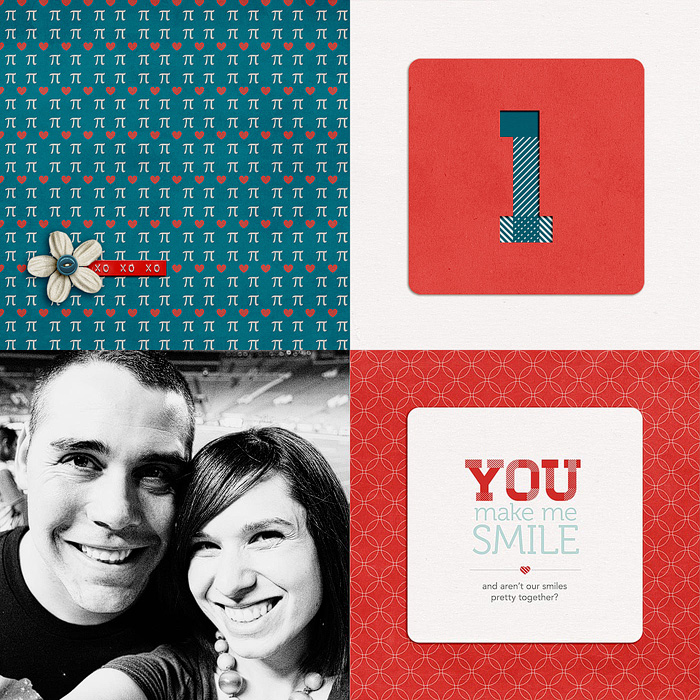
The mini book is made up of 10 sections numbered 1-10. Each numbered section of the mini book is made up of 2 two-page templates for a total of 4 pages: one accent & number spread and one photo & text spread, each themed around this idea of “YOU” like so:

To make printing extra easy on you, I’ve included two sets of templates in one download: one 6×6-inch set which can be customized for any photo book printer and a second slightly smaller 5.25×5.25-inch Mpix.com print-ready set which is perfectly sized for the 5×5 Custom Hardcover Coffee Table Book from Mpix. I used Mpix for printing my own photo book and not only was the process super quick & easy (my book arrived in 3 days!) but the quality was top-notch as well. Highly recommended!

Mini Photo Book Inspiration

Of course, I had a ton of fun designing my own pre-Valentine’s Day gift for my husband using these templates. There’s something so incredibly cool about seeing your own work as an adorable little book. Plus I guarantee your giftee will ooo and awe at your mad digi skills when it’s printed in such a legit-looking way.

Plus my husband? Totally got a little teary-eyed looking through this mini book from his normally non-mushy wife. So if you’re looking to score some major wife-y points, I highly recommend making your own lovey-dovey mini book. And with these templates, it couldn’t be any easier.

New Release Discount: SAVE 20% thru Saturday

As with every Sweet Shoppe New Release Day, you can save 20% off all new releases thru Saturday. Which since we’re kicking things off on Friday gives you a whole extra day to shop.

Want to save 20% off this weekend?

Pick up 10 Things I Love About You Mini Photo Book Templates here today!

Well that’s it from me today! Have a great weekend everyone!

Can diabetes cause erectile dysfunction

POSTED IN 10 Things I Love Mini, Shop News & Releases, Hybrid Scrapbooking, Mini Albums, Template-y Goodness

Project Life 2013 | Weeks 2-4 & A Faves Freebie For You

POSTED ON January 29, 2013 IN Free Stuff, Project Life

Welcome to Project Life 2013, Weeks 2-4.

If you’re thinking you somehow missed Week 1, well you haven’t. Ha! The week of Dec 31st to Jan 7th, we were still out in California (we flew home on the 4th) so we did a TON of stuff in those days. And since I chose to wait to start my album until my Seafoam kit arrived mid-month, I decided to start with the most recent week and work my way back. So I will share Week 1 once it’s finished, hopefully by my next update.

But I wanted to share what I have finished today.

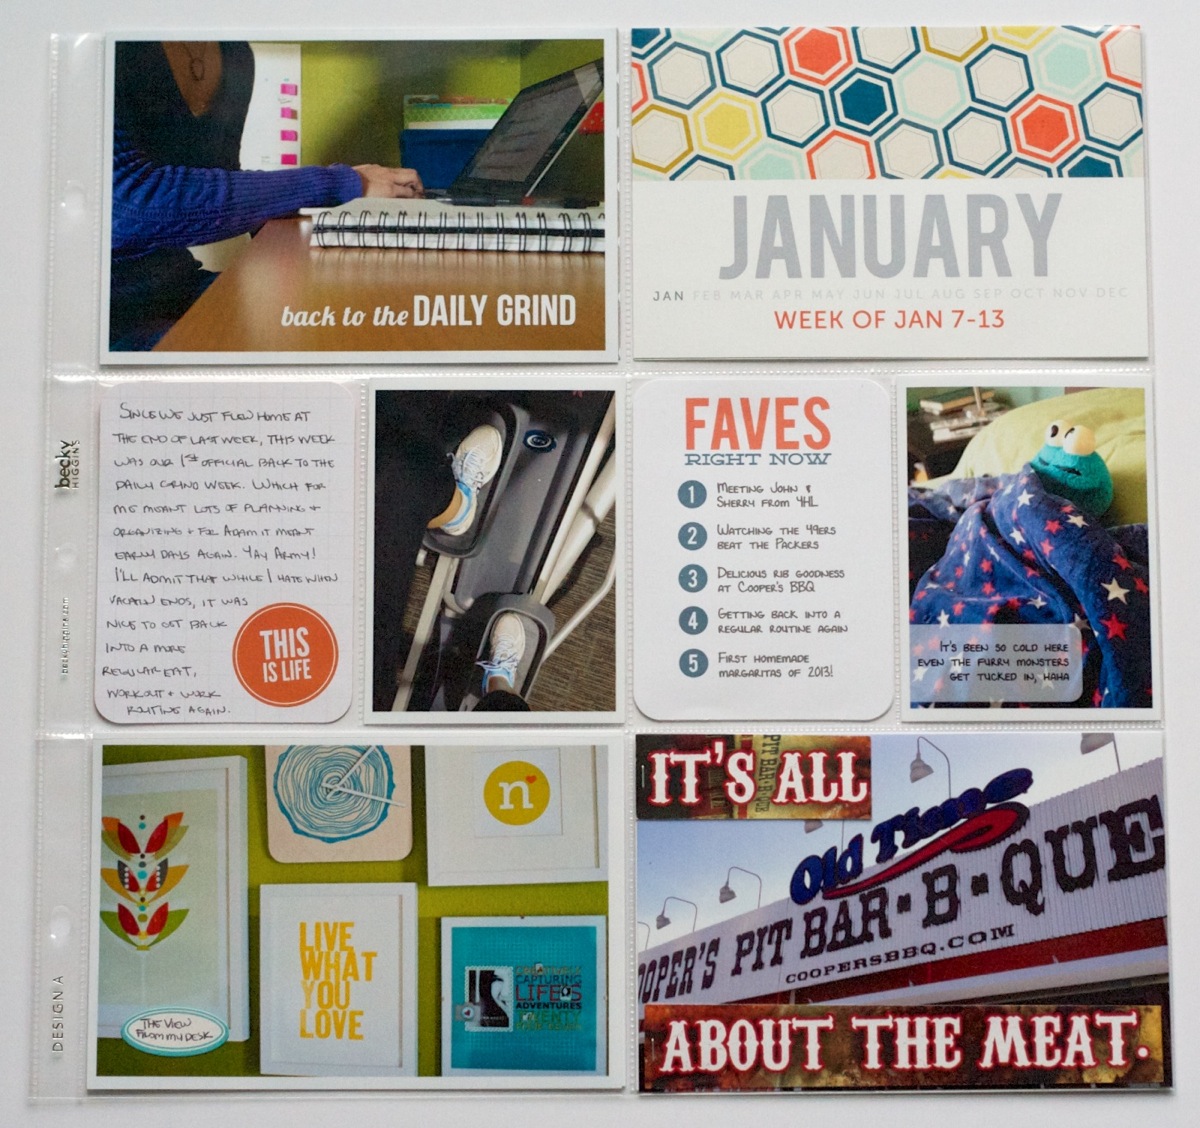
Project Life 2013 Week 2: Jan 7-13

Here’s a look at Week 2 spread. I mentioned in my Creative Adventure: Project Life post that I’m mixing Design A page protectors with a variety of other designs. You can see that in action here – the left page is Design D, right page is Design A.

Nettio Project Life Wk2 4 1

Closer view of the left side of Week 2:

Nettio Project Life Wk2 4 2

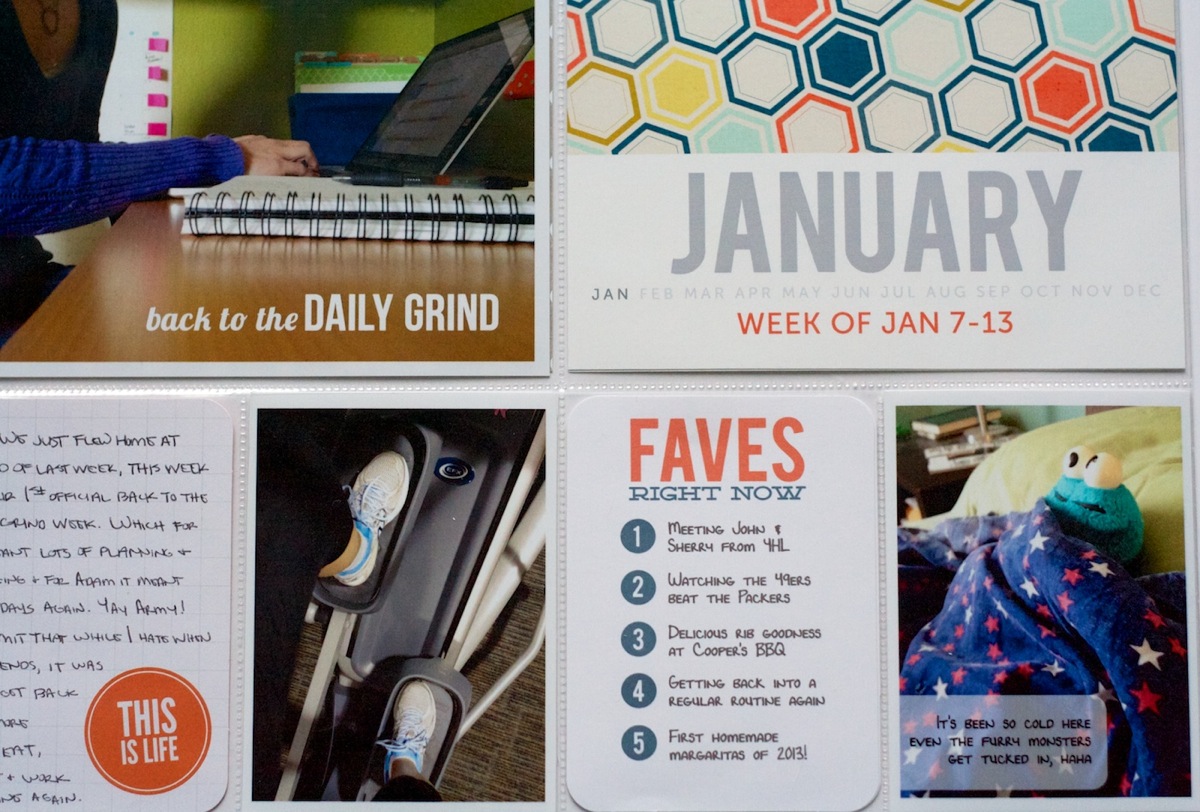
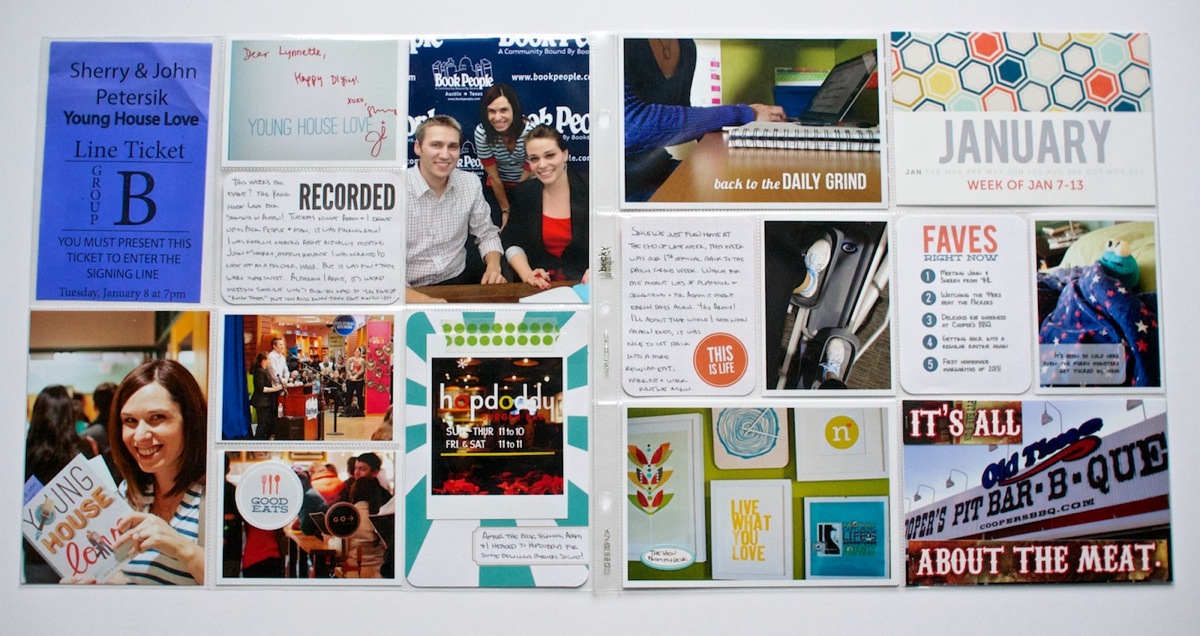
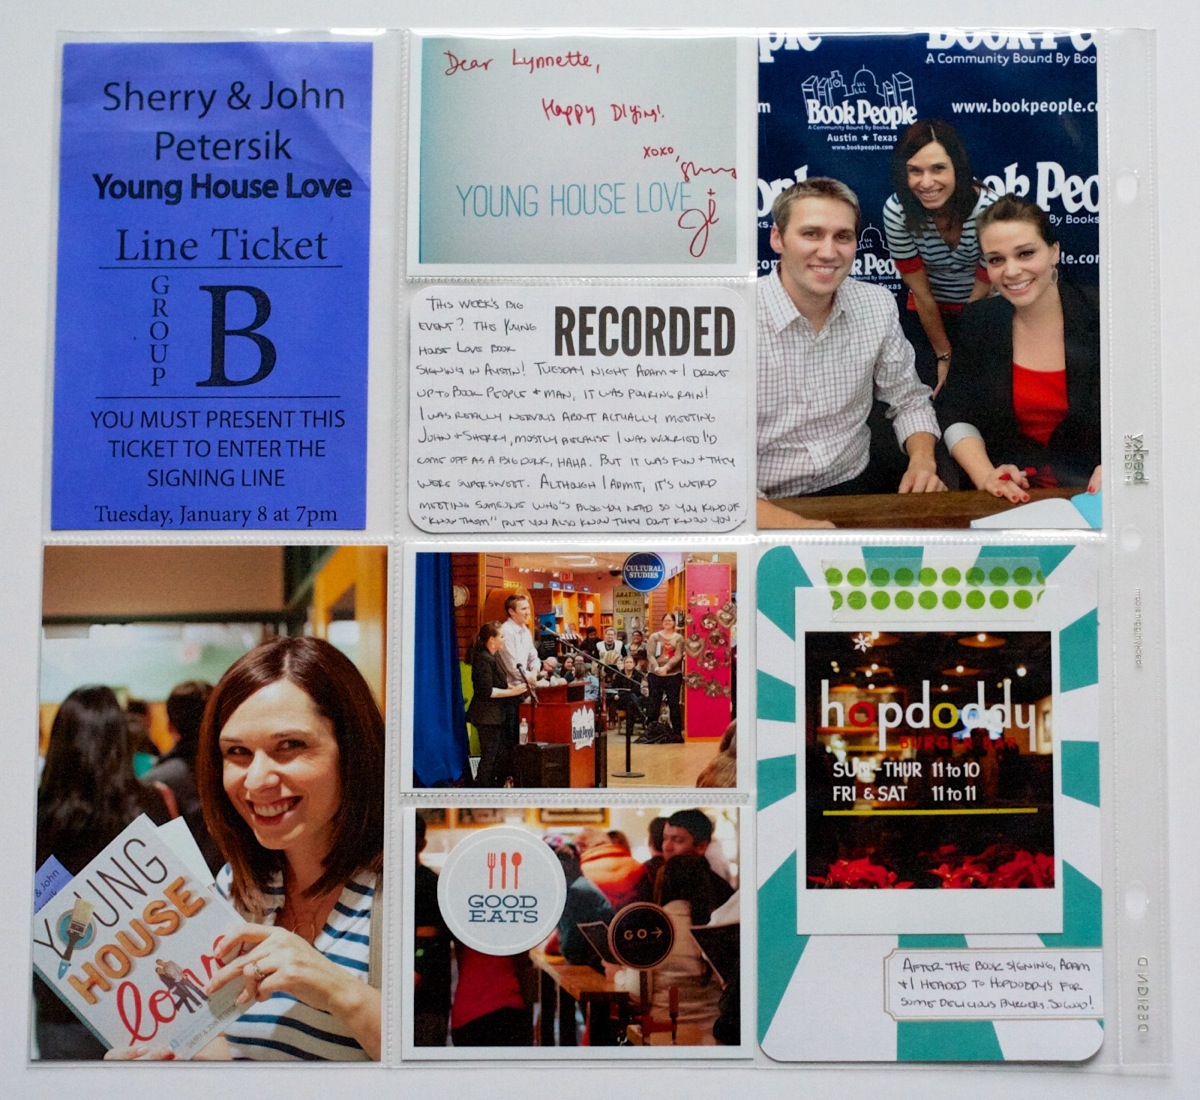
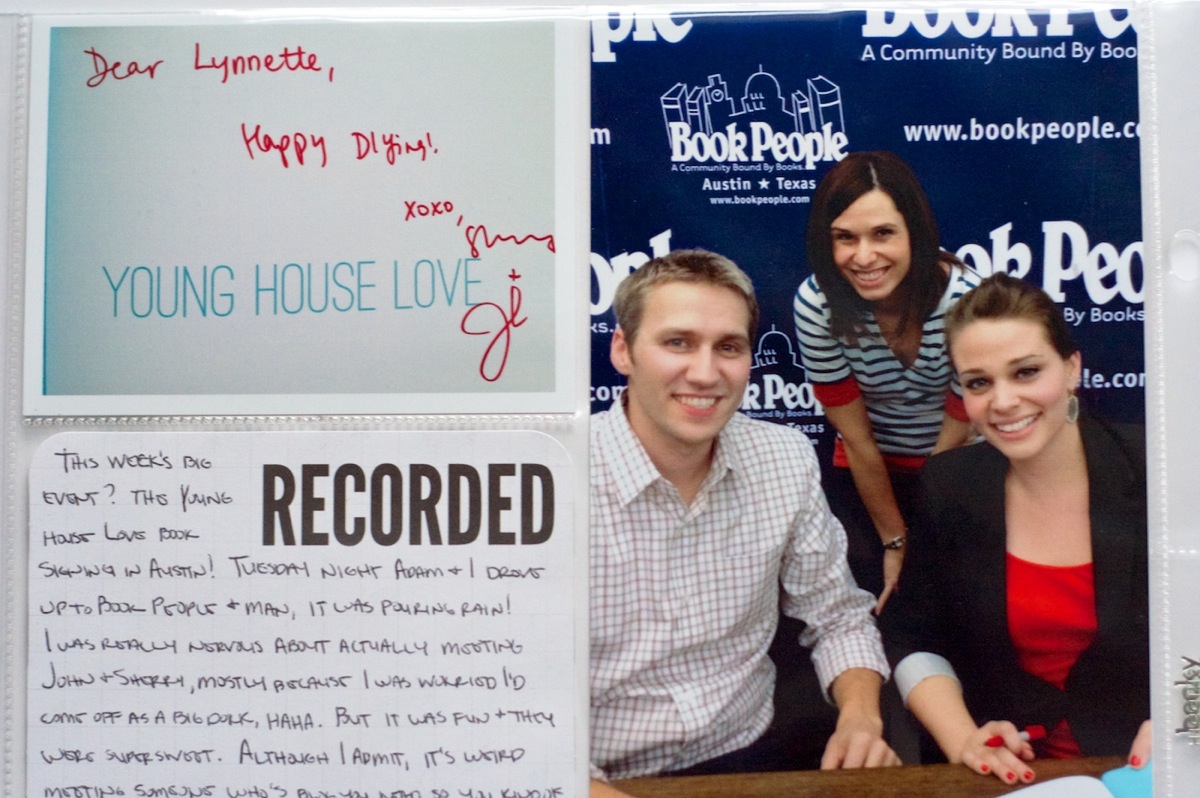
Why yes, that is me meeting John & Sherry from Young House Love (points to Jen for catching this in my peek last week!). They came to Book People in Austin for a signing so Adam and I went (even though he had no idea who they were, haha).

I admit I was really nervous – what exactly do you say to someone when you”know” all about them from their blog but they have no idea who you are? LOL! But they were super sweet though and just as fun in person as in their blog. And I have to say major points to Book People because they ran that signing like a well-oiled machine.

The photo on the left is of my signed copy of their book:

Nettio Project Life Wk2 4 2Detail 1

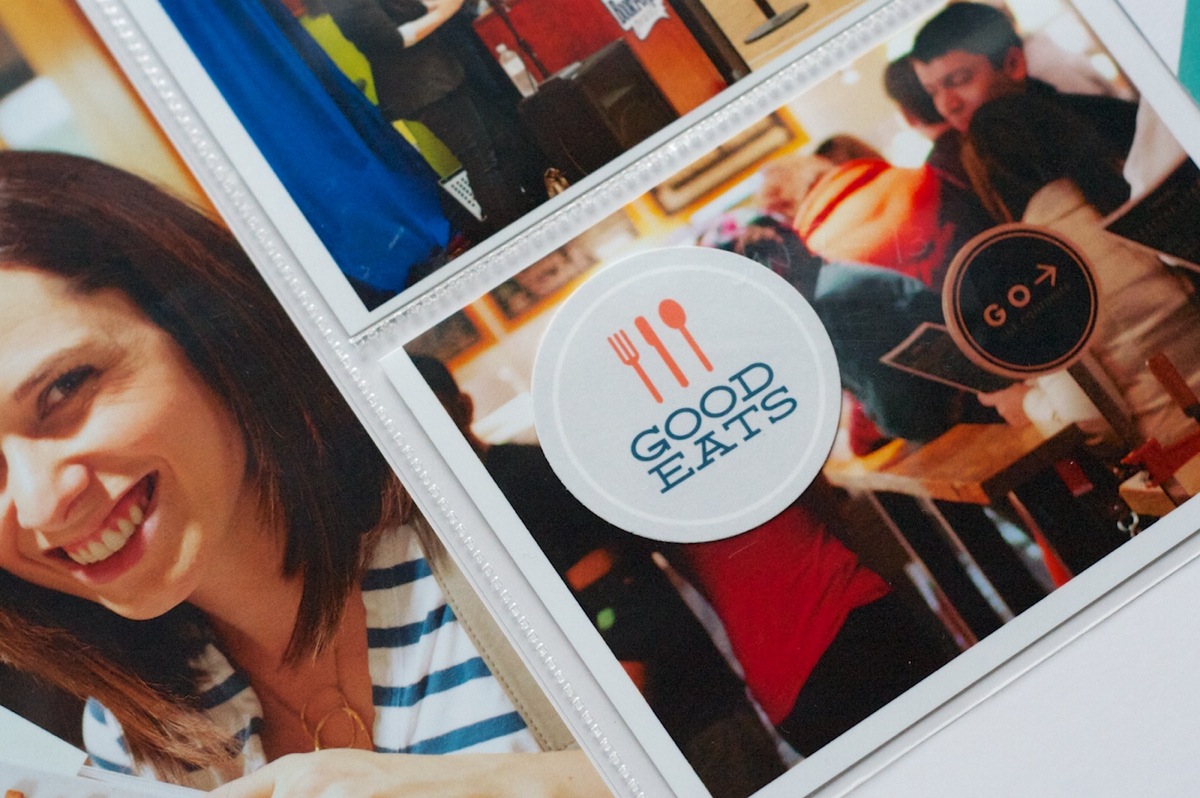
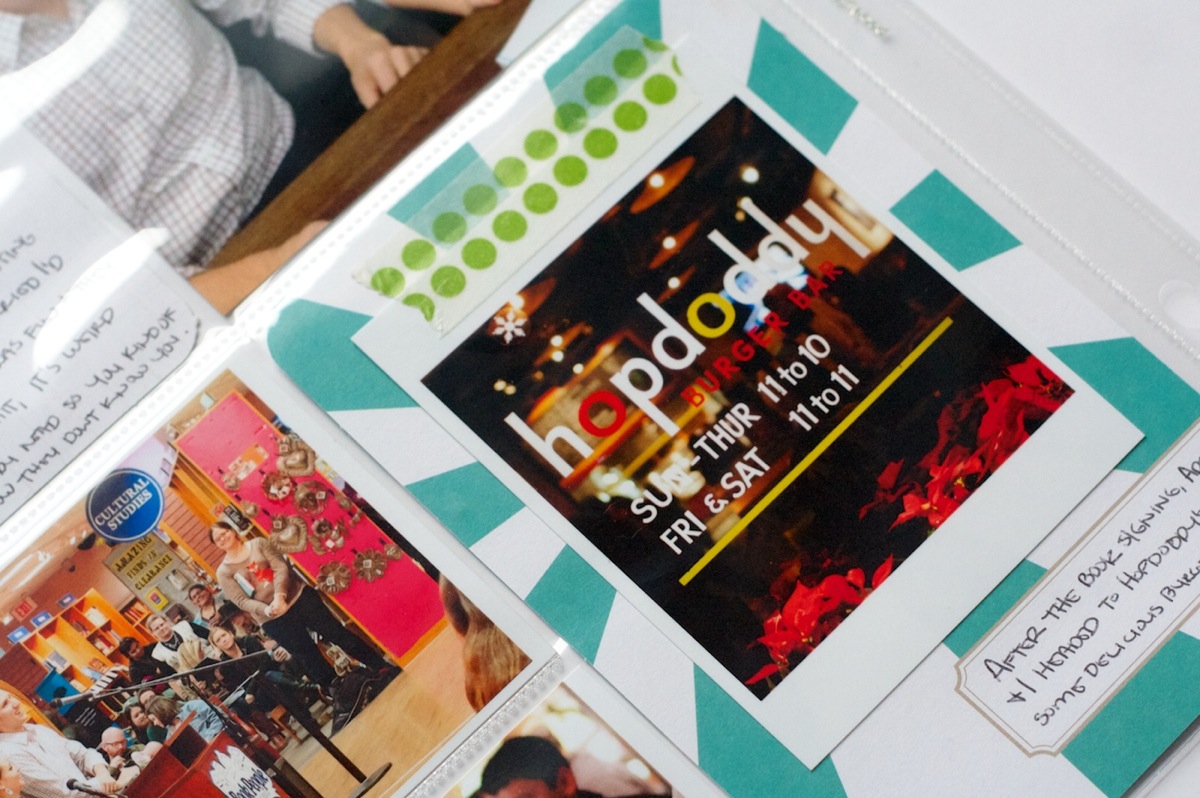
After the signing Adam and I headed to one of our fave Austin eateries Hopdoddy Burger Bar. Even though it was almost 9 on a weekday when we got there, there was still a line!

I made a little accent card using one of the 4×6 cards from the Seafoam core kit and some washi-type tape from Target:

Nettio Project Life Wk2 4 2Detail 2

And I also made a little foodie accent as well:

Nettio Project Life Wk2 4 2Detail 3

Here’s a closer look at the right side of Week 2:

Nettio Project Life Wk2 4 3

I mentioned in my intro post that I’m planning to have some items that repeat every week. Well here’s an example of the two main ones: my Weekly Faves card and the Month/Week title card:

Nettio Project Life Wk2 4 3Detail

I know, the Faves are hitting Project Life, surprise, surprise right? I do love my faves, haha.

My plan is to use papers/colors from the same kit for each month so all the titles, Faves cards and any accents I make will all match. I think it’ll add some nice continuity to the album since the colors in the photos are all over the place. For January I’m using Paislee Press’ More + Less kit. You can see how the same blue & tangerine color tie the title card and Faves card together throughout all the spreads.

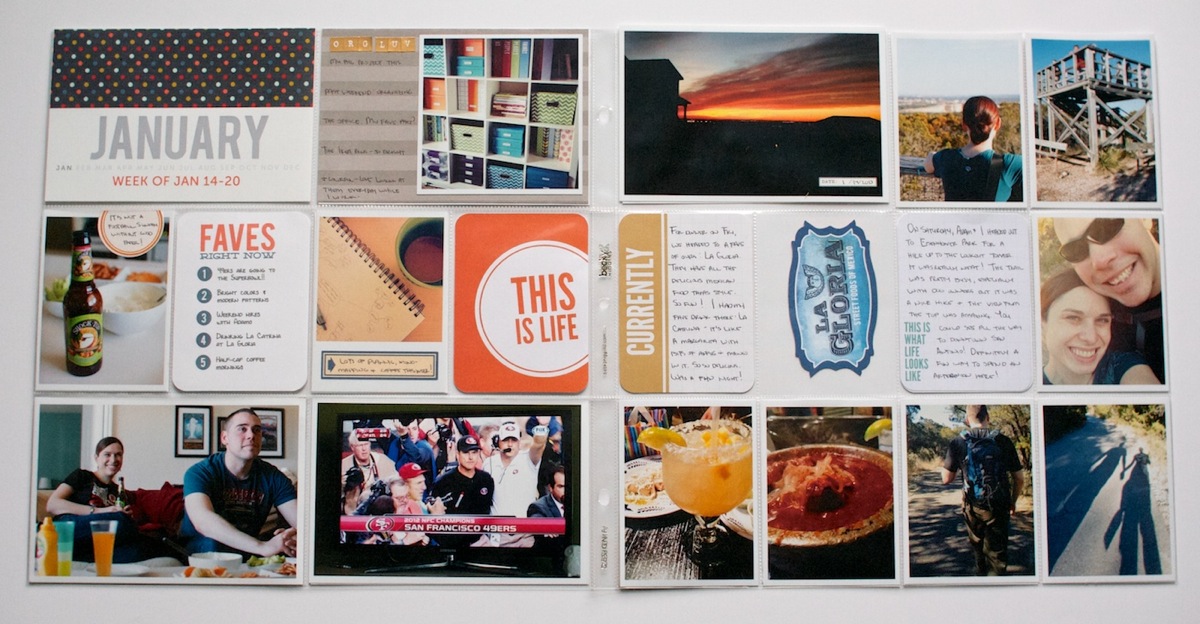
Project Life 2013 Week 3: Jan 14-20

Here’s my Week 3 spread:

Nettio Project Life Wk2 4 4

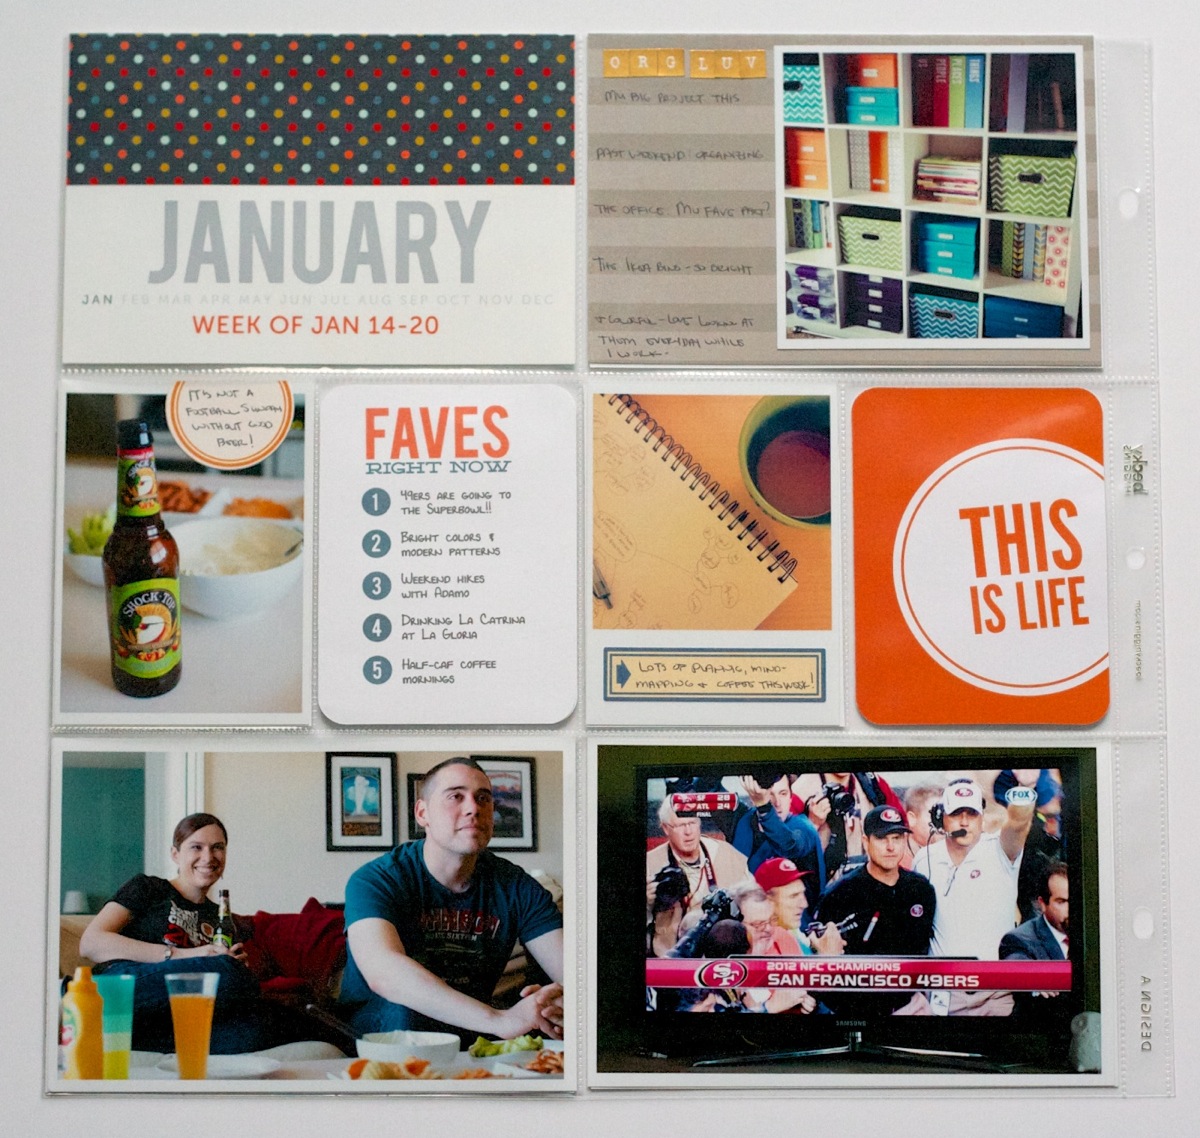
Left side Week 3. You can see how I swapped out the paper on the title card but kept the same colors for all the text:

Nettio Project Life Wk2 4 5

Orange “This is Life” card is from the Seafoam core kit. Everything else is random scrap stuff I had lying around. This week was the first time I tried adding in Instagram square photos – I have to say, I’m liking them.

And can we just pause for a moment and say, WAHOOOOO 49ERS!! SUPERBOWL HERE WE COME! WAY stressful game to watch, haha, but we were a wee bit excited about how it turned out. It’s hard to tell in the photo but I’m totally wearing my SF Giants World Series Champions shirt in the photo – figured maybe some of the SF Giants luck might rub off on them, hehe.

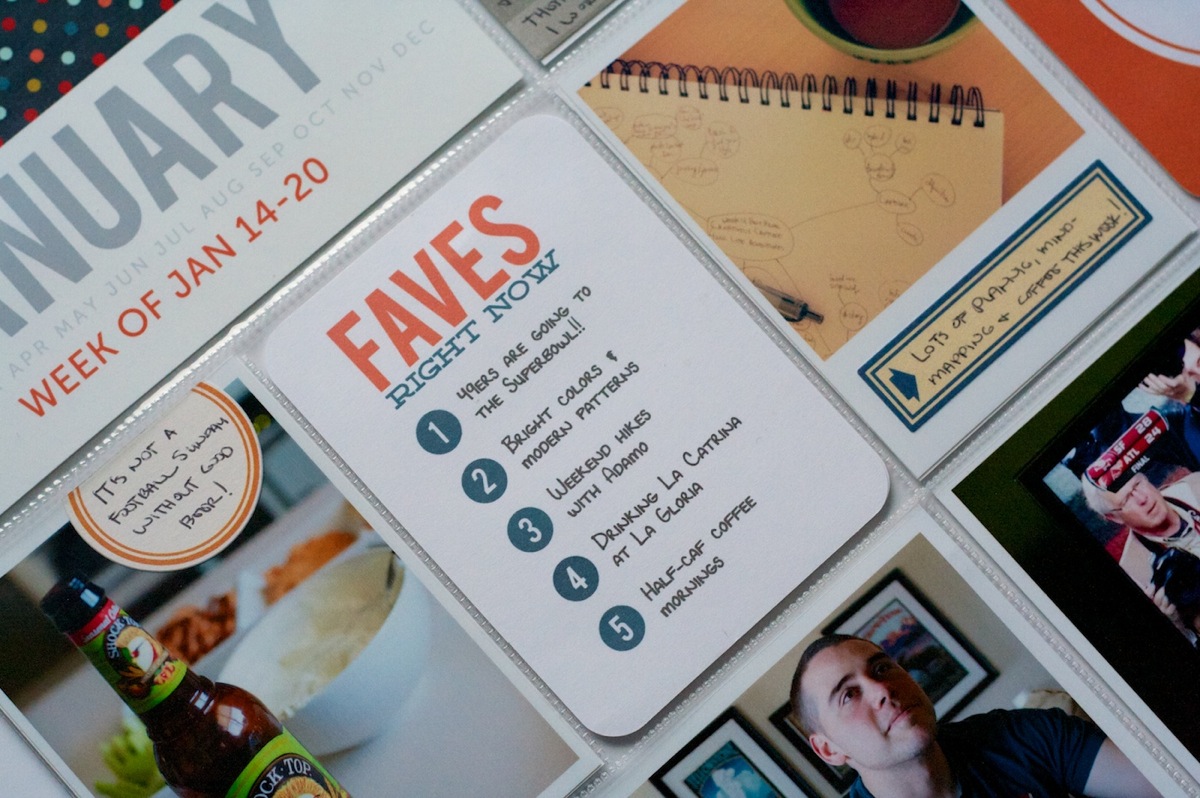
Another look at this week’s Faves card. I’m totally not stressing about these – I just write out 5 quick items and print them directly onto one of the blank 3×4 Project Life cards.

Nettio Project Life Wk2 4 5Detail

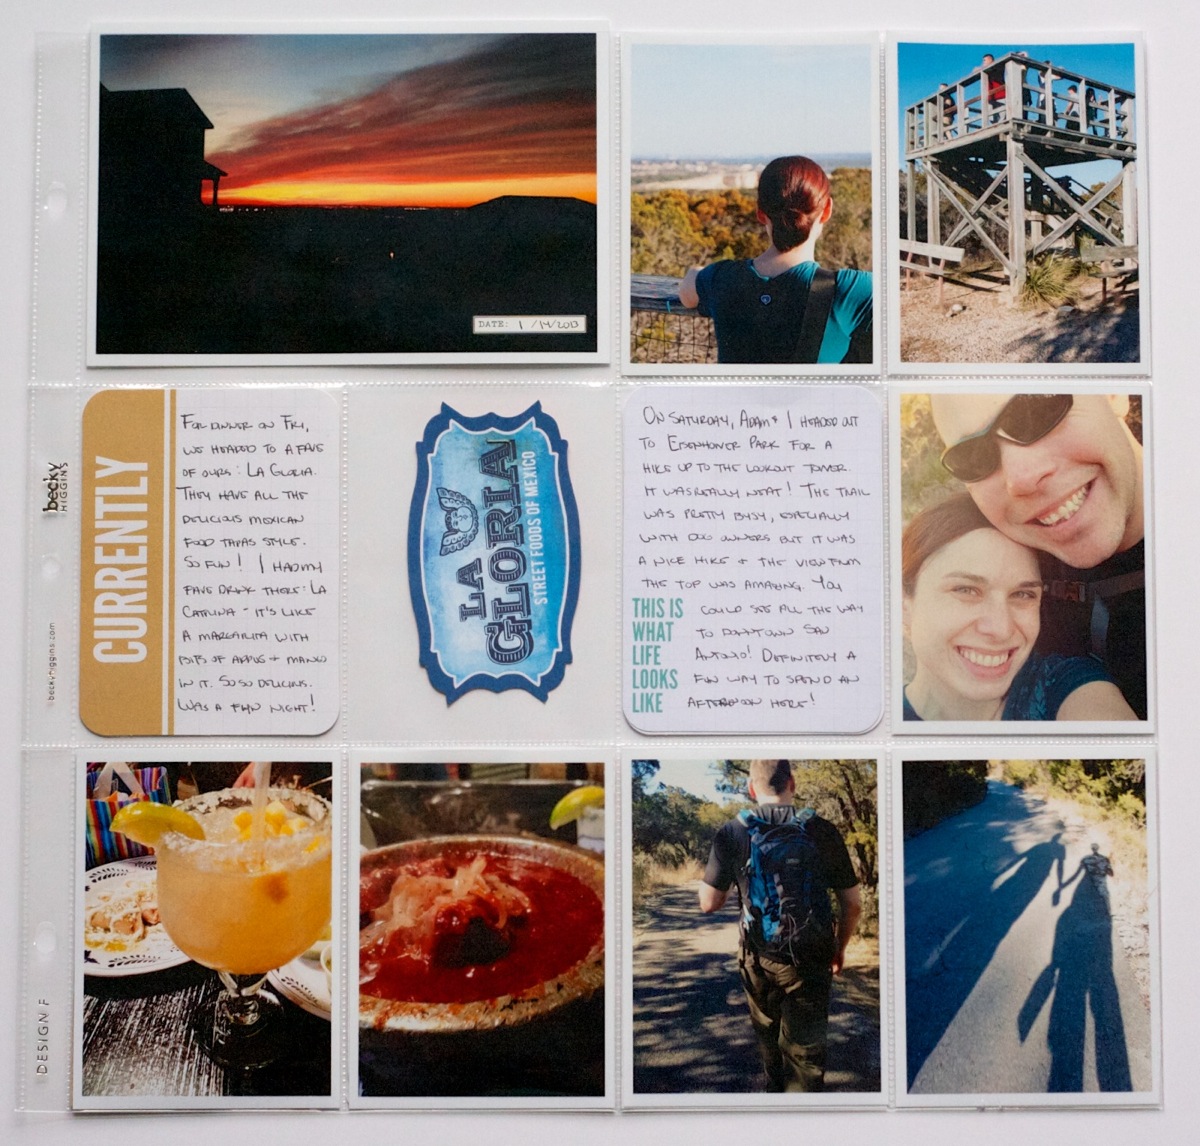
Right side of Week 3. This week is a mix of Design A & Design F page protectors. Saturday we went on a hike here in San Antonio so the entire right side of the page is devoted to photos from that.

Nettio Project Life Wk2 4 6

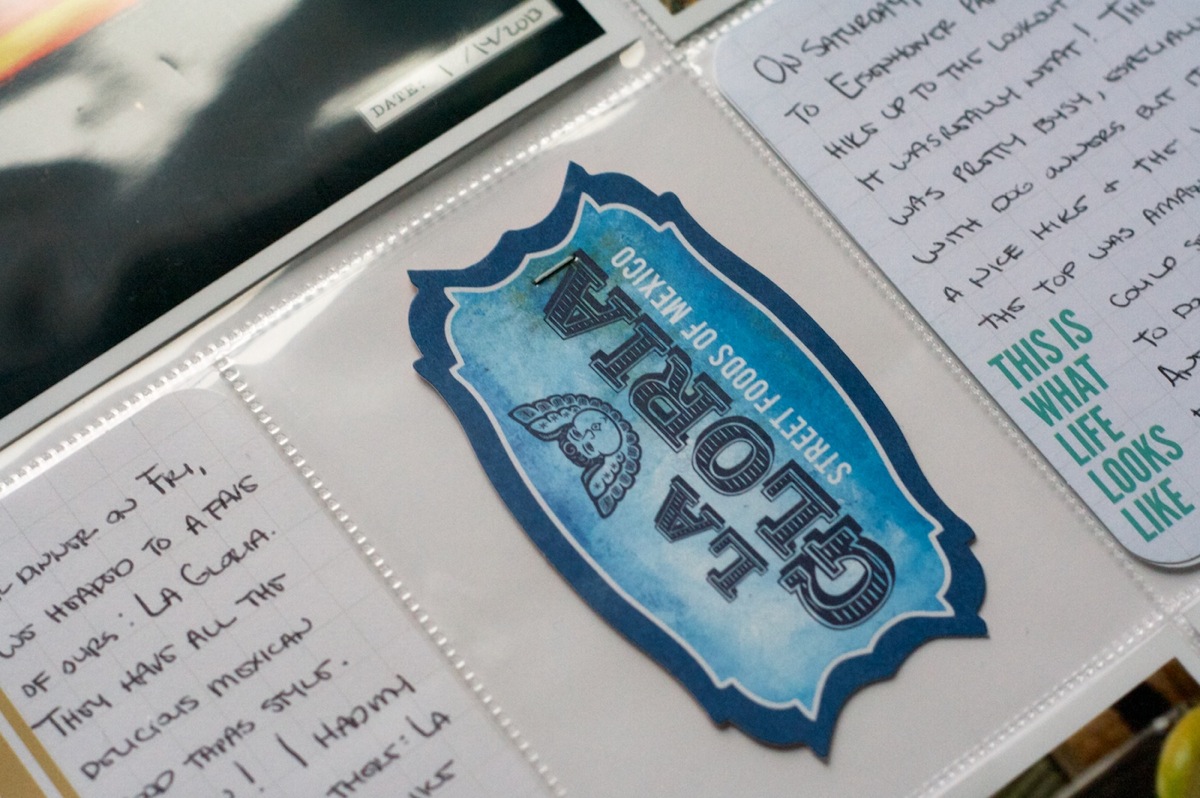
We went out to dinner on Friday so I included one of their cool business cards on it. Since it was too small for the pocket, I just stapled it directly to the page protector using my Tim Holtz Tiny Attacher.

Nettio Project Life Wk2 4 6Detail

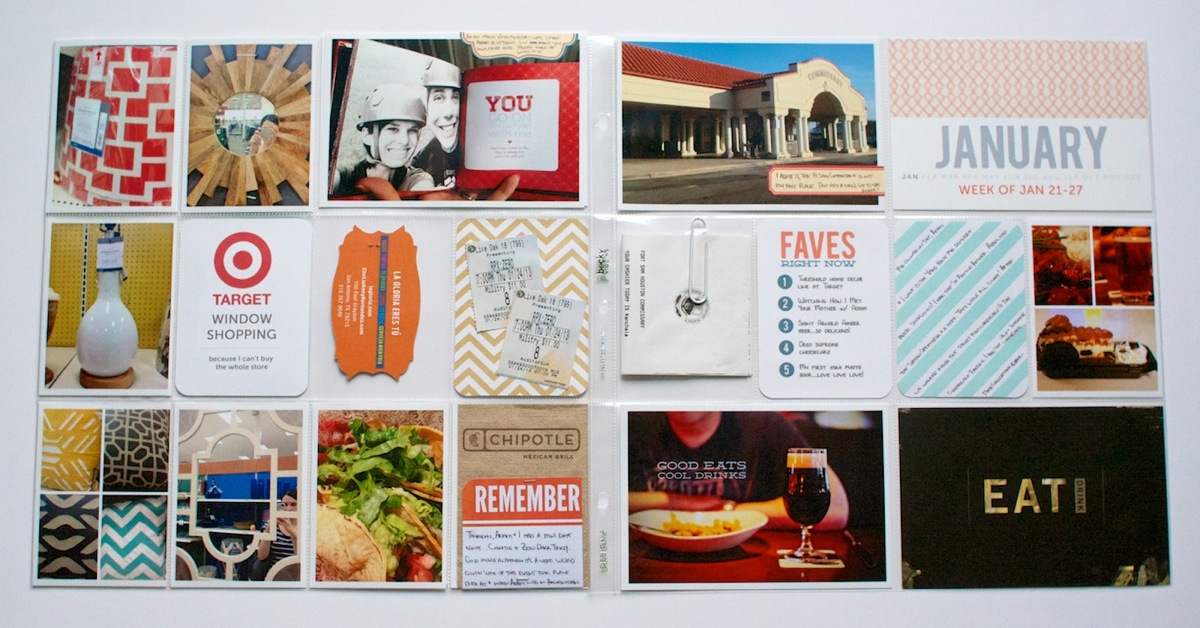
Project Life Week 4: Jan 21-27

My Week 4 spread – a mix of Design F & Design A page protectors. I’m really thinking Design F may be my fave – I love filling all the little pockets.

Nettio Project Life Wk2 4 7

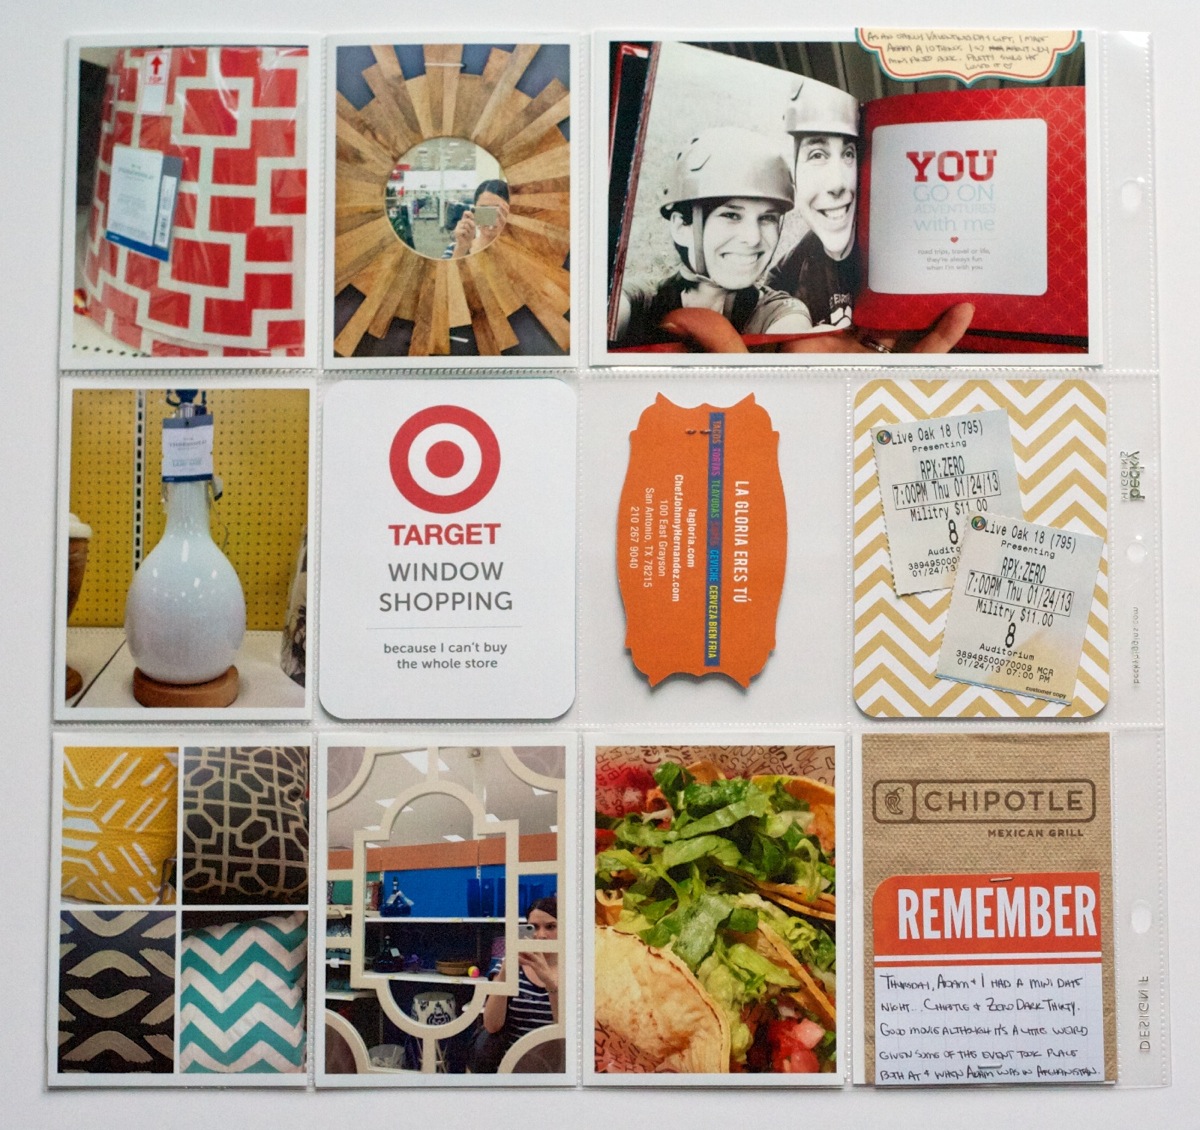
Left side of Week 4. Pretty simple, movie tickets, back of the restaurant business card. The mini photo book in the top right photo is an extra early sneak peek of my product for this weekend.

Nettio Project Life Wk2 4 8

The Target “window shopping” photos were a total happy accident. I went to Target last night to get some frames and since I needed a bunch I knew I couldn’t buy anything else. So I snapped photos with my iPhone of a bunch of stuff I liked so I could “try” them out in our house instead. But when I saw them all together I thought they made for a fun addition to Project Life. Just imagine if you had something like this from the 70s or 80s. It’d be so fun!

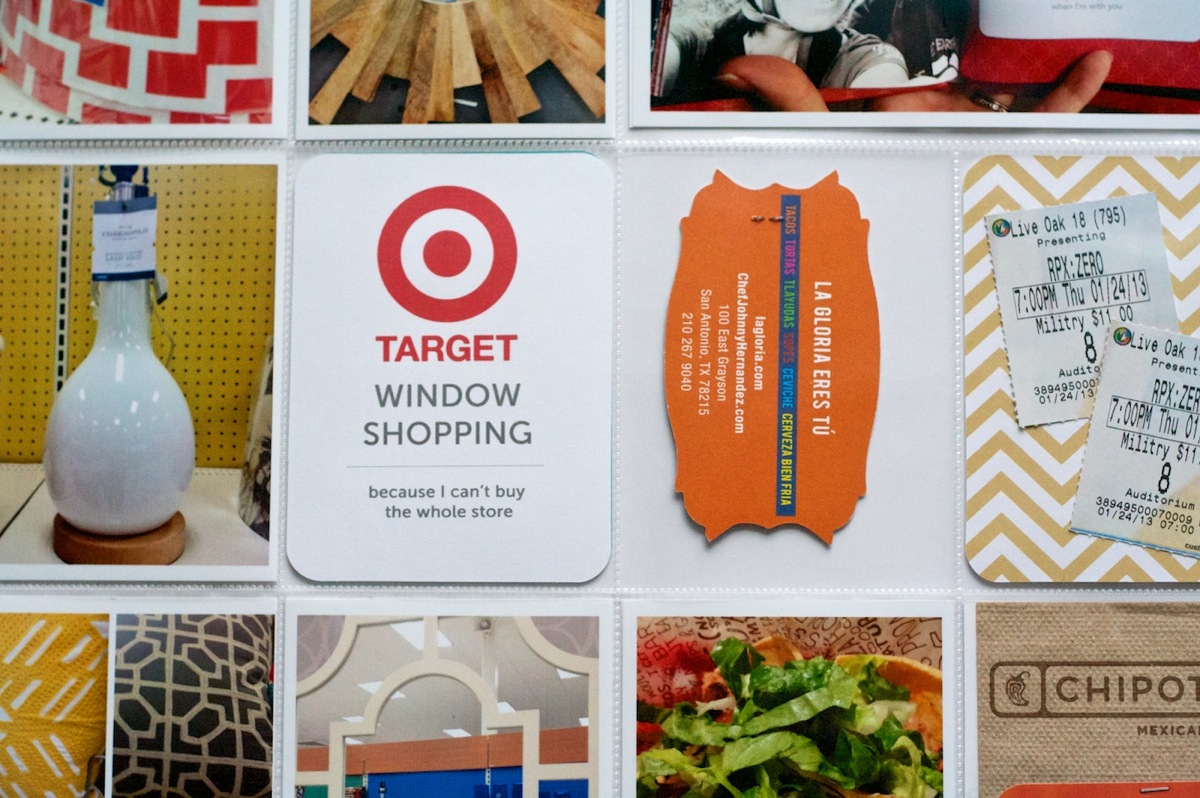
For the Target card, I just googled for a logo image that had enough pixels that’d print nicely and then added some text in Photoshop and printed it onto a blank 3×4 Project Life card.

Nettio Project Life Wk2 4 8Detail 1

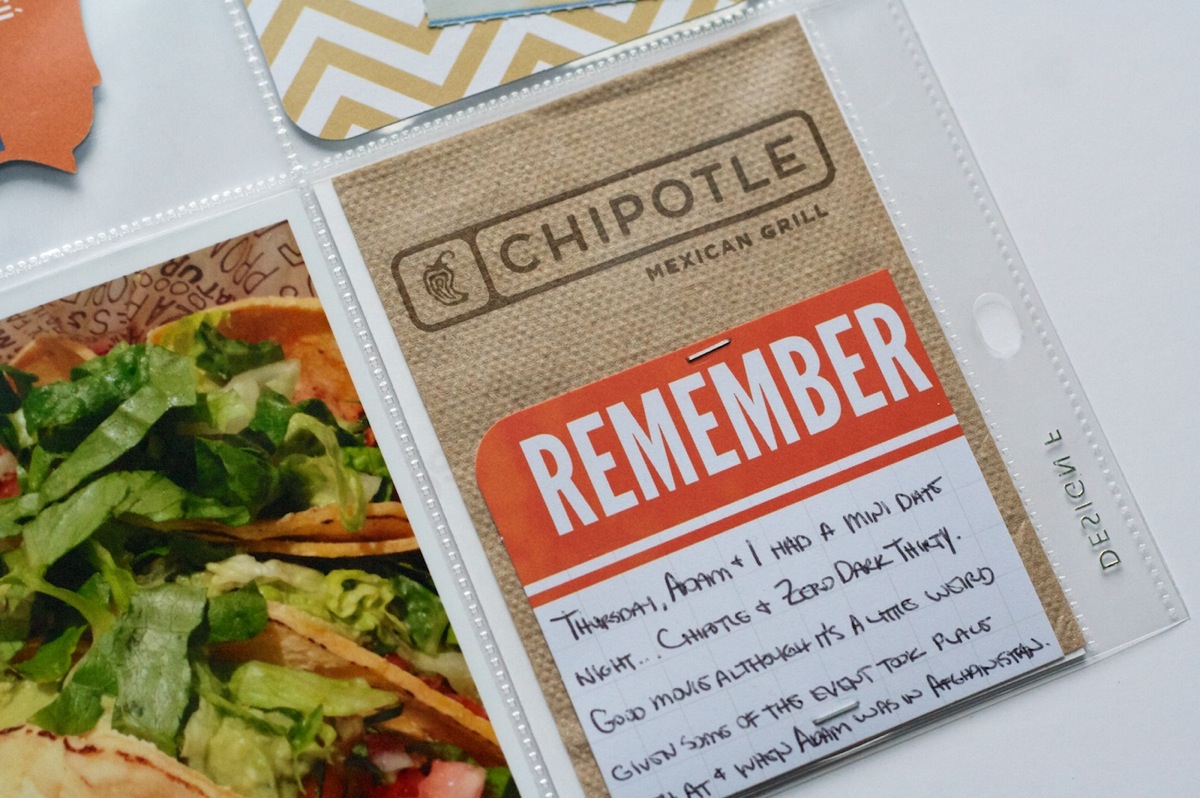
Before we went to the movies we had dinner at Chipotle so I saved one of the napkins to include and then trimmed down one of the Seafoam 3×4 cards for my journaling. We went & saw Zero Dark Thirty which I have to say, we really enjoyed. But it was a wee bit weird considering some of the places and events happened when & where Adam was in Afghanistan. So he kept saying things like, “yeah that’s totally not what that FOB is actually called” or “it doesn’t really look like that at all,” haha.

Nettio Project Life Wk2 4 8Detail 2

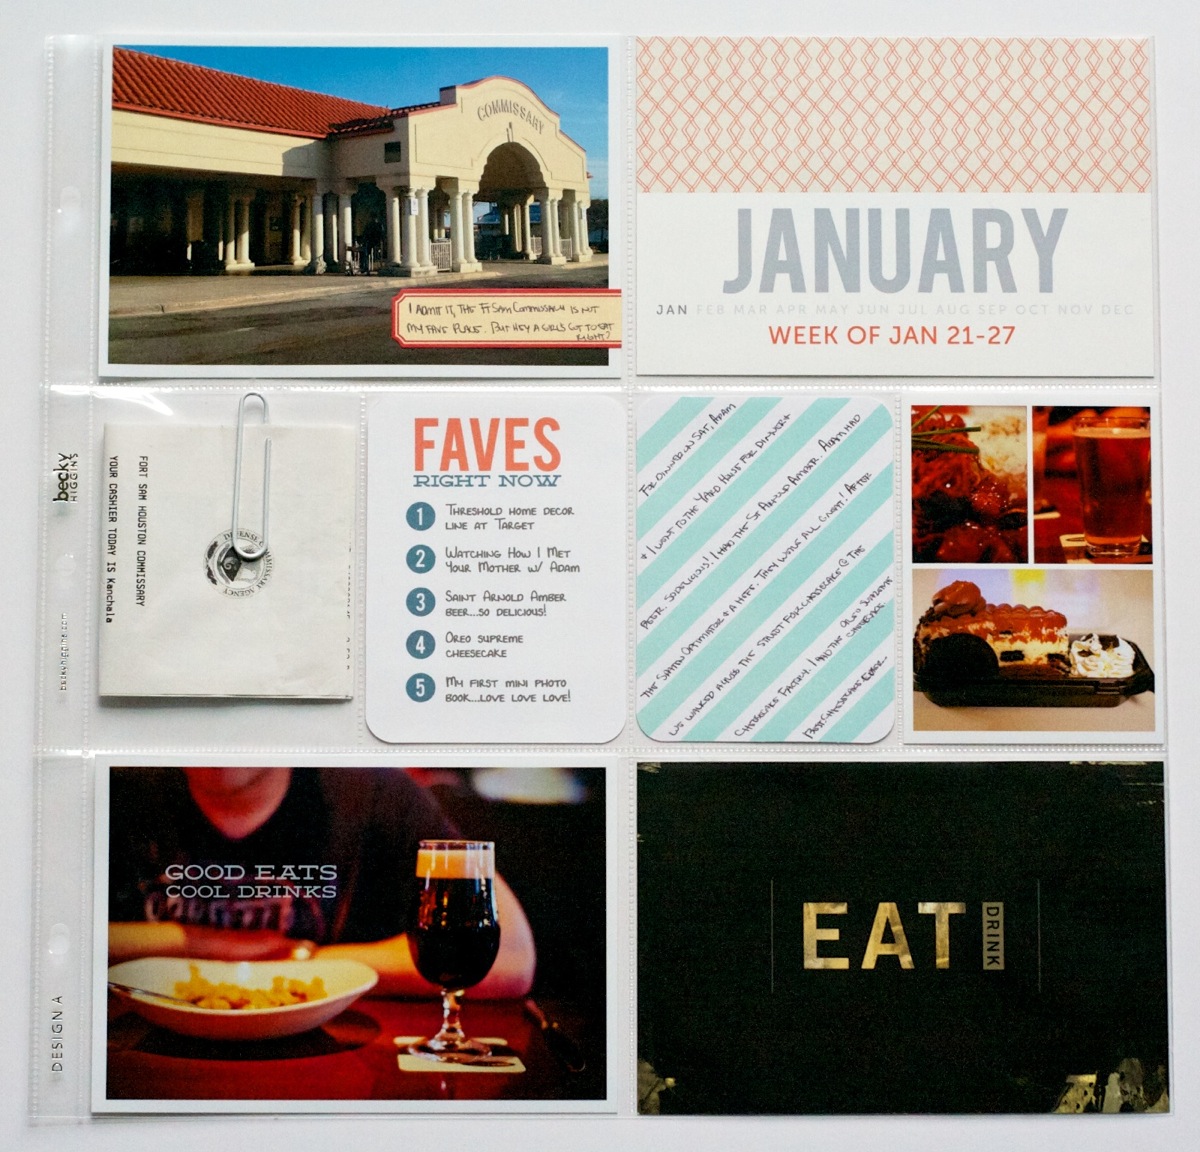
Right side of Week 4. The Eat|Drink card came from a brochure from the Yard House where we ate dinner on Saturday. Diagonal journal card from the Seafoam kit.

Nettio Project Life Wk2 4 9

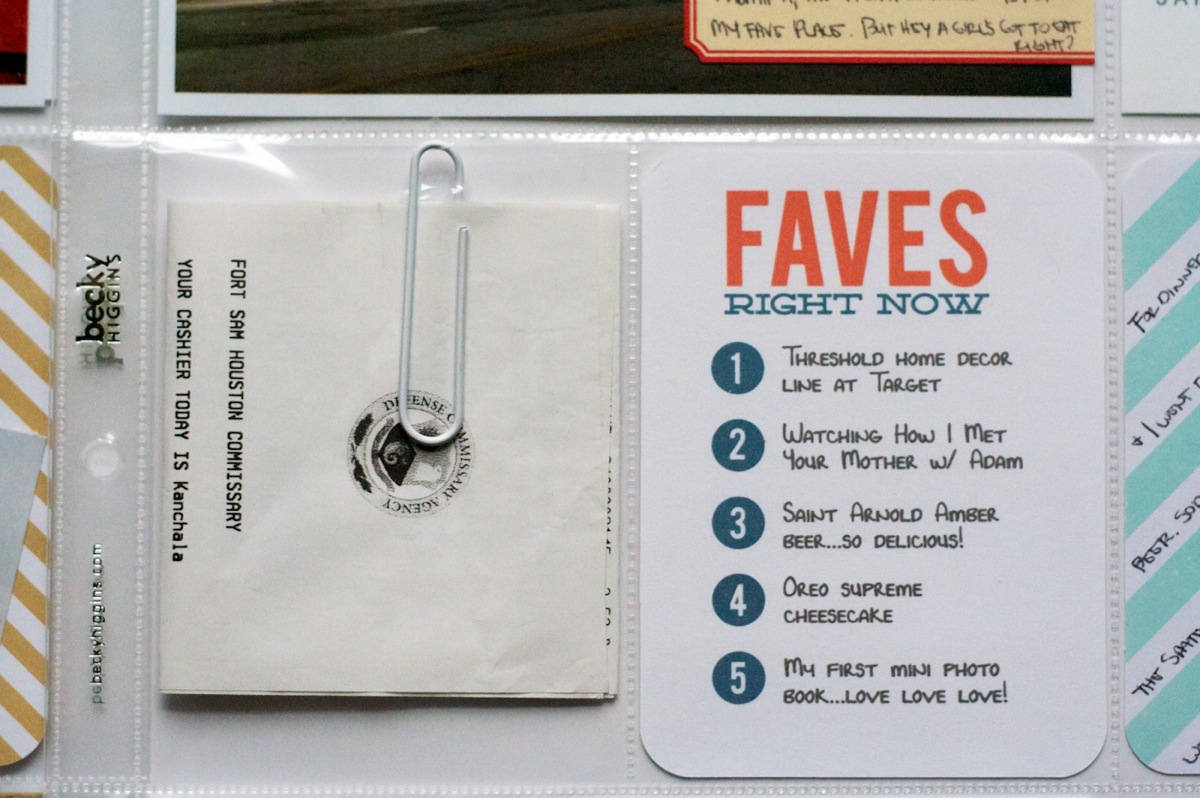
This week’s Faves card. Since we went to the commissary on Saturday (the grocery store on the military base) I included our receipt with a paperclip to hold it in.

Nettio Project Life Wk2 4 9Detail

Well that’s it for Project Life 2013: Week’s 2-4!

Here are my thoughts on this project so far:

  • LOVE the mix of page protectors. So very glad I decided to go that route.
  • Faves cards – always a winner in my book. Loving the repeating title cards & colors too.
  • I was really worried about having enough content for each week, especially since some weeks I felt like I didn’t really take many photos during the week. But I’ve had to cut more than I’ve had to fill so far. That’s the hardest part for me – I want to include it all!
  • Definitely need to streamline my process a bit but I think once I get in a rhythm it’ll be good. Not getting behind is going to be key though.
  • Am already coming up with new product ideas, simply because they’re things I want to use. Love that.
  • LOVE LOVE LOVE-ing all the little stories captured so far in this album. They’re exactly the reason I wanted to do this album this year. SO glad that I took the plunge. I’m loving the completed pages even more than I thought I would.

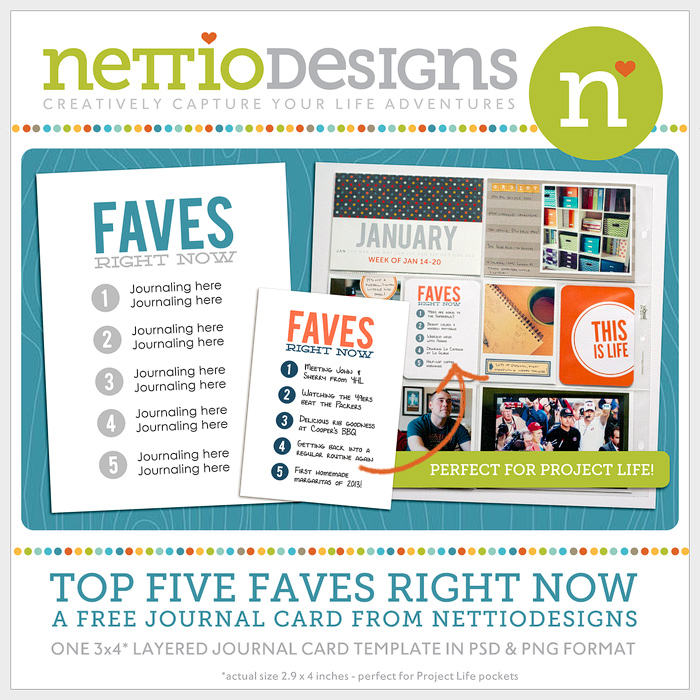
FAVES 3×4 Journal Card Free Download

Clearly there’s a whole lot of Project Life lovin’ going on here, hehe. And to share a little bit of the love, I’ve got a little freebie for ya!

Use the link below to download your own FREE copy of my Faves 3×4 Journal Card. All I ask in exchange is if you like it, pin it, share it & let your friends know they can find it right here at Nettio Designs.

Since the card is designed for Project Life, the actual size is a tiny bit smaller than 3×4 inches – it’s about 2.9×4 inches. File includes a layered, customizable PSD file and a solid colored PNG file.

 Download here

What about you? Are you doing Project Life this year? If you are, how are things going for you so far? We’re almost a full month in, can you believe it?!

Project Life is a memory-keeping system created by Becky Higgins. New to Project Life? Learn more here & find all my Project Life posts here.

Benefits Of Using Canadian Pharmacy

POSTED IN Free Stuff, Project Life, Template-y Goodness

It’s Time for December Daily Nettio-Style, Round 2

POSTED ON November 17, 2012 IN Announcements, Holiday Faves, Holiday Faves 2012, Shop News & Releases

Wow, November is half already half over! The holiday season will be here before we know which means it’s time for one of the scrapbooking projects I most look forward to every year: December Daily.

Back in 2010, I created a 7×9 mixed-sized paper mini book and I have to say I LOVED it. Of all the scrapbooking projects and layouts I completed in 2010, my December Daily album is the one I never stopped thinking about.

There is just something magical about putting together the foundation of the album ahead of time and then seeing it fill up with memories over the course of the holiday season.

But in thinking about my December Daily plan for 2011, I realized there were a few things about the album that didn’t work for me: the daily-ness of December Daily, the mixed-sized pages and the lack of any digital goodness.

So last year I came up with a new plan for my not-so-daily December Daily mini book which I lovingly called the Holiday Faves. It was a 5×7 hybrid mini album complete with foundation pages which I printed and then filled up with goodness over the Holiday season.

And I have to admit, I may have done a happy dance or two in excitement over it because it worked out even better than I’d hoped.

(You can find an entire video of my 2011 Holiday Faves album here.)

Which brings me to today’s Sweet Shoppe Saturday New Release!

The Holiday Faves 5×7 Mini Album Templates Vol. 2

Yes, the Holiday Faves 5×7 Mini Album templates are back with an all-new more awesome design combined with the same hybrid 5×7-inch tree-saving style!

And I could not be more excited. Seriously, lots of oh-so-excited (and occasionally awkward, I’m sure) happy dances going on over here, haha. Especially knowing just how well the Holiday Faves worked out for me last year.

You can read about all the details of the Holiday Faves 5×7 Mini Album Templates here at Sweet Shoppe Designs but here are a few specific things I want to point out:

  • The mini album templates are 5×7 inches which for me is the perfect balance of size and at-home printability since you can print 2 5×7 pages on a single 8.5×11 pages. Woohoo for saving trees!
  • I designed the templates to be a starting point for building your Holiday album foundations pages so I kept the design simple so you can dress them up or down depending on your personal style. The goal is to let your photos, memorabilia and memories take center stage.
  • I will be going with a Holiday Faves theme for my album with my plan being to document my top ten favorite things from this Holiday season (with the backup plan being if I only get to say, 5, it’ll be ok). But if you’re not a Faves fiend like I am, haha, I also included a “Holiday Memories” cover and journaling option as well a list of the fonts I used so you can customize your own.
  • One thing I missed from December Daily last year was capturing a few of the more broad holiday themes, like decorations, music, etc so this year I’ve included 8 additional more general holiday-themed journaling cards for documenting those stories.

What’s really cool about these templates is not only can you use these mini album templates for creating your own Holiday album but I will be using them to create my own album as well.

And starting next week here on the blog, I will be sharing more details on how I’m personally using these templates to create the foundation for my own Holiday Faves album and of course throughout December I’ll be showing how it all comes together as well. It’s going to be fun so I hope you’ll come scrap along with me!

The Holiday Faves 5×7 Mini Album Templates Vol. 2 are available now at Sweet Shoppe Designs and are 20% off thru Saturday, November 17th.

So now’s a great time to get yourself ready to scrap your holiday heart out.

How Can Customers Lower Their Remedy Costs

POSTED IN Announcements, Holiday Faves, Holiday Faves 2012, Shop News & Releases, Hybrid Scrapbooking, Mini Albums, Template-y Goodness

  • 1
  • 2
  • 3
  • …
  • 7
  • Next Page »
HI I'M LYNNETTE. Graphic designer, tech-lovin’ memory keeper and lover of bold colors & patterns, good food and the great outdoors. Here at Nettio Designs, I share a behind the scenes peek at my own creative & life adventures. Read more...

KICKSTART YOUR CREATIVITY


By popular demand, photo book templates are back! Grab all three sets in the shop.
ADVENTURES IN ORGANIZING
GOAL-SETTING
MEMORY KEEPING
PROJECT LOVE
LIFE ADVENTURES
TIPS & TRICKS
BEHIND THE SCENES

POPULAR PROJECTS

TO SEE ALL MY PROJECTS, CLICK HERE

MUST READ POSTS

  • WHY EVERY SCRAPPER SHOULD SCRAP A FAVES PAGE
  • HOW TO CREATE A SCRAP-WORTHY MAP WITH PHOTOSHOP
  • REMEMBERING THE IMPORTANCE OF TELLING YOUR STORY
  • WHAT DOES IT MEAN TO CREATIVELY CAPTURE YOUR LIFE ADVENTURES?
  • BROWSE BY CATEGORY

    BROWSE THE ARCHIVES

    GET IT FOR FREE

    Copyright © 2023 ·Dynamik Website Builder · Genesis Framework by StudioPress · WordPress · Log in