Nettio Designs

Design + Creativity + Adventure = LOVE

  • HOME
  • JOIN THE 2023 MONTHLY FAVES
  • THE SHOP
  • ABOUT
  • CONTACT
You are here: Home / Archives for Announcements / Free Stuff

2015 Goal Setting & Thoughts On Last Year (Plus a FREE Printable!)

POSTED ON January 22, 2015 IN Free Stuff, Goal Setting

15 in 2015 Goal Setting Free Printable | NettioDesigns

January may be two-thirds of the way over but that doesn’t mean it’s too late for my favorite part of the new year: creative goal setting!

Last year I decided to try something new: a list of 14 goals to complete in 2014.

I loved it.

For me, it was similar to setting a list of birthday goals but as my husband Adam likes to remind me, now that I’m in my 30s, birthday goal lists tied to my age aren’t terribly practical. So this seemed like the best of both worlds: a finite number of goals to strive for AND a number that seemed more doable.

nettiodesigns_15-in-2015-Goals-Printable_1

14 in 2014: The Completed List

2014 was the first year I tried this goal setting system. Was it a success? Well, here’s what I completed in 2014 (and yes I used a blue highlighter to mark them off as I went. I’m nothing is not high-tech.):

  1. FINISH ADVENT CALENDAR: Done with time to sew a Christmas stocking for Ryan.
  2. LAUNCH KICKASS SCRAPBOOKING: DONE as of last March although I’ll likely be making some changes to do this – more details to come in a future post. 
  3. HANG ADVENTURE WALL: Done and our apartment entryway looks all the better for it.
  4. MAKE A BABY QUILT: Done although we primarily use it for photo shoots since Ryan is only just now growing out of the “spit up on everything” phase.
  5. GO ON A BABY MOON : Our babymoon to Dallas for the Rangers Opening Day was so fun!
  6. ORGANIZE DIGITAL PHOTOS: Not done by choice. After Apple announced the end of Aperture, I decided to hold off to see what they have in store first.
  7. TURN MASTER BEDROOM INTO A COZY SPACE: 50% done. We painted an accent wall and I’ve chosen all the art – just need to get around to finally hanging it up.
  8. MAKE ART FOR OVER THE TV: Done although I’m not 100% in love with it.
  9. DECORATE OFFICE/NURSERY FOR THE LIL’ DUDE’S ARRIVAL: Done and the camping themed nursery turned out adorable.
  10. HAVE A BABY. : )  Not only done but somehow he’s 7 months already!
  11. CREATE PROJECT LIFE 6/6: Not done but with being pregnant the first six months of the year and a newborn the last half, I’m not sure this was a terribly practical goal to begin with.
  12. SCRAP 100 LAYOUTS: 38/100. Not even close. But considering pregnancy killed my creativity and I didn’t even open my computer the first three months after Ryan was born, I figure I’m lucky I finished that many. Hopefully 2015 will be better.
  13. READ 10 BOOKS: 10/10. So done, but only just barely. This one ended up being surprisingly more difficult than I expected. I’m hoping I can make it to 25 this year.
  14. LEARN TO USE MY SILHOUETTE: Not done. I’d planned to do this as part of my Holiday Faves mini album but when I pulled off the cover I realized I had no clue where the cords for it were. Hoping to find them and revisit it later this year.

So in total: 10/14 which I’m thrilled about! That’s more than I thought I’d accomplish when I made the list at the start of 2014.

My list was heavily baby-weighted and the tasks I completed are as well but honestly, I’m cool with that because 2014 was pretty much the year of the baby. Hopefully this year will see the return of more creative adventures.

nettiodesigns_15-in-2015-Goals-Printable_5

MY 15 IN 2015 LIST

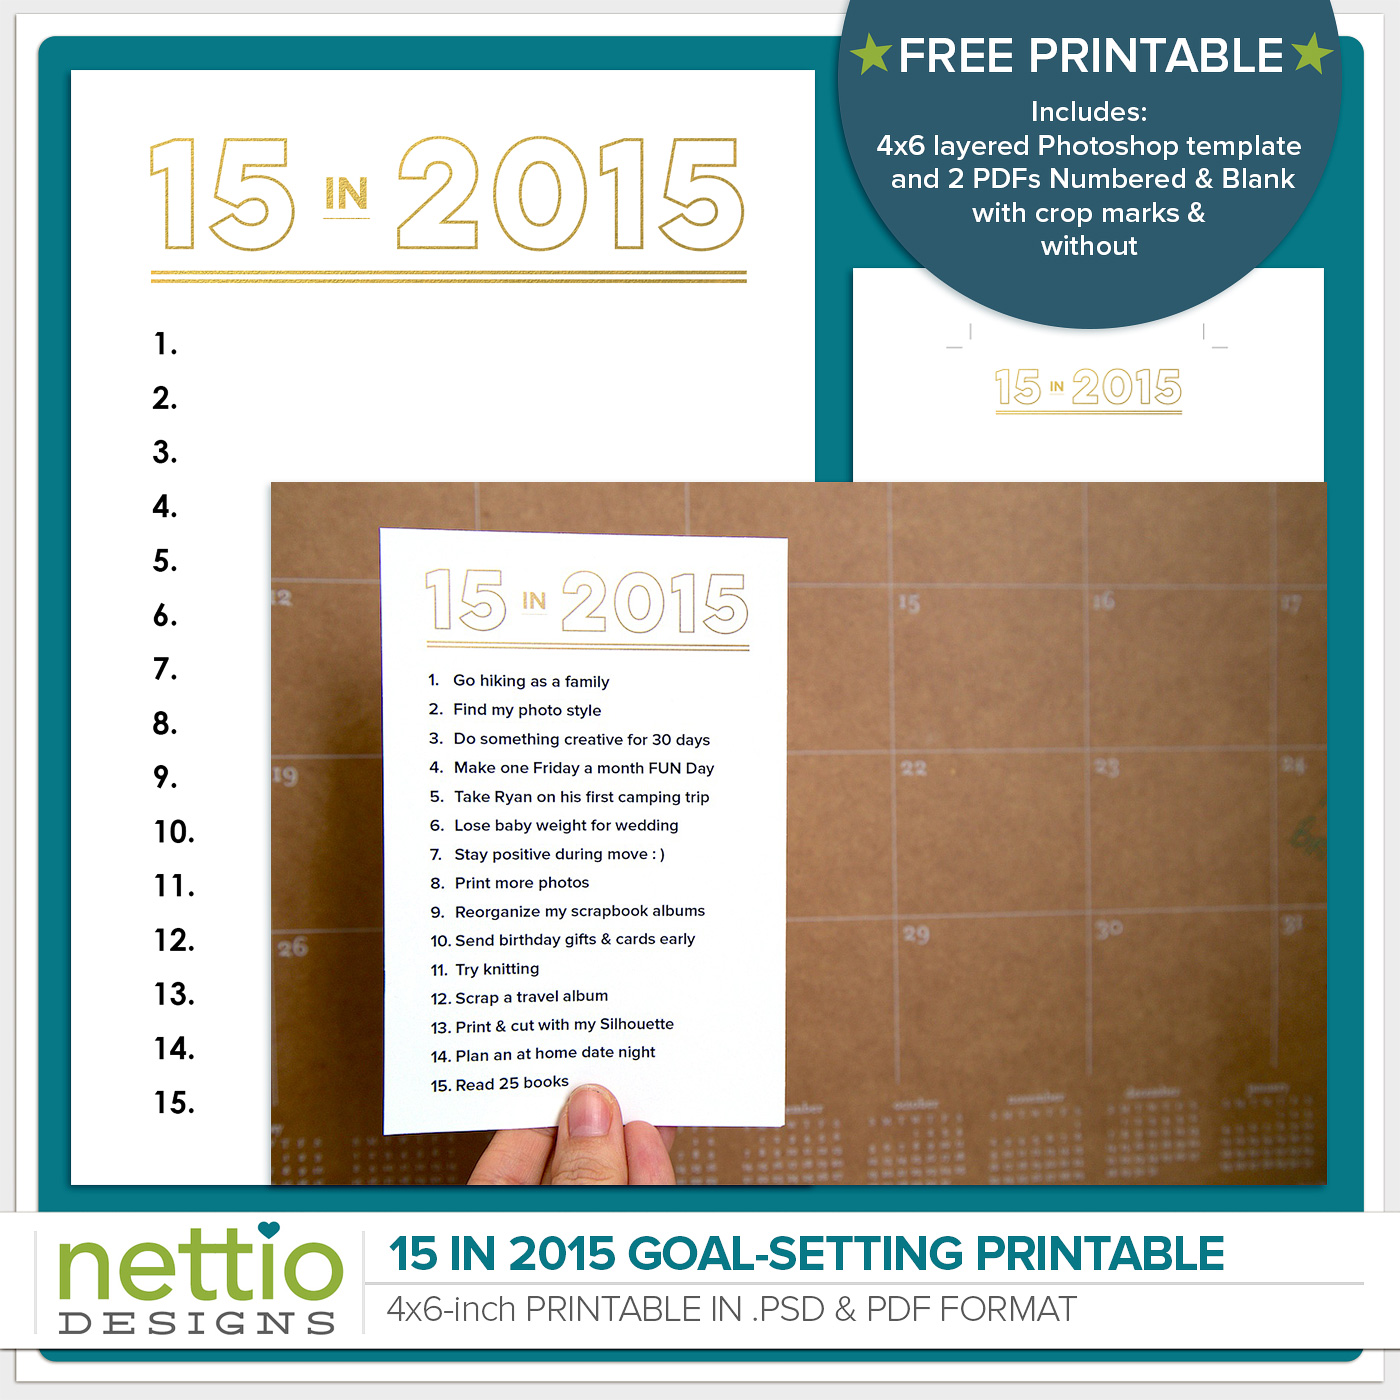
So what do I have planned in 2015? Well here’s a look at my 15 in 2015 list:

  1. Go hiking as a family
  2. Find my photo style
  3. Do something creative for 30 days
  4. Make one Friday a month FUN day
  5. Take Ryan on his first camping trip
  6. Lose baby weight for wedding
  7. Stay positive during move : )
  8. Print more photos
  9. Reorganize my scrapbook albums
  10. Send birthday gifts & cards early
  11. Try knitting
  12. Scrap a travel album
  13. Print & cut with my Silhouette (assuming I can find the cords!)
  14. Plan an at home date night
  15. Read 25 books

As you see my list is a mix of personal and creative goals. The breakdown of it looks something like this:

  • Family (5)
  • Personal (3)
  • Creative (3)
  • Scrapbooking (4)

To me, that’s a pretty good mix. You may notice that I don’t have any business-related goals in my list and that’s because I decided to keep my 15 in 2015 for personal/creative goal-setting instead – you know, the fun stuff. I have a separate system I use for business-related goals.

nettiodesigns_15-in-2015-Goals-Printable_8

Tips For Creating Your Own 15 in 2015 List

If you’re interested in doing your own 15 in 2015 goal-setting this year, here are a few things to keep in mind:

Tip #1 | Your list should match your priorities: Take some time to really think about what you want to focus on in 2015 and how those goals will fit into your everyday life. Keep in mind that not right now doesn’t have to mean not ever. Save it for a year when it’s a better fit.

Last year I weighted my list heavily toward home & baby-related items because with our first baby arriving mid-year, it was simply where my mind and momentum was at at the time.

Tip #2 | Short term projects work better than year-long ones: Unless you’re really fantastic at maintaining momentum on year-long projects, I’d shy away from adding too many to your list.

15 goals is plenty and in my experience those ongoing goals are the momentum killers – they hang over your head reminding you all year long of your failure, which is most definitely what we don’t want!

I have one on my list this year (Make one Friday a month FUN day) but it’s both fun AND doable so I’m ok with giving it a go.

Tip #3 | Wants work better than shoulds:  We all have those things are our mental to-do lists that we feel like we should do. You’ll recognize them because during your brainstorm because your thought process will go something like “Well, I really should do {insert uninspiring and unexciting goal here}.” For example, “Well, I really should learn to use my Silhouette because I’ve had it two years and it’s currently collecting dust on my desk.”

I can tell you from experience the four goals I didn’t complete last year all fell into the “well I sort of want to do it but more I really should do it” category…which is exactly why they didn’t get done.

While I won’t tell you to avoid these goals completely because sometimes the key to a should getting done is to add it to your list, I would be careful adding too many to your list. You want to be excited and inspired by your list, not reminded of all the things you should do.

Tip #4 | Making your list visible is the key to success:  The best thing I did last year, and no doubt the reason for my success, was I printed out a small 4×6-inch card of my 14 in 2014 goals list and tucked it into the pocket of my wall calendar. Every time I walked into my office there it would be, sometimes inspiring me, sometimes mocking me, but always reminding me that “oh yeah, THAT’s what I planned to do this year.”

15 in 2015 Goal Setting Free Printable | NettioDesigns

Free 15 in 2015 Goal Setting Printable

If you’re a creative like me, odds are out of sight=out of mind for you too. So to make making your list easy for you, I’ve put together a free printable 4×6-inch card you can use to keep your list visible all year long.

The download includes 5 files in a single zip file: a layered Photoshop (.PSD) file with an editable text box for adding your list (title is not editable) and two printable PDFs (one with numbers and one without) that you can use to handwrite your list.

Since the PDFs are 8.5×11 but the card is intended to be 4×6-inches, both PDFs include crop marks so you know where to trim. But I also included two crop mark free versions in case crop marks scare you and you’d rather guess where to trim or leave your list floating on an 8.5×11 sheet of paper. That works too.

Download 15 in 2015 Printable Here

Download includes 5 files in a single zip file:

  • 15 in 2015 4×6 Photoshop (.PSD) template
  • 15 in 2015 Numbered PDF (2 files, one with crop marks, one without)
  • 15 in 2015 Blank PDF (2 files, one with crop marks, one without)

Once you’ve downloaded the file, simply unzip the folder and you’ll have access to all the files.

And hey, if you find this post and/or printable helpful, do your friends a favor and pin it on Pinterest or share it on Facebook to let them know where they can find it.

Now let’s talk creative goal-setting: do you have a system for setting goals for the new year? What do you have on the agenda for 2015?

Can I take Levitra if I am taking other remedies at the same time

POSTED IN Free Stuff, Goal Setting

FREE Holiday Faves 6×8 Printable & Template | Making A List

POSTED ON December 3, 2014 IN Free Stuff, Holiday Faves 2014

nettiodesigns_HolidayFaves-Free-List

The Holiday Faves 6×8 Mini Album & Project Class is in full-swing behind the scenes here at Nettio Designs, so today I wanted to give those of you who haven’t joined in yet a chance to try out one of the templates from the class…for FREE!

The Making A List free download includes one 6×8-inch layered Photoshop (.PSD) file for you to customize as well as one printable 6×8 JPG you can use as is. Print them at 6×8 to use in your holiday mini album or scale them down to 3×4 inches to slip into your pocket scrapbooking.

Download the Holiday Faves Free 6×8-inch Printable & Template here!

Of course, if you’d like to join me and almost 50 other Holiday Favers in scrapbooking your favorites holiday memories and moments in a fun and creative way, sign up up for the Holiday Faves 2014 Mini Album & Project Class. Class started Monday but we’re just getting started so there’s still plenty of time to jump in.

For only $25, you’ll not only receive an exclusive set of 6×8-inch mini album templates designed by me (one student told me the templates alone are worth the price!) but you’ll also receive a printable planning guide, interactive album planner, exclusive tutorials and downloads for printing and putting your album together and access to a private Facebook group where you can connect with me and a whole group of kickass memory keepers.

It’s everything you need to actually complete your holiday mini album this year.

Registration ends December 8th, so don’t delay – sign up now.

Benefits Of Using Canadian Pharmacy

POSTED IN Free Stuff, Holiday Faves 2014

Project Life 2013 | Weeks 2-4 & A Faves Freebie For You

POSTED ON January 29, 2013 IN Free Stuff, Project Life

Welcome to Project Life 2013, Weeks 2-4.

If you’re thinking you somehow missed Week 1, well you haven’t. Ha! The week of Dec 31st to Jan 7th, we were still out in California (we flew home on the 4th) so we did a TON of stuff in those days. And since I chose to wait to start my album until my Seafoam kit arrived mid-month, I decided to start with the most recent week and work my way back. So I will share Week 1 once it’s finished, hopefully by my next update.

But I wanted to share what I have finished today.

Project Life 2013 Week 2: Jan 7-13

Here’s a look at Week 2 spread. I mentioned in my Creative Adventure: Project Life post that I’m mixing Design A page protectors with a variety of other designs. You can see that in action here – the left page is Design D, right page is Design A.

Nettio Project Life Wk2 4 1

Closer view of the left side of Week 2:

Nettio Project Life Wk2 4 2

Why yes, that is me meeting John & Sherry from Young House Love (points to Jen for catching this in my peek last week!). They came to Book People in Austin for a signing so Adam and I went (even though he had no idea who they were, haha).

I admit I was really nervous – what exactly do you say to someone when you”know” all about them from their blog but they have no idea who you are? LOL! But they were super sweet though and just as fun in person as in their blog. And I have to say major points to Book People because they ran that signing like a well-oiled machine.

The photo on the left is of my signed copy of their book:

Nettio Project Life Wk2 4 2Detail 1

After the signing Adam and I headed to one of our fave Austin eateries Hopdoddy Burger Bar. Even though it was almost 9 on a weekday when we got there, there was still a line!

I made a little accent card using one of the 4×6 cards from the Seafoam core kit and some washi-type tape from Target:

Nettio Project Life Wk2 4 2Detail 2

And I also made a little foodie accent as well:

Nettio Project Life Wk2 4 2Detail 3

Here’s a closer look at the right side of Week 2:

Nettio Project Life Wk2 4 3

I mentioned in my intro post that I’m planning to have some items that repeat every week. Well here’s an example of the two main ones: my Weekly Faves card and the Month/Week title card:

Nettio Project Life Wk2 4 3Detail

I know, the Faves are hitting Project Life, surprise, surprise right? I do love my faves, haha.

My plan is to use papers/colors from the same kit for each month so all the titles, Faves cards and any accents I make will all match. I think it’ll add some nice continuity to the album since the colors in the photos are all over the place. For January I’m using Paislee Press’ More + Less kit. You can see how the same blue & tangerine color tie the title card and Faves card together throughout all the spreads.

Project Life 2013 Week 3: Jan 14-20

Here’s my Week 3 spread:

Nettio Project Life Wk2 4 4

Left side Week 3. You can see how I swapped out the paper on the title card but kept the same colors for all the text:

Nettio Project Life Wk2 4 5

Orange “This is Life” card is from the Seafoam core kit. Everything else is random scrap stuff I had lying around. This week was the first time I tried adding in Instagram square photos – I have to say, I’m liking them.

And can we just pause for a moment and say, WAHOOOOO 49ERS!! SUPERBOWL HERE WE COME! WAY stressful game to watch, haha, but we were a wee bit excited about how it turned out. It’s hard to tell in the photo but I’m totally wearing my SF Giants World Series Champions shirt in the photo – figured maybe some of the SF Giants luck might rub off on them, hehe.

Another look at this week’s Faves card. I’m totally not stressing about these – I just write out 5 quick items and print them directly onto one of the blank 3×4 Project Life cards.

Nettio Project Life Wk2 4 5Detail

Right side of Week 3. This week is a mix of Design A & Design F page protectors. Saturday we went on a hike here in San Antonio so the entire right side of the page is devoted to photos from that.

Nettio Project Life Wk2 4 6

We went out to dinner on Friday so I included one of their cool business cards on it. Since it was too small for the pocket, I just stapled it directly to the page protector using my Tim Holtz Tiny Attacher.

Nettio Project Life Wk2 4 6Detail

Project Life Week 4: Jan 21-27

My Week 4 spread – a mix of Design F & Design A page protectors. I’m really thinking Design F may be my fave – I love filling all the little pockets.

Nettio Project Life Wk2 4 7

Left side of Week 4. Pretty simple, movie tickets, back of the restaurant business card. The mini photo book in the top right photo is an extra early sneak peek of my product for this weekend.

Nettio Project Life Wk2 4 8

The Target “window shopping” photos were a total happy accident. I went to Target last night to get some frames and since I needed a bunch I knew I couldn’t buy anything else. So I snapped photos with my iPhone of a bunch of stuff I liked so I could “try” them out in our house instead. But when I saw them all together I thought they made for a fun addition to Project Life. Just imagine if you had something like this from the 70s or 80s. It’d be so fun!

For the Target card, I just googled for a logo image that had enough pixels that’d print nicely and then added some text in Photoshop and printed it onto a blank 3×4 Project Life card.

Nettio Project Life Wk2 4 8Detail 1

Before we went to the movies we had dinner at Chipotle so I saved one of the napkins to include and then trimmed down one of the Seafoam 3×4 cards for my journaling. We went & saw Zero Dark Thirty which I have to say, we really enjoyed. But it was a wee bit weird considering some of the places and events happened when & where Adam was in Afghanistan. So he kept saying things like, “yeah that’s totally not what that FOB is actually called” or “it doesn’t really look like that at all,” haha.

Nettio Project Life Wk2 4 8Detail 2

Right side of Week 4. The Eat|Drink card came from a brochure from the Yard House where we ate dinner on Saturday. Diagonal journal card from the Seafoam kit.

Nettio Project Life Wk2 4 9

This week’s Faves card. Since we went to the commissary on Saturday (the grocery store on the military base) I included our receipt with a paperclip to hold it in.

Nettio Project Life Wk2 4 9Detail

Well that’s it for Project Life 2013: Week’s 2-4!

Here are my thoughts on this project so far:

  • LOVE the mix of page protectors. So very glad I decided to go that route.
  • Faves cards – always a winner in my book. Loving the repeating title cards & colors too.
  • I was really worried about having enough content for each week, especially since some weeks I felt like I didn’t really take many photos during the week. But I’ve had to cut more than I’ve had to fill so far. That’s the hardest part for me – I want to include it all!
  • Definitely need to streamline my process a bit but I think once I get in a rhythm it’ll be good. Not getting behind is going to be key though.
  • Am already coming up with new product ideas, simply because they’re things I want to use. Love that.
  • LOVE LOVE LOVE-ing all the little stories captured so far in this album. They’re exactly the reason I wanted to do this album this year. SO glad that I took the plunge. I’m loving the completed pages even more than I thought I would.

FAVES 3×4 Journal Card Free Download

Clearly there’s a whole lot of Project Life lovin’ going on here, hehe. And to share a little bit of the love, I’ve got a little freebie for ya!

Use the link below to download your own FREE copy of my Faves 3×4 Journal Card. All I ask in exchange is if you like it, pin it, share it & let your friends know they can find it right here at Nettio Designs.

Since the card is designed for Project Life, the actual size is a tiny bit smaller than 3×4 inches – it’s about 2.9×4 inches. File includes a layered, customizable PSD file and a solid colored PNG file.

 Download here

What about you? Are you doing Project Life this year? If you are, how are things going for you so far? We’re almost a full month in, can you believe it?!

Project Life is a memory-keeping system created by Becky Higgins. New to Project Life? Learn more here & find all my Project Life posts here.

Benefits Of Using Canadian Pharmacy

POSTED IN Free Stuff, Project Life, Template-y Goodness

Free Cookies 4 Kids Template Available TODAY Only at Sweet Shoppe Designs!

POSTED ON December 21, 2011 IN Announcements, Free Stuff

Happy December 21st everyone!

Today is my Cookies 4 Kids template day over at the Sweet Shoppe which means for TODAY only you can download a FREE template from me!

Here’s a peek at my template…

Lfpenacho 1221 SSDcookie preview

Which was based off this layout…

Fallinchicago

The download link will only be active on December 21st so if you want to pick it up, make sure you stop by the Sweet Shoppe forums today!

Happy Holidays & Happy Scrapping!

Can I take Levitra if I am taking other remedies at the same time

POSTED IN Announcements, Free Stuff

December News & A Holiday Freebie

POSTED ON December 1, 2011 IN Announcements, Free Stuff, Holiday Faves, Holiday Faves 2011

Happy December everyone! Welcome to one of my most favorite months of the year!

This month is already shaping up to be FULL of amazingness so here’s a look at some of the FUN stuff I’ve got going on this month…

Masterful Scrapbook Design

CoverCanvasHoriz

This month I’m guest teaching over at Masterful Scrapbook Design along with 4 other AMAZINGLY talented scrapbookers: Anna Aspnes, Emily Pitts, Doris Sander, and Dina Wakley.

This month we’re talking all about the scrapbook page canvas, beginning with the options you have for its base, moving onto the first layers and foundations you place upon on it, and delving into the many ways you can fill a canvas for striking looks.

I had a totally fun time putting together my assignments for this month’s seminar so I really hope you stop by and check it out.

At only $12.50 for the entire month, it’s a complete steal. (Maybe an early Christmas gift for yourself? hehe)

Cookies 4 Kids

Cookies4kids

The always popular Cookies 4 Kids template giveaway is BACK at Sweet Shoppe Designs!

If you’re new to Cookies 4 Kids, each day in December, in the Sweet Shoppe Designs forums, a free template from one member of our team will be available to download for that day only.

My free template day won’t be coming around until later this month, but in the meantime, if you want to make sure you dont miss a single day, you can purchase the entire set of templates in advance with 100% of the proceeds being donated to Toys for Tots!

It’s a total win-win. You can get some amazing templates from our team AND help out an amazing cause at the same time. The advance template set is only available until December 15th so make sure you pop on over to the Sweet Shoppe and check them out.

Holiday Faves

Nettio FoundationPage 1

And of course here at NettioDesigns, I’ll be sharing my progress on my Holiday Faves Mini Album all month long. I have been waiting for this project literally ALL year long so I’m so excited it’s finally time to get scrapping. It’s like Christmas has come 25 days early!

If you’re looking for a little December Daily-style pep talk, be sure to check out these great tips from Ali Edwards along with this post full of awesome ideas to include in your album.

AND if you’re in need of even more Holiday Album inspiration and ideas, my super amazing Creative Team and I (or the NettioDesigns Team Awesome as I call them, hehe) have teamed up to bring you this PDF FULL of holiday-themed prompts to get you started documenting your holidays.

And best of all?

It’s FREE!

Just click the Download button below to get your very own copy of the NettioDesigns Holiday Album Idea Book. Included in the download is a 4-page PDF full of journaling prompts, photo ideas and even a planning page you can use to jot down your topic ideas and December events.

Holidaybookpreview

Download here

Consider it our little holiday gift to you. All I ask is you spread the word and let people know they can download it right here at NettioDesigns.  : )

And with that, I’m off to work on my Holiday Faves Mini Album pages…Happy December scrapbooking!

How Can Customers Lower Their Remedy Costs

POSTED IN Announcements, Free Stuff, Holiday Faves, Holiday Faves 2011

How To Create a Scrap-worthy Map with Photoshop

POSTED ON September 22, 2011 IN Free Stuff

For the Sugarbabe September Portfolio challenge over at Sweet Shoppe Designs, I was tasked with creating a digital scrapbooking layout based on inspiration I had saved/favorited/pinned.

Since I have an love obsession with Pinterest, I turned to my scrapbooking pin board and selected this super awesome layout by one of my absolute favorite paper scrapbookers, Kelly Purkey. She’s a girl after my own paper-lovin’ heart with the way she rocks patterned paper!

Kellypurkey map

Specifically what inspired me about this layout was the graphic shapes she gave to the states and her bold use of patterned paper against the kraft background (no surprise there, haha).  I also loved all her little circle photos representing all the places she had visited.

Now while I love to travel, I certainly don’t travel as much as she does, so I decided instead to theme my layout around all the places Adam and I have lived so far. Since we have yet to live on the East Coast (it’s on our short list of places to go next since it’s the one US time zone we haven’t lived in yet, haha), I decided to simplify my layout and do a single page featuring the Western half of the United States.

Here’s my finished layout featuring Zoe Pearn’s super adorable Sunshine & Lollipops kit:

Nettiodesigns placeswevelived

Since I posted this layout over in the Sweet Shoppe gallery earlier this month, I’ve gotten a some questions asking how I put this layout together. Kelly has an awesome tutorial over on her blog showing how she designed her map using paper, but since my layout is 100% digital, I’ve whipped up a little tutorial to show you how you can get this same look using Photoshop.

A little note: this tutorial was written based on Photoshop CS3 so it should work in other versions of Photoshop, but I haven’t tried it using Photoshop Elements. As always, there are a million different ways to do the same thing in Photoshop so I’m just sharing what worked for me.

Ok, on to the tutorial…

Step 1: The first thing you need to is find a map of your desired location. I took a screenshot from Google Maps for my map but any map image will do as long as it has the outlines of the states/countries on it.

Once you have your map, you need to drag it onto your scrapbooking canvas and resize it to the size you want your final map to be. I made my map fill the majority of the page. Don’t worry if your map image ends up pixelated, it won’t show in your final layout.

01 googlemap

Step 2: Next, you want to grab your Polygonal Lasso Tool. You’ll find it under the normal Lasso tool –  it’s the lasso with the weird angles on it.

02 polygonallasso

Step 3: Now we’re going to use the Polygonal Lasso Tool to draw a shape around each state using the lines on the map as a guide. Don’t worry about all the little detailed areas, we’re going for the angular look of the shapes in Kelly’s inspiration layout so we want to keep the shape simple.

If you’ve never used the Polygonal Lasso Tool before, it’s really easy. You just point and click where you want to add a corner on your shape. If you want to draw an exact straight line between two points, hold down the Shift key and it will give you either a 90 or 45 degree angled line. To close off your shape, bring your arrow back to your starting point and move it around until you see a small circle. Then click to close the shape.

If you’ve done it correctly, you’ll end up with a shape surrounded by marching ants like this:

03 marchingants

Step 4: Our next step is to fill the shape we’ve created. The easiest way to do this is to hold down the Shift+F5 key which will bring up the Fill dialog box that looks like this:

04 filllayer

Step 5: Select a color for your shape (I went with grey tones but it doesn’t really matter) and then click ok. Your shape will now look like this:

05 filledlayer

Step 6: Now you want to deselect your shape (Cmd+D on a Mac, Ctrl+D on a PC) and repeat steps 1-5 for ALL of the states or countries on your map. For my original layout this meant the entire Western half of the US but for the sake of this tutorial, I’m going to just do four states.

Here’s what your map should look like once you’ve completed all your shapes. Notice at this point there is no space between the shapes – they all fit together nice and tight. That’s what you want.

06 filledstates

Step 7: Our next step is going to be to add space between the shapes so our mat layer will show through. (On my layout the mat is kraft, on Kelly’s layout the mat is white.) To do this we’re going to contract each shape down by the same exact amount.

First you need to get the marching ants around your shape again. A really easy way to do this is to hold down the Cmd/Ctrl key and click on the layer thumbnail for that layer in the Layer palette. Once you have your shape selected, go up to your toolbar at the top of your screen and choose Select>Modify>Contract:

07 modify contract

Step 8: We’re going to contract each shape by 10 pixels so enter a 10 into the dialog box and click ok.

08 contract

Your marching ants should now be slightly smaller than your original shape:

09 contract

Step 10: Now we’re going to inverse the selection by hitting Cmd+Shift+I (Ctrl+Shift+I on a PC) and then hit the Delete key to remove the extra part of the shape like so:

11 inverse

Now your shape should have an empty border around it that separates it from the surrounding shapes:

10 contract

Step 11: Now you’re going to repeat Steps 7-10 for all the shapes on your map. As you contract each shape, you may find that you need to adjust the placement of some of the states. Since you have already drawn all your states, you don’t need to worry about the states lining up perfectly with the map layer anymore. How they relate to each other is more important. I just eyeballed the spacing based on what I thought looked best.

Your finished product should look like this:

12 contractedshapes

Which if we hide the map layer will look like this:

13 withoutmap

See, we have nice even borders between each of the shapes.

Now if you’re wondering why I essentially told you to create each shape twice rather than just contracting the original selection, the answer is because I found it much easier to draw out the shapes when they were all touching. I did try a few different methods for adding space between the shapes but ultimately the Contract & Duplicate gave me the best results. Yes it’s a little tedious this way but once you get into a rhythm it goes pretty quickly.

Step 12: Once you’ve got all your shapes drawn and contracted, the final step is use the Polygonal Lasso Tool to draw a shape for your mat layer. The steps are the same as how you originally created each state, just on a bigger scale.

I didn’t worry about the mat being the exact same size all the way around so I just eyeballed the border to get this:

14 border

And that’s pretty much it! You’ve created your very own map template! Now all you have to do is add in all your photos and papers and elements and you’re good to go.

The great thing is this method will work for any map so if you’re not in the US or are wanting to do something more country or even world focused, you can totally follow the steps in this tutorial to create a layout based on any map your heart desires.

Now I’m sure there are some of you who are reading the tutorial and thinking, “well that’s great, Lynnette, but it sounds like a LOT of work and I would much rather be pinning on Pinterest.”

Which is why I also created a little something extra for all my fellow US-map lovers. And because I was feeling extra generous, I even included all of the Eastern half of the US for you as well.

And best of all?

It’s FREE!

Yes, that’s right I am offering up this awesome template for FREE for personal (non-commercial) use. If you’ve never purchased one of my templates before, here’s your chance to see what NettioDesigns is all about.

All I ask in return is you spread your love for the template on Twitter/Facebook/forums/blogs and let everyone know they can download it right here at NettioDesigns. Oh and if you post your layout in any gallery, please credit NettioDesigns and where allowed, include a link back to this post.

The template is a single 12×24 inch file so if you use the entire template you’ll end up with a two-page layout similar to Kelly’s layout or you can use your crop tool to crop the template to create a single page layout like I did.

Nettiodesigns OhthePlaces preview

Download here

I can’t wait to see what you create so if you use the template or tutorial, be sure to link me up to your layout!

Happy scrapping!

Benefits Of Using Canadian Pharmacy

POSTED IN Free Stuff, Digital Scrapbooking, Template-y Goodness, Tips & Tricks

HI I'M LYNNETTE. Graphic designer, tech-lovin’ memory keeper and lover of bold colors & patterns, good food and the great outdoors. Here at Nettio Designs, I share a behind the scenes peek at my own creative & life adventures. Read more...

KICKSTART YOUR CREATIVITY


By popular demand, photo book templates are back! Grab all three sets in the shop.
ADVENTURES IN ORGANIZING
GOAL-SETTING
MEMORY KEEPING
PROJECT LOVE
LIFE ADVENTURES
TIPS & TRICKS
BEHIND THE SCENES

POPULAR PROJECTS

TO SEE ALL MY PROJECTS, CLICK HERE

MUST READ POSTS

  • WHY EVERY SCRAPPER SHOULD SCRAP A FAVES PAGE
  • HOW TO CREATE A SCRAP-WORTHY MAP WITH PHOTOSHOP
  • REMEMBERING THE IMPORTANCE OF TELLING YOUR STORY
  • WHAT DOES IT MEAN TO CREATIVELY CAPTURE YOUR LIFE ADVENTURES?
  • BROWSE BY CATEGORY

    BROWSE THE ARCHIVES

    GET IT FOR FREE

    Copyright © 2023 ·Dynamik Website Builder · Genesis Framework by StudioPress · WordPress · Log in